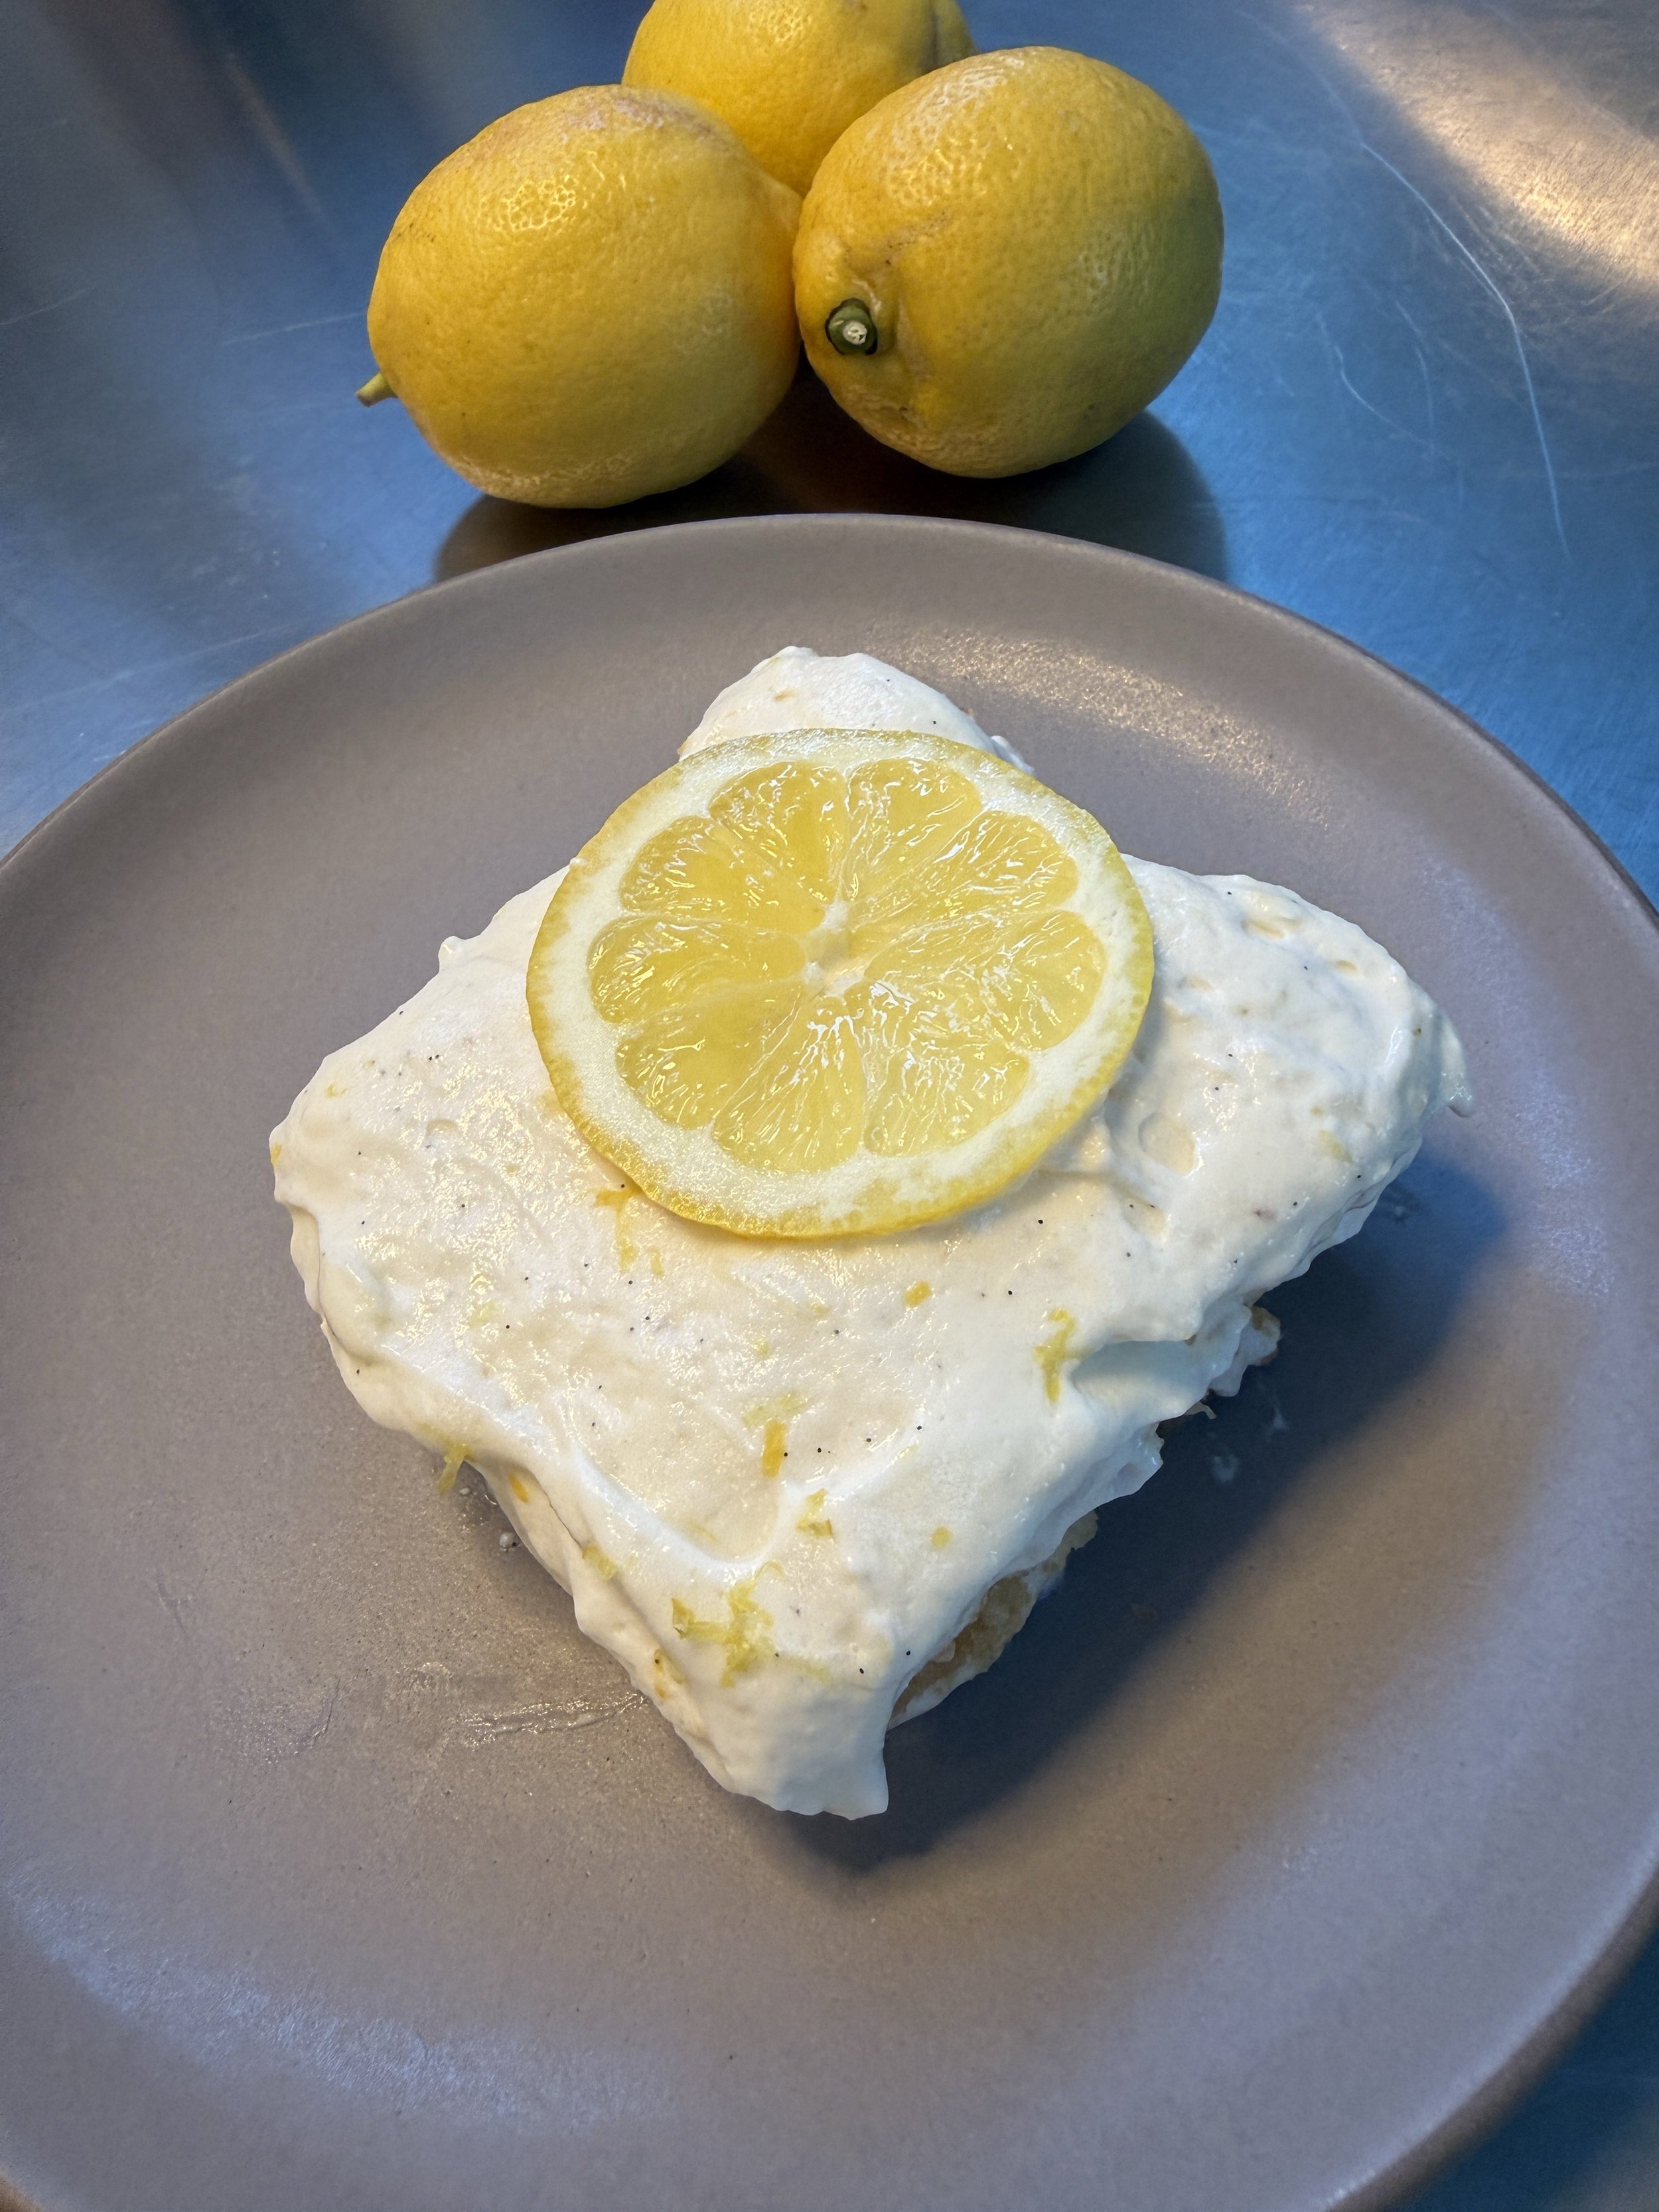
Sweet • Sour • Savory

Food blog on scandinavian style food done right.

Holiday

Boozy Mulled Wine Extract

Christmas, Drinks, HolidayTove Balle-PedersenComment

Boozy Mulled Wine Extract.

For years, I’ve been making a classic mulled wine — or Gløgg, as we Danes call it.
This year, I wanted to try a more grown-up, boozier version.


And just to be clear — please don’t drink and drive!

This recipe is strongly inspired by Timm Vladimir’s Gløgg Extract.
I used his base as a starting point but added extra spices that I normally include in my own mulled wine.

The result? A rich, aromatic Gløgg with a little more kick — perfect for cozy winter nights.

Extract:

Ingredients:

  • 2 hvidtøl, a dark, sweet malty beer like Malta Goya

  • 500 g sugar

  • 35 ml port

  • 35 ml dark rum

  • 1 orange, sliced

  • 1 lemon, sliced

  • 8 whole allspice

  • 3 whole nutmegs, cracked

  • 3 cinnamon sticks

  • 6 whole cloves

  • 6 whole cardemomme, cracked

  • 4 Tonga beans, cracked

  • 5 whole black pepper

  • 5 vanilla beans, splited in half

  • 1 star anise

Directions:

Heat the base:
Pour the hvidtøl and sugar into a large pot. Bring it gently to a boil.
Be careful — this mixture foams easily and can boil over quickly.
Remove the pot from the heat and let the mixture cool completely to room temperature.

Add the aromatics:
When the mixture has cooled, add the port, dark rum, and all remaining ingredients.
Transfer everything to a clean container or large jar.
Refrigerate and let the mixture marinate for 2–3 weeks, stirring or gently shaking the container every other day to help the flavors develop evenly.

Strain and bottle:
After steeping, strain the extract through a fine sieve.
Pour the finished Gløgg extract into a sterilized bottle.
Stored in the refrigerator, it will keep for months — even years.

Serving:

To serve the Boozy Mulled Wine, combine 200-300 ml extract with a bottle of red wine, or to taste. Traditionally gløgg is served with raisons (soaked in port wine or a stronger liquor) and almond slivers.
Choose a soft, fruity red — something non-oaky and low in tannins like Merlot, Pinot Noir, or a young Tempranillo
These wines let the warm spices shine without adding bitterness.

Enjoy!

Sweet Potato & Lentil Salad

Christmas, Dinner, Halloween, Holiday, Salad, Sides, Thanksgiving, Vegetables, vegan, VegetarianTove Balle-PedersenComment

Sweet Potato & Lentil Salad.

This sweet potato and beluga lentil salad is definitely going to be one of those recipes I make on repeat this winter. It’s hearty, colorful, and full of those cozy flavors I crave when the weather turns cold. The roasted sweet potatoes add sweetness, the lentils bring a lovely earthiness, and the cranberries give just the right pop of chewiness. Everything gets tied together with a creamy tahini dressing that makes the whole bowl feel extra comforting. I might even sprinkle in some nuts next time for a little extra crunch.

It’s also a great make-ahead dish, which is always a lifesaver during busy weeks. You can roast the sweet potatoes and cook the lentils in advance, then toss everything together right before serving. And while I love it for lunch or an easy dinner, it also makes a wonderful side for Thanksgiving or Christmas — festive, vibrant, and guaranteed to disappear fast.

Inspired by Downshiftology.

Serves 4.

Ingredients:

  • 2 pounds (1 kg) sweet potatoes (2 to 3 potatoes)

  • 2 tablespoons extra-virgin olive oil

  • ½ teaspoon ground cumin

  • ½ teaspoon garlic powder, or 1 garlic clove crushed

  • ½ teaspoon paprika

  • salt and freshly ground black pepper, to taste

  • ½ cup (1 dl) black beluga lentils

  • 1 vegetable stock cube

  • ½ cup (1 dl) dried unsweetened cranberries

  • ¼ cup (½ dl) fresh cilantro, finely chopped (optional)

  • ¼ cup (½ dl) italian parsley, finely chopped

  • ¼ small red onion, finely chopped

Dressing:

  • ¼ cup (½ dl) tahini

  • 2 tablespoons Dijon mustard

  • 1 tablespoon maple syrup

  • 1 tablespoon lemon juice

  • 2 to 3 tablespoons water

  • 1 garlic clove, minced

  • kosher salt and freshly ground black pepper, to taste

Ingredients:

Preheat your oven to 425°F (200°C).

Peel the sweet potatoes and cut them into ½-inch (1-cm) cubes. Place them in a freezer bag.
Add olive oil, cumin, garlic, paprika, salt, and pepper. Shake the bag to coat the cubes evenly.
Spread the sweet potatoes in a single layer on a baking sheet.
Roast for 20–25 minutes, stirring halfway, until tender and lightly caramelized.
Set aside to cool.

Cook the beluga lentils in water with a vegetable stock cube for 20–25 minutes, or according to package instructions.
Drain, drizzle with a little olive oil, and let cool.

Mix the dressing: Whisk together tahini, Dijon mustard, maple syrup, lemon juice, minced garlic, salt, and pepper.
Add water, a little at a time, until the dressing reaches your desired consistency.

In a large bowl, combine the roasted sweet potatoes, cooled lentils, cranberries, red onion, cilantro, and parsley.
Pour about ⅓ of the dressing over the salad and toss gently.
Serve the remaining dressing on the side.

Enjoy!

Kransekage - Danish Almond Wedding Cake

Desserts, Cookies, Holiday, New Year's Eve, CakeTove Balle-PedersenComment

Kransekage - Danish Almond Wedding Cake.

For me this is not a wedding cake, but a New Years Eve cake. Most Danes celebrates New Year by drinking champagne and eating kransekage. This year I decided to make numbers instead of the traditional top.

You get the best cake by using a mazipan/almond paste with more than 63% almonds, otherwise the cake will flatten, and flow out during the baking, masking a cookie.

Kransekage should be crispy outside and a soft inside.

Happy New Year from Copenhagen Denmark.

Makes about 100 cm kransekage (6 rings and the top ball)

Ingredients:

Kransekage:

  • 75g almonds blanched or ¾ cup slivered almonds

  • 150 g (1 cup) sugar

  • 1½ (48 g) egg whites

  • 375 g marzipan, use Ren Rå marcipan or this Almond Paste

Icing:

  • confectionary sugar (powdered sugar)

  • egg white

  • water

Directions:

Put almonds and sugar into food processor with the steel blade in place and process until finely pulverized. Add the egg whites and process until smooth. Be careful not to heat the mass to more than 95 - 104°F, else the egg white will cook. 

Shred the marzipan and add it and the almond/egg white mixture to a stand mixer fitted with the paddle attachment. Beat it until it's completely smooth and free of lumps. Form the dough into a ball, and refrigerate for 2-3 hours.

Preheat oven to 375℉ (190℃).

Weigh out 400 g Doug and roll it into a 70 cm log. By during this, you will get the perfect size kransekage, whether. you make pieces, a number cake or a top.
Bake the kransekage for 12 minutes or on til golden brown.

With the palm of your hand gently press each log into a rounded triangle. You can wet you hands a little so the dough won’t stick to your hands.

Form the logs into circles on the parchment paper. Make sure to connect the ends really well.

Cutting the log up making rings.

For the numbers you need 12 cm + 4 cm for the number 2. and 22 cm for the number 0.

If you make a top, you start with 7 cm, and roll it into a ball. For the next ring add 2 cm, so you form a ring out og the 9 cm piece. For each remaing ring add another 2 cm, this will make a perfect top. With this amount of dough, you can make a top with 6 rings and a top ball. (7 cm, 9 cm, 11 cm, 13 cm, 15cm , 17 cm, 19 cm )

A trick to making Danish Kransekage, is to make the rings tall. When you cut the rings or pieces is should be in the shape of a triangle.

Here you see the shape of rings or pieces cut through.

Don’t use the kransekage pans, the rings will become rounded on the bottom, and harder to stack. Shape the kransekage with your hands.

Bake the kransekage on parchment paper, on a double baking sheet, this will prevent the bottom from burning.

Mix the powdered sugar with egg white and water.

When making the icing, it should be thick, not runny at all. Put the icing in a piping bag, cut a tiny tiny hole in the bag. I use half water and half egg whites for the icing.

When piping the icing shouldn't be runny. You almost place the thin line of icing on the kransekage. the piping take time, don't rush it.

If you make a top place the rings on top of each other, lifting the rings with your fingers like hooks inside the rings. Glue the rings together with small dots of icing.

Enjoy!

Lemon Mousse Cake - Citronfromage-kage

Brunch, Cake, Desserts, HolidayTove Balle-Pedersen1 Comment
E9D91B6C-06E4-453C-A83B-36F1AD344523.jpeg

Lemon Mousse Cake - Citronfromage-kage.

Lemon mousse is a classic dessert we had a lot growing up. The silky smooth mousse just melts in your mouth. So when I saw a former participant in the The Great Danish Baking Show, Micki Cheng made the lemon mousse into a dessert, I had to make it.

So with my lemon tree filled with lemons and it being Easter 🐣 we were in for a perfect storm.

It was an instant winner, it could even be a new must have for Easters to come. Well I would make it any time of the year - replacing the chocolate bunnies with something else chocolate or berries.

Disclaimer: This dessert is made with raw eggs. I recommend using pasteurized eggs. This minimizes the risk of getting Salmonella food poisoning. You can find pasteurized eggs in some supermarkets here in California, on safeeggs.com you can see where to find them in your neighborhood. In Denmark you'll find it right next to regular eggs. For tips and information on how to handle eggs, check out FDA’s website. The Danish version of FDA, Fødevarestyrelsen also has advisory on egg

Serves 8-12.

Ingredients:

Crust:

Lemon Mousse:

  • 3 teaspoons gelatin (6 sheets husblas)

  • 4 whole eggs (read disclaimer)

  • 100 g sugar

  • 100 ml freshly squeezed lemon juice

  • 300 ml heavy whipping cream

  • 1 lemon, the zest of

Topping:

  • 150 ml heavy whipping cream

  • small chocolate bunnies or chocolate shavings

Directions:

Crust:

Crush the shortbread cookies, using a food processor or a rolling pin. In a medium bowl, mix together crumbs, melted butter, and vanilla bean paste until combined and crumbs are moistened. Press the mixture into the bottom of the spring form using either your fingers or the bottom of a small glass to form the crust layer.

Tips:

To ease the unmolding line the spring form with parchment paper in the bottom and some clear cake strips/cake collar, so the mousse won't adhere to the side of the pan.

Lemon Mousse:

Whip the heavy whipping cream until soft peaks, and set aside.

Whisk the eggs pale and fluffy with the sugar, set aside.

Mix the gelatin with half the lemon juice and melt the gelatin over a double boiler. Mix in the rest of the lemon juice and lemon zest.  

Using Husblas: put the sheets in a bowl of cold water for about 10 minutes. Over a double boiler melt the sheets with the water that adheres to it when removed from the bowl. Mix in the lemon juice and zest when melted completely.

Mix the gelatin lemon mixture with the eggs while whisking. Gently fold in the whipped cream. Pour the mousse onto the crust, and set it in the refrigerator for about 3 hours.

Gently unmold the mousse cake and place it on a platter.

Topping:

Whip the heavy whipping cream, and pipe the whipped cream onto the cake in a decorative manner. Place chocolate bunnies or chocolate shavings on top.

Serve the cake cold.

Enjoy!

Hasselback Potatoes

Dinner, Holiday, VegetablesTove Balle-PedersenComment
071630C5-B4AB-4616-82B4-83F26B0A4DD5.jpeg

Hasselback potatoes is a Swedish dish invented in the 1950’s created at the Hasselbacken restaurant in Stockholm. And they were very popular during the 70’s and 80’s, but do no deserve to be forgotten. Personally i love them for their crispy outer and creamy center.

Normally I won’t add any flavors to the butter, but fresh herbs like rosemary and thyme goes really well with the potatoes, as do garlic. If you like another flavor profile, you can use other types of fat or oil, like olive oil and duck fat.

Serves 3-4 depending on the size of the potatoes.

Ingredients:

8-10 potatoes, the size of a golf ball, I used Yukon Gold potatoes

60 g salted butter (About ½ stick)

salt

Direction:

7B48BC0D-9765-429A-8C3D-1445CAE86953.jpeg

Preheat the oven to 400℉ (200℃), and line a large rimmed baking sheet with parchment paper, set a side.
Place a potato up against a handle of a wooden spoon. Slice the potato into thin slices, not cutting all the way through. The handle of the spoon helps you not slicing the whole way through. Repeat with the remaining potatoes.

Place the potatoes on the baking sheet and brush them with the melted butter, making sure to get in between all the slices. Sprinkle with salt. Bake potatoes for about 55 to 60 minutes, brush the potatoes with more butter every 20 minutes. Bake until crisp and tender.

Serve them as a side.

Enjoy!