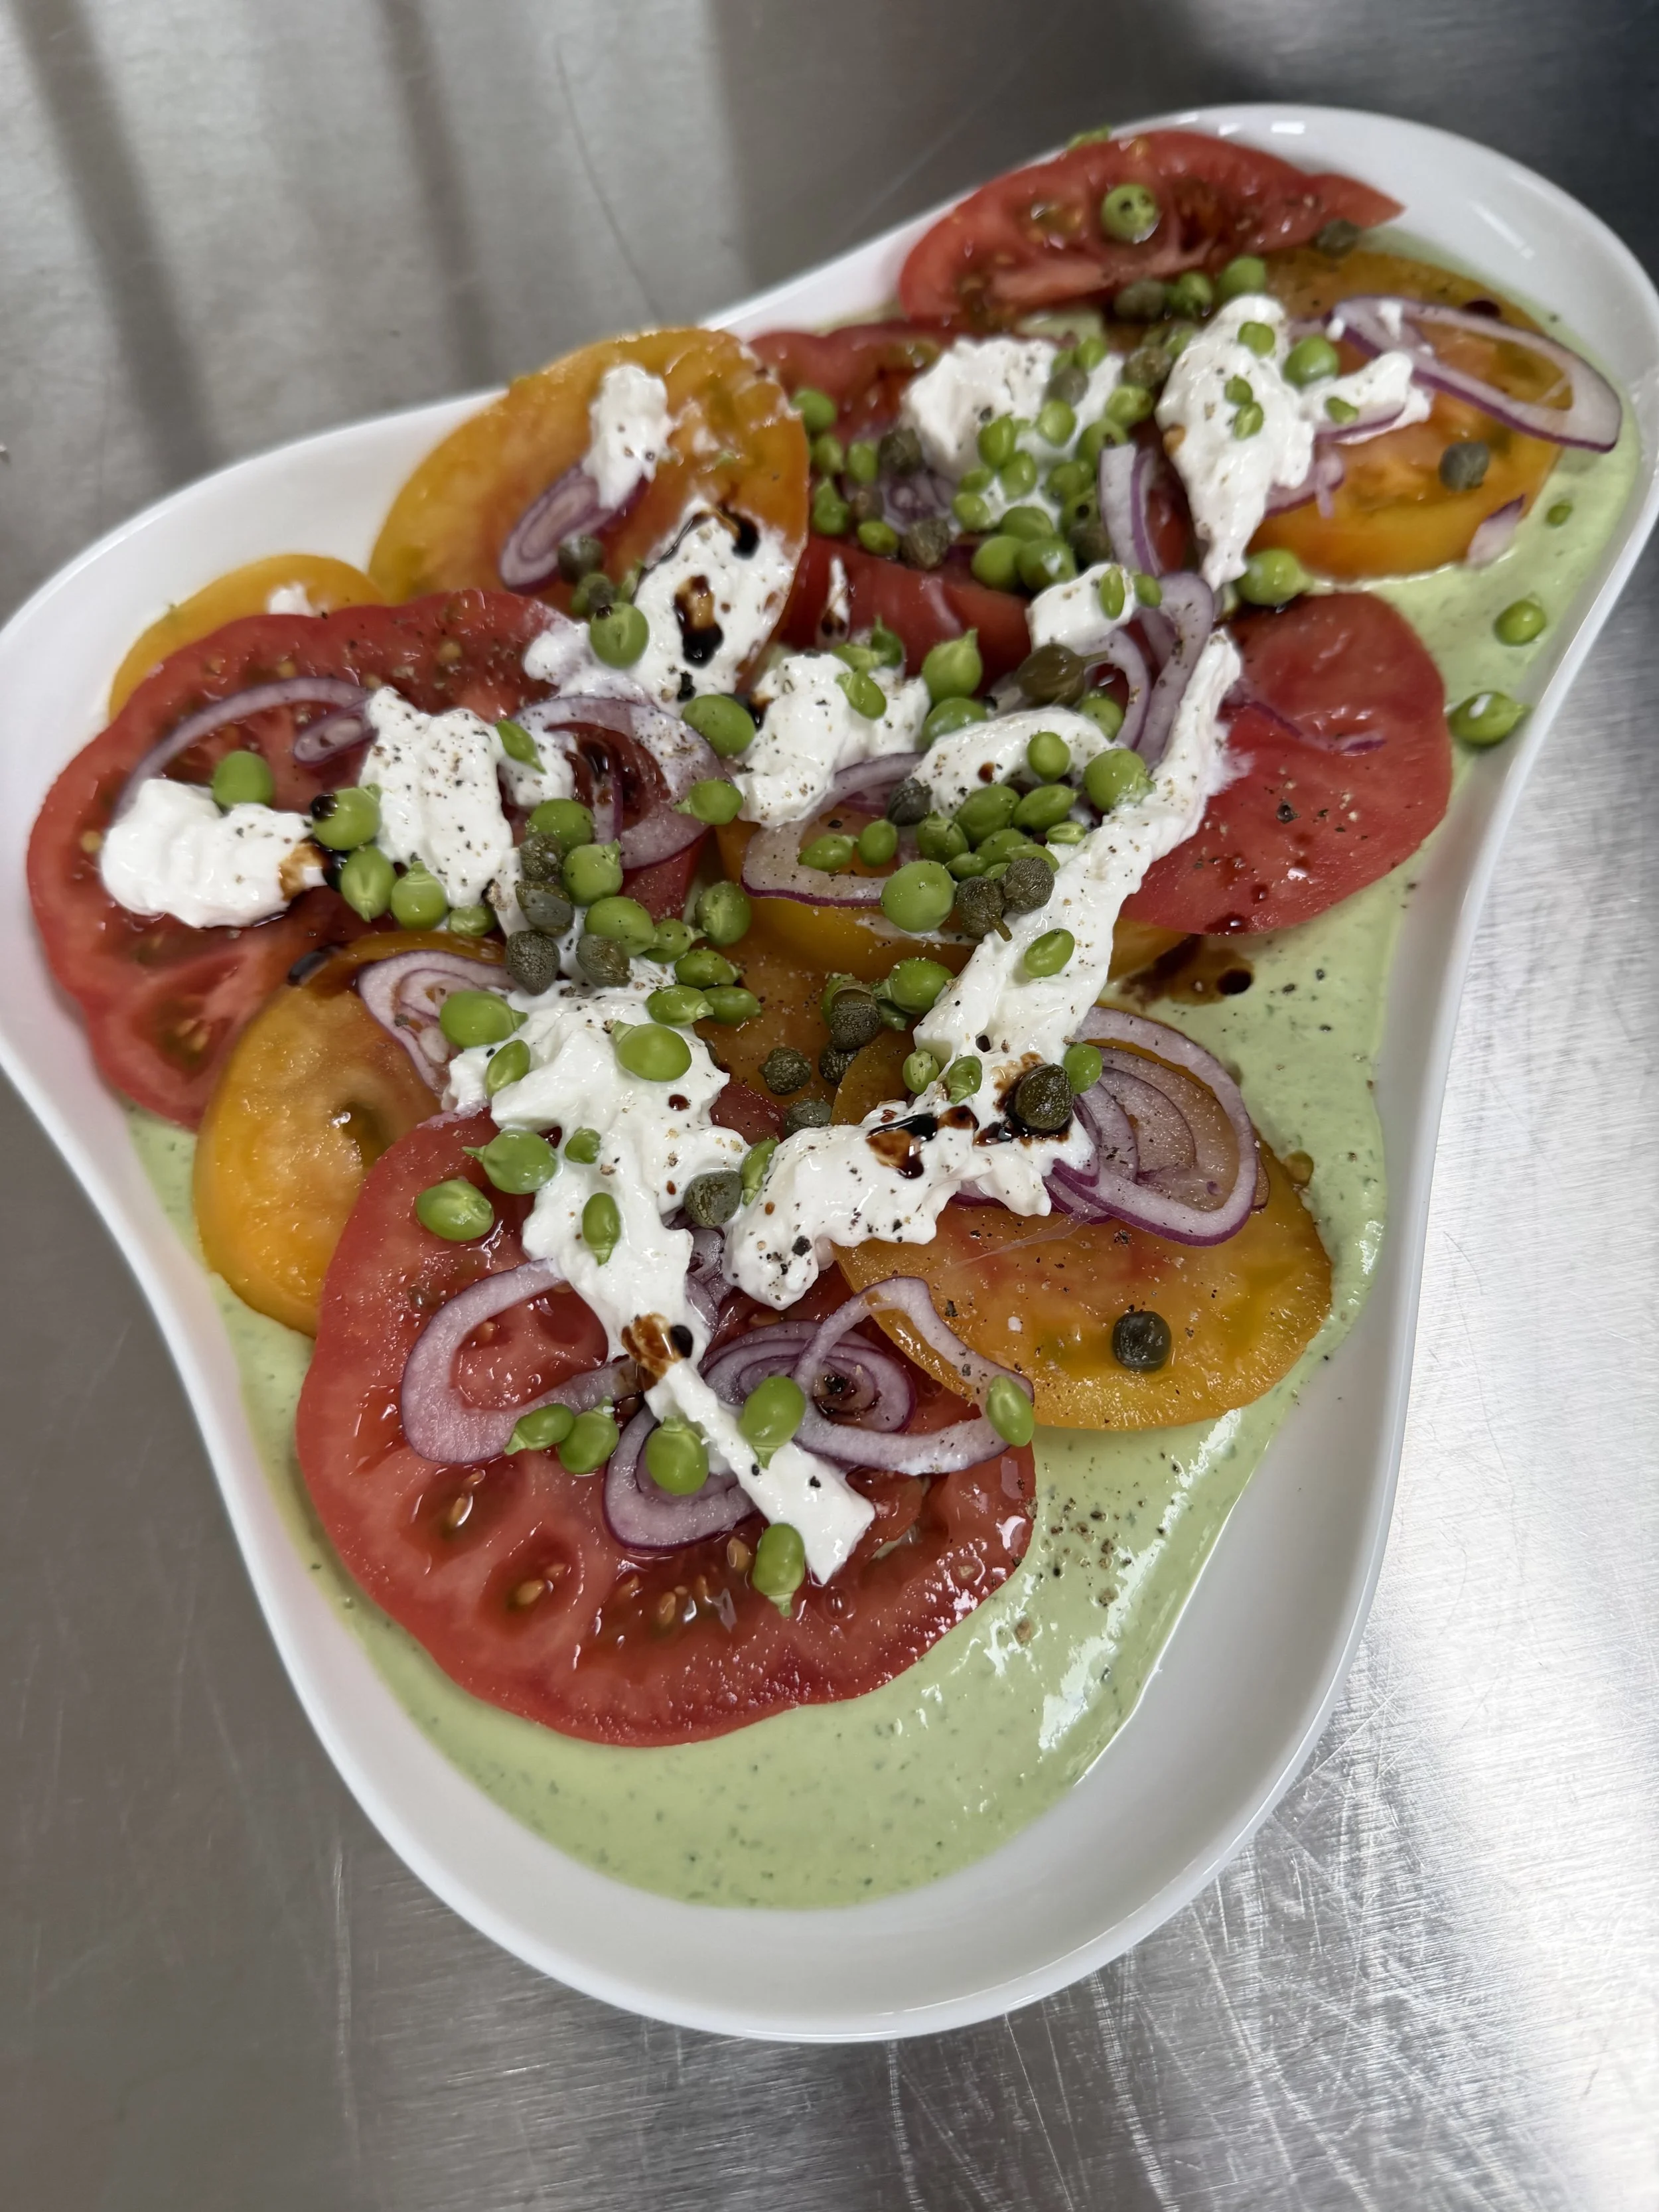
Sweet • Sour • Savory

Food blog on scandinavian style food done right.

Copycat Panera Breakfast Soufflé

Breakfast, BrunchTove Balle-PedersenComment

When we moved to California in 2008, one of the first breakfasts we had was at Panera Bread. I ordered a Spinach & Bacon Soufflé — and it was love at first bite. Puff pastry, a savoury egg mixture, spinach, cheese, and bacon. A perfect little savoury, cheesy treat, not too big and not too small. I never forgot it.

Last weekend I finally tried to make my own version, and I am so glad I did.

Make-ahead note: These reheat beautifully. Once completely cooled, place them in a ziplock bag and refrigerate overnight. The next morning, warm them in the oven at 340℉ (170℃) until heated through. They also freeze well — just thaw in the refrigerator overnight before reheating.

Tip: I used a popover pan this time, but I'd recommend ramekins — the puff pastry cooled too quickly in the popover pan and didn't get as golden brown as I'd like. Ramekins it is next time!

Yield: 6–8 soufflés.

Ingredients:

  • 1 pack of puff pastry

  • 5 slices of bacon

Egg mix:

  • 8 eggs

  • 1 tablespoon freshly chopped chives

  • 1½ teaspoon salt

  • ½ teaspoon ground black pepper

  • a pinch cayenne pepper

Bechamel Sauce:

  • 240 ml (1 cup) milk

  • 4 tablespoon butter

  • 5 tablespoon all-purpose flour

  • 75 g baby spinach

  • 75 g shredded emmentale cheese

  • 75 g shredded cheddar cheese

  • 75 g shredded gruyere cheese

Directions:

Preheat the oven to 400℉ (200℃).

Shred all three cheeses and set aside. Whisk together the eggs, chives, salt, black pepper, and cayenne pepper in a bowl and set aside.

Make the béchamel. Melt the butter in a saucepan over medium heat, then stir in the flour to make a roux. Cook for a minute until the flour is no longer visible. Gradually whisk in the milk — it may look separated at first, but keep stirring and it will come together. The sauce will thicken as it heats up. Remove from the heat and let it cool for a few minutes. If it is too hot the eggs will curdle.

Gradually add the egg mixture to the béchamel a little at a time, stirring well between each addition until fully combined. Fold in all the cheese and the spinach.

Place some puff pastry into each ramekin, pressing and stretching it to fit up the sides. Divide the mixture evenly between the ramekins. Top each one with a slice of bacon.

Bake for 30–35 minutes until golden brown and the bacon is crisp.

Let the soufflés cool for a few minutes before serving.

Enjoy!

Spicy Gochugaru Chicken

Dinner, Meats, Poultry, SaladTove Balle-PedersenComment

Spicy Gochugaru Chicken with a spicy slaw and oat “rice.”

This dish has everything I love — bold, layered flavours, a glossy sweet-savoury sauce with just the right amount of heat, and a crunchy slaw that ties it all together. I am a sucker for a good slaw, and this one, dressed with soy, sesame, and a little gochugaru, is one of my favorites. I served some cooked oat berries for a more filling meal. We use oat berries instead of rice, it's a healthy choice.

Serves 4.

Ingredients:

  • 4-6 chicken leg

  • salt

  • pepper

  • olive oil

Sauce:

  • 2 garlic cloves

  • 2 tablespoons neutral oil

  • 2 tablespoons gochugaru (korean chili flakes)

  • 2 tablespoons ketchup

  • 50 ml soyasauce

  • 2 tablespoons brown sugar

  • 2 teaspoons sesame oil

  • 1 teaspoon white wine vinegar

Slaw:

  • 1 small green cabbages, shredded

  • 1 small red cabbage, shredded

  • 2 carrots, shredded

  • 5 scallions, chopped

Dressing:

  • 1 tablespoon sugar

  • 3 tablespoons soya

  • 1 tablespoon sesame oil

  • 1 teaspoon white wine vinegar

  • 1 galic clove, crushed

  • 1 teaspoon gochugaru (korean chili flakes)

Topping:

  • 2 scallions, chopped

  • 2 tablespoons roasted sesame

Directions:

Preheat the oven to 356℉ (180℃).

Season the chicken legs generously with salt and pepper and drizzle with olive oil. Place them on a baking sheet lined with parchment paper and roast for about 45 minutes, or until a thermometer inserted into the thickest part reads 165℉ (75℃).

Meanwhile, make the slaw. Combine the shredded green cabbage, red cabbage, carrots, and scallions in a large bowl. Mix all the dressing ingredients together, then pour over the slaw and toss well to coat. Set aside while the chicken roasts, the flavors will develop as it sits

Make the sauce. Place all the sauce ingredients in a small saucepan — mincing the garlic first — and bring to a gentle simmer over medium heat. Cook for 4–5 minutes, stirring occasionally, until slightly thickened and glossy. The sauce will separate a little, but give it a good whisk before serving..

When the chicken is done, spoon the sauce generously over the pieces. Sprinkle with chopped scallions and roasted sesame seeds and serve immediately alongside the slaw.

Enjoy!

Spatchcocked (Butterflied) Roast Chicken

Dinner, Meats, Poultry, Simmer FoodTove Balle-PedersenComment

Spatchcocked (Butterflied) Roast Chicken.

This is my take on my parents' favourite chicken dish Poularde au Bayard - Chicken in White Wine - reimagined as a simple one-pan roast. Same flavours, same comfort, but with the crackling golden skin you only get from roasting.

Spatchcocking (or butterflying) means removing the backbone and flattening the bird before it goes in the oven. It sounds more dramatic than it is — two minutes with a pair of kitchen scissors and the hard part is done. The flat bird roasts faster and more evenly, and the skin, stretched taut across the whole surface, goes wonderfully crisp.

I love a one-pan dish like this and roast, rather than stews, because it brings a deeper, more complex flavour and caramelized skin. The roasted vegetables, and all those pan juices make a very tasty sauce. Simple enough for a busy weeknight, but impressive enough for company.

This dish is going to become a family favourite.

Yield: 4-6

Ingredients:

  • 1 large chicken, 2200 g and slow grown

  • 3 carrots, peeled, chopped

  • 500 g potatoes, peeled, halved

  • 4 tomatoes

  • 5 onions, peeled

  • 25 whole cloves to stud the onions

  • 4 garlic cloves, peeled

  • 250 g brussels sprouts, trimmed and halved

  • salt

  • pepper

  • 100 ml white wine

  • 100 ml heavy cream

Flavored Butter:

  • 4 tablespoons butter, salted and room temperature

  • ½ teaspoon dried tarragon

  • ½ teaspoon dried basil

  • ½ teaspoon paprika

  • ½ teaspoon dried rosemary

  • ½ teaspoon dried thyme

  • 1 bay leaf, crushed

  • 1 garlic clove

Directions:

Allow the raw chicken to sit at room temperature for 30 minutes before start cooking, it will produce juicier, and more evenly cooked meat.

Preheat the oven to 425℉ (220℃).

Make the flavoured butter: Mix all the ingredients until well combined, and set aside.

Spatchcock the chicken: Place the chicken breast-side down. Using sturdy kitchen scissors, cut along both sides of the backbone and remove it. Flip the bird breast-side up and press firmly down on the centre of the breastbone until it cracks flat. Place the chicken on a large rimmed baking sheet.

Butter the chicken: Pat the chicken dry with paper towels. Gently loosen the skin over the breasts and over the thighs, and push half the flavored butter underneath. Rub the remaining butter all over the outside of the bird. Season generously with salt and black pepper.

Stud each peeled onion with 4–5 whole cloves, pressing them firmly into the flesh. The cloves perfume the onions, making them extremely tasty.

Arrange all the vegetables round the chicken, and season with salt and pepper. Pour the cream and wine in the baking sheet when you put the sheet pan into the oven. The drippings, wine and cream will make a great sauce.

Roast the chicken for about 45 minutes, until the skin is deep golden and a thermometer inserted into the thickest part of the thigh reads 165°F (74°C). If the skin colors too quickly, tent loosely with tinfoil.

Transfer the chicken to a board and let it rest for about 10 minutes. This lets the juices redistribute for much juicier meat.

Make the sauce: Transfer the vegetables to a serving dish. Pour the pan drippings and all the caramelized bits into a small saucepan and bring to a gentle simmer. Season with salt and pepper. Thicken the sauce with some cornstarch.

Serve immediately, with the sauce spooned over. Make sure everyone gets some of the clove-studded onions — just remind your guests to remove the cloves before eating. They are, quietly, one of the best things on the plate.

Enjoy!

The roasted chicken.

Pine Cone Pops

Cake, Christmas, Cookies, Desserts, Holiday, Snacks, Sweets and Candy, ThanksgivingTove Balle-PedersenComment

Pine Cone Pops.

These chocolate pine cone treats might be the cutest winter dessert! If you’re looking for a festive, no-fuss holiday treat, these little pine cones are perfect. They’re easy to make, irresistibly cute, wonderfully chocolatey with a nice crunch—and completely no-bake. Honestly, they taste just as good as they look.

The pine cone pops will keep for up to 3 days at room temperature, or up to a week in the fridge.

Yield about 20.

Ingredients:

  • 5-600 g chocolate sheet pan cake, homemade or store bought

Frosting:

  • 75 g natural cream cheese

  • 75 g dark chocolate

  • 25 g powdered sugar

Pine Cone Decorations:

  • cocopops

  • powdered sugar

Directions:

Start to make the frosting. Melt the dark chocolate over a double boiler or gently in a saucepan over very low heat. Stir the melted chocolate into the cream cheese and powdered sugar until smooth.

Crumble the chocolate cake into a large bowl. Add the frosting to the cake crumbs and mix until the texture is soft, even, and workable. Refrigerate for 30 minutes to 1 hour to firm up.

Shape the chilled cake mixture into small egg like balls, about the size of a whole walnut.

Press the chocolate cereal into the pine cone, starting at the top and working your way down in rows to create a pine-cone effect. To serve, lightly dust with powdered sugar for a snowy finish.

Enjoy!

Boozy Mulled Wine Extract

Christmas, Drinks, HolidayTove Balle-PedersenComment

Boozy Mulled Wine Extract.

For years, I’ve been making a classic mulled wine — or Gløgg, as we Danes call it.
This year, I wanted to try a more grown-up, boozier version.


And just to be clear — please don’t drink and drive!

This recipe is strongly inspired by Timm Vladimir’s Gløgg Extract.
I used his base as a starting point but added extra spices that I normally include in my own mulled wine.

The result? A rich, aromatic Gløgg with a little more kick — perfect for cozy winter nights.

Extract:

Ingredients:

  • 2 hvidtøl, a dark, sweet malty beer like Malta Goya

  • 500 g sugar

  • 35 ml port

  • 35 ml dark rum

  • 1 orange, sliced

  • 1 lemon, sliced

  • 8 whole allspice

  • 3 whole nutmegs, cracked

  • 3 cinnamon sticks

  • 6 whole cloves

  • 6 whole cardemomme, cracked

  • 4 Tonga beans, cracked

  • 5 whole black pepper

  • 5 vanilla beans, splited in half

  • 1 star anise

Directions:

Heat the base:
Pour the hvidtøl and sugar into a large pot. Bring it gently to a boil.
Be careful — this mixture foams easily and can boil over quickly.
Remove the pot from the heat and let the mixture cool completely to room temperature.

Add the aromatics:
When the mixture has cooled, add the port, dark rum, and all remaining ingredients.
Transfer everything to a clean container or large jar.
Refrigerate and let the mixture marinate for 2–3 weeks, stirring or gently shaking the container every other day to help the flavors develop evenly.

Strain and bottle:
After steeping, strain the extract through a fine sieve.
Pour the finished Gløgg extract into a sterilized bottle.
Stored in the refrigerator, it will keep for months — even years.

Serving:

To serve the Boozy Mulled Wine, combine 200-300 ml extract with a bottle of red wine, or to taste. Traditionally gløgg is served with raisons (soaked in port wine or a stronger liquor) and almond slivers.
Choose a soft, fruity red — something non-oaky and low in tannins like Merlot, Pinot Noir, or a young Tempranillo
These wines let the warm spices shine without adding bitterness.

Enjoy!