Sweet • Sour • Savory

Food blog on scandinavian style food done right.

Cake

Marble Cake - Marmorkage

CakeTove Balle-PedersenComment
Marble Cake - Marmorkage

Marble Cake - Marmorkage

This cake was one of the first cakes I've ever learned to make. I'm sure most danes learned to make this in school. But oddly enough I have not been able to make this cake the way my husband likes it. He like his marble cakes slightly on the dryer side, without it being crumbly. This time was the first time I got it right. 

Ingredients:

  • 250 g butter

  • 250 g sugar

  • 4 eggs

  • 1 teaspoon vanilla paste or the seeds from 1 vanilla bean pod

  • 250 g all-purpose flour

  • 1½ teaspoon baking powder

  • 50 ml milk

  • 2½ tablespoons unsweetened cocoa powder

  • 1 tablespoon cold espresso or another strong coffee

Directions:

Preheat the oven for 355℉ (180℃). 

Butter a 4¾x9” (12x23 cm) pan. Line the bottom with some parchment paper.

In a large mixing bowl, cream the butter and sugars until very light and fluffy, mix in the vanilla paste. Add the eggs one at a time, and mix just until fully incorporated. 

Sift flour and baking powder in a bowl.

Fold in alternately dry ingredients and milk. 

Pour ⅔ of the batter into the prepared pan. Mix in cocoa and coffee in the last third of the batter, and pour it on top of the white in the pan. Using a knife “cut” in a zig-zag and up’n down motion down the pan to create a marbled effect.

Bake the cake for 45-55 minutes until a cake tester inserted into the center comes out clean. Turn out onto a cooling rack and leave to cool. 

Enjoy!

The Danish Version:

Marmorkage

Ingredienser:

  • 250 g smør

  • 250 g sukker

  • 4 æg

  • 1 vaniljestang, kornene fra 

  • 250 g hvedemel

  • 1½ tsk bagepulver

  • 25 ml mælk

  • 2½ spsk usødet kakaopulver

  • 1 spsk kold espresso eller stærk kold kaffe

Fremgangsmåde:

Opvarm ovnen til 180℃.

Smør formen med smør og kom et style bagepapir i bunden.  

Rør smør og sukker sammen til det er let og skummende. Tilsæt æggene et ad gangen og derefter vanillien. Rør lidt af melet i og herefter mælken.  Bland resten af melet forsigtigt i dejen. 

Kom ⅔ dele af dejen i den smurte form, og bland resten af dejen med kakaopulver og kaffen. Kom resten af dejen i formen. Kør en kniv igennem kagen i et zig-zag-mønster, så den bliver marmoreret. Bag kagen i ca. 45 minutter indtil en kødnål/strikkepind, der stikkes ned i kagen, kommer ud uden dej på.

Afkøl kagen på en rist.

Velbekomme!

Valentines Pavlova

Cake, Desserts, HolidayTove Balle-PedersenComment
Valentines Pavlova

Valentines Pavlova

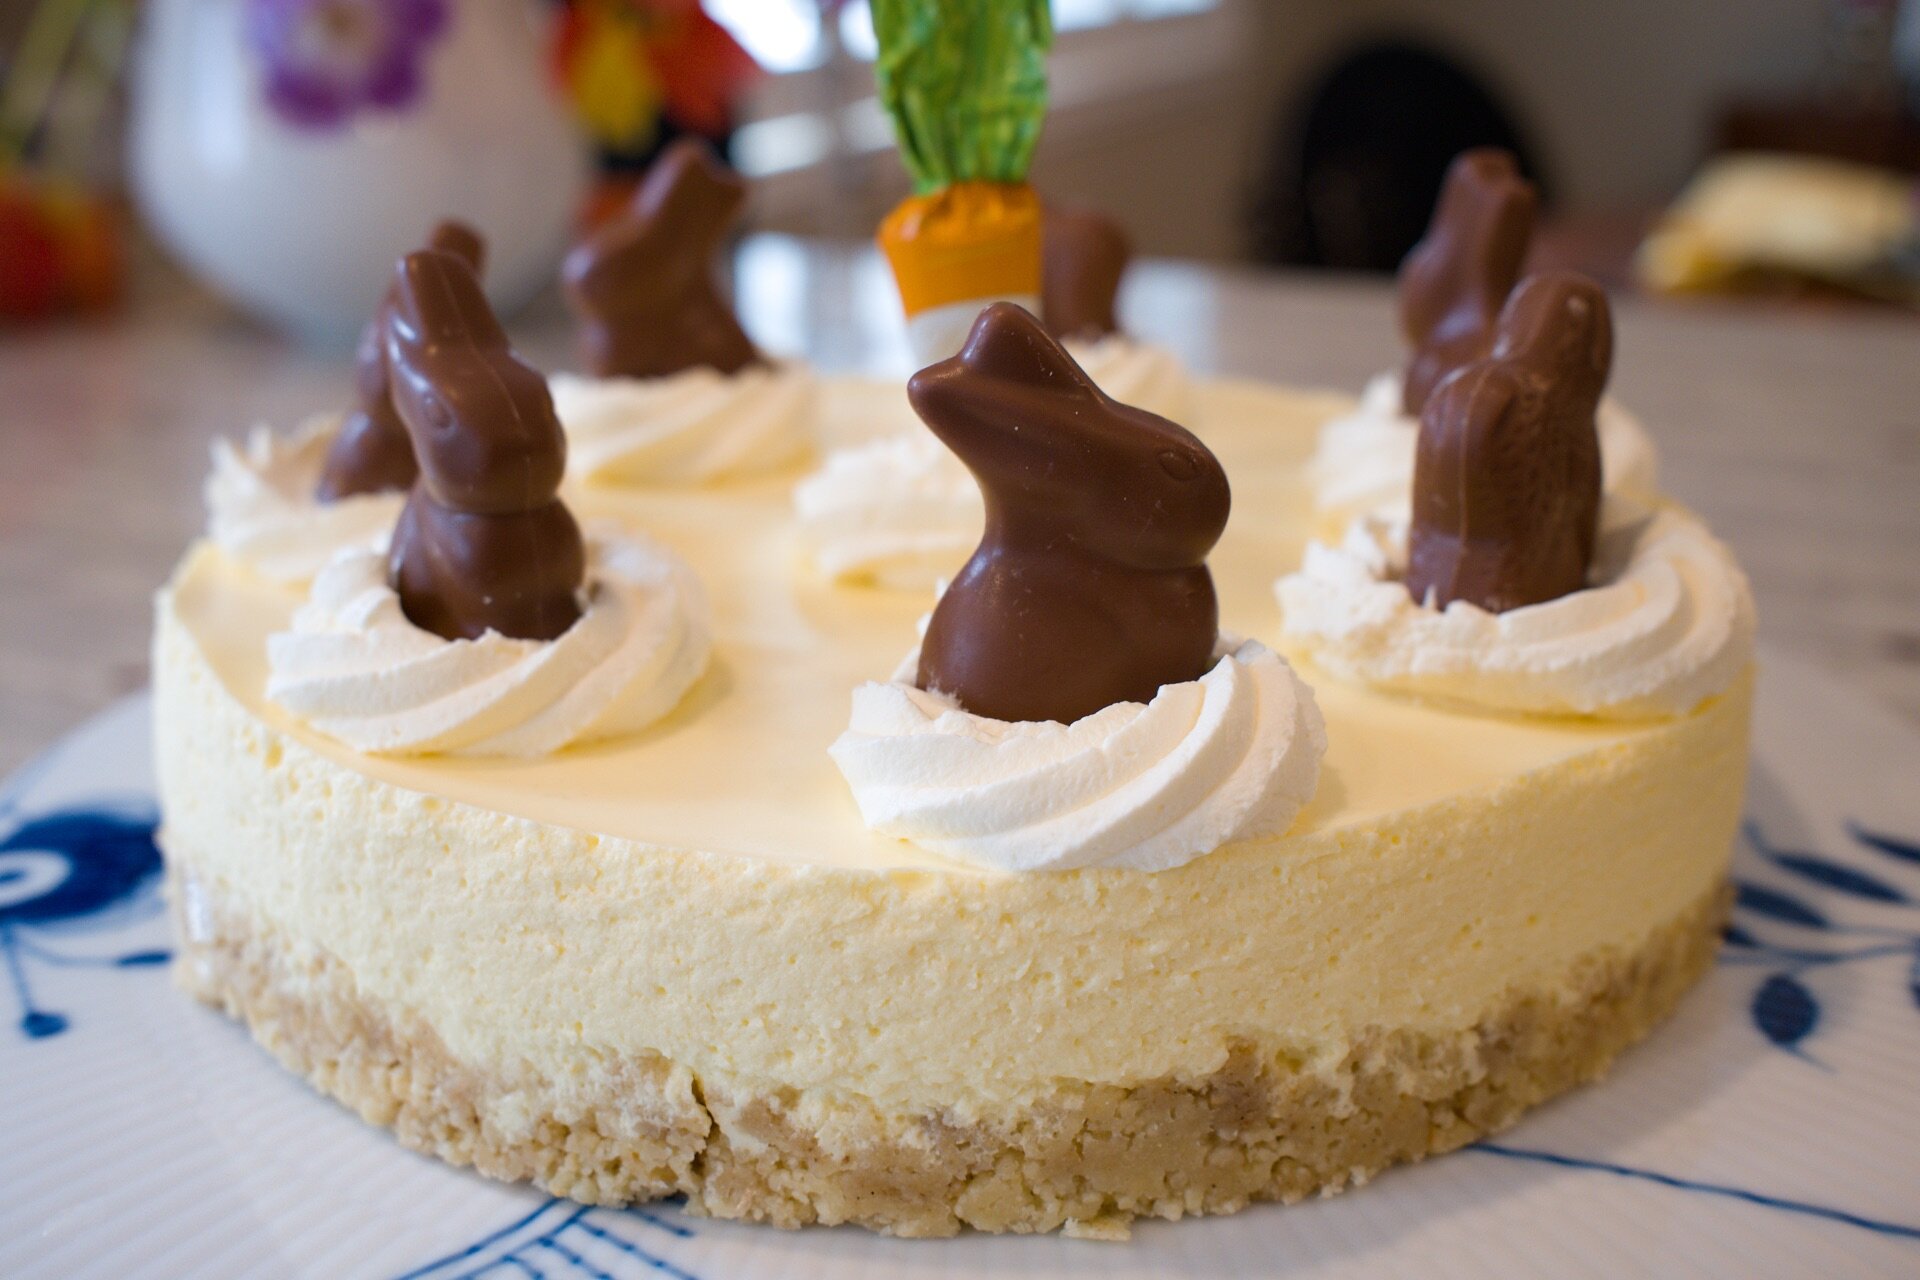
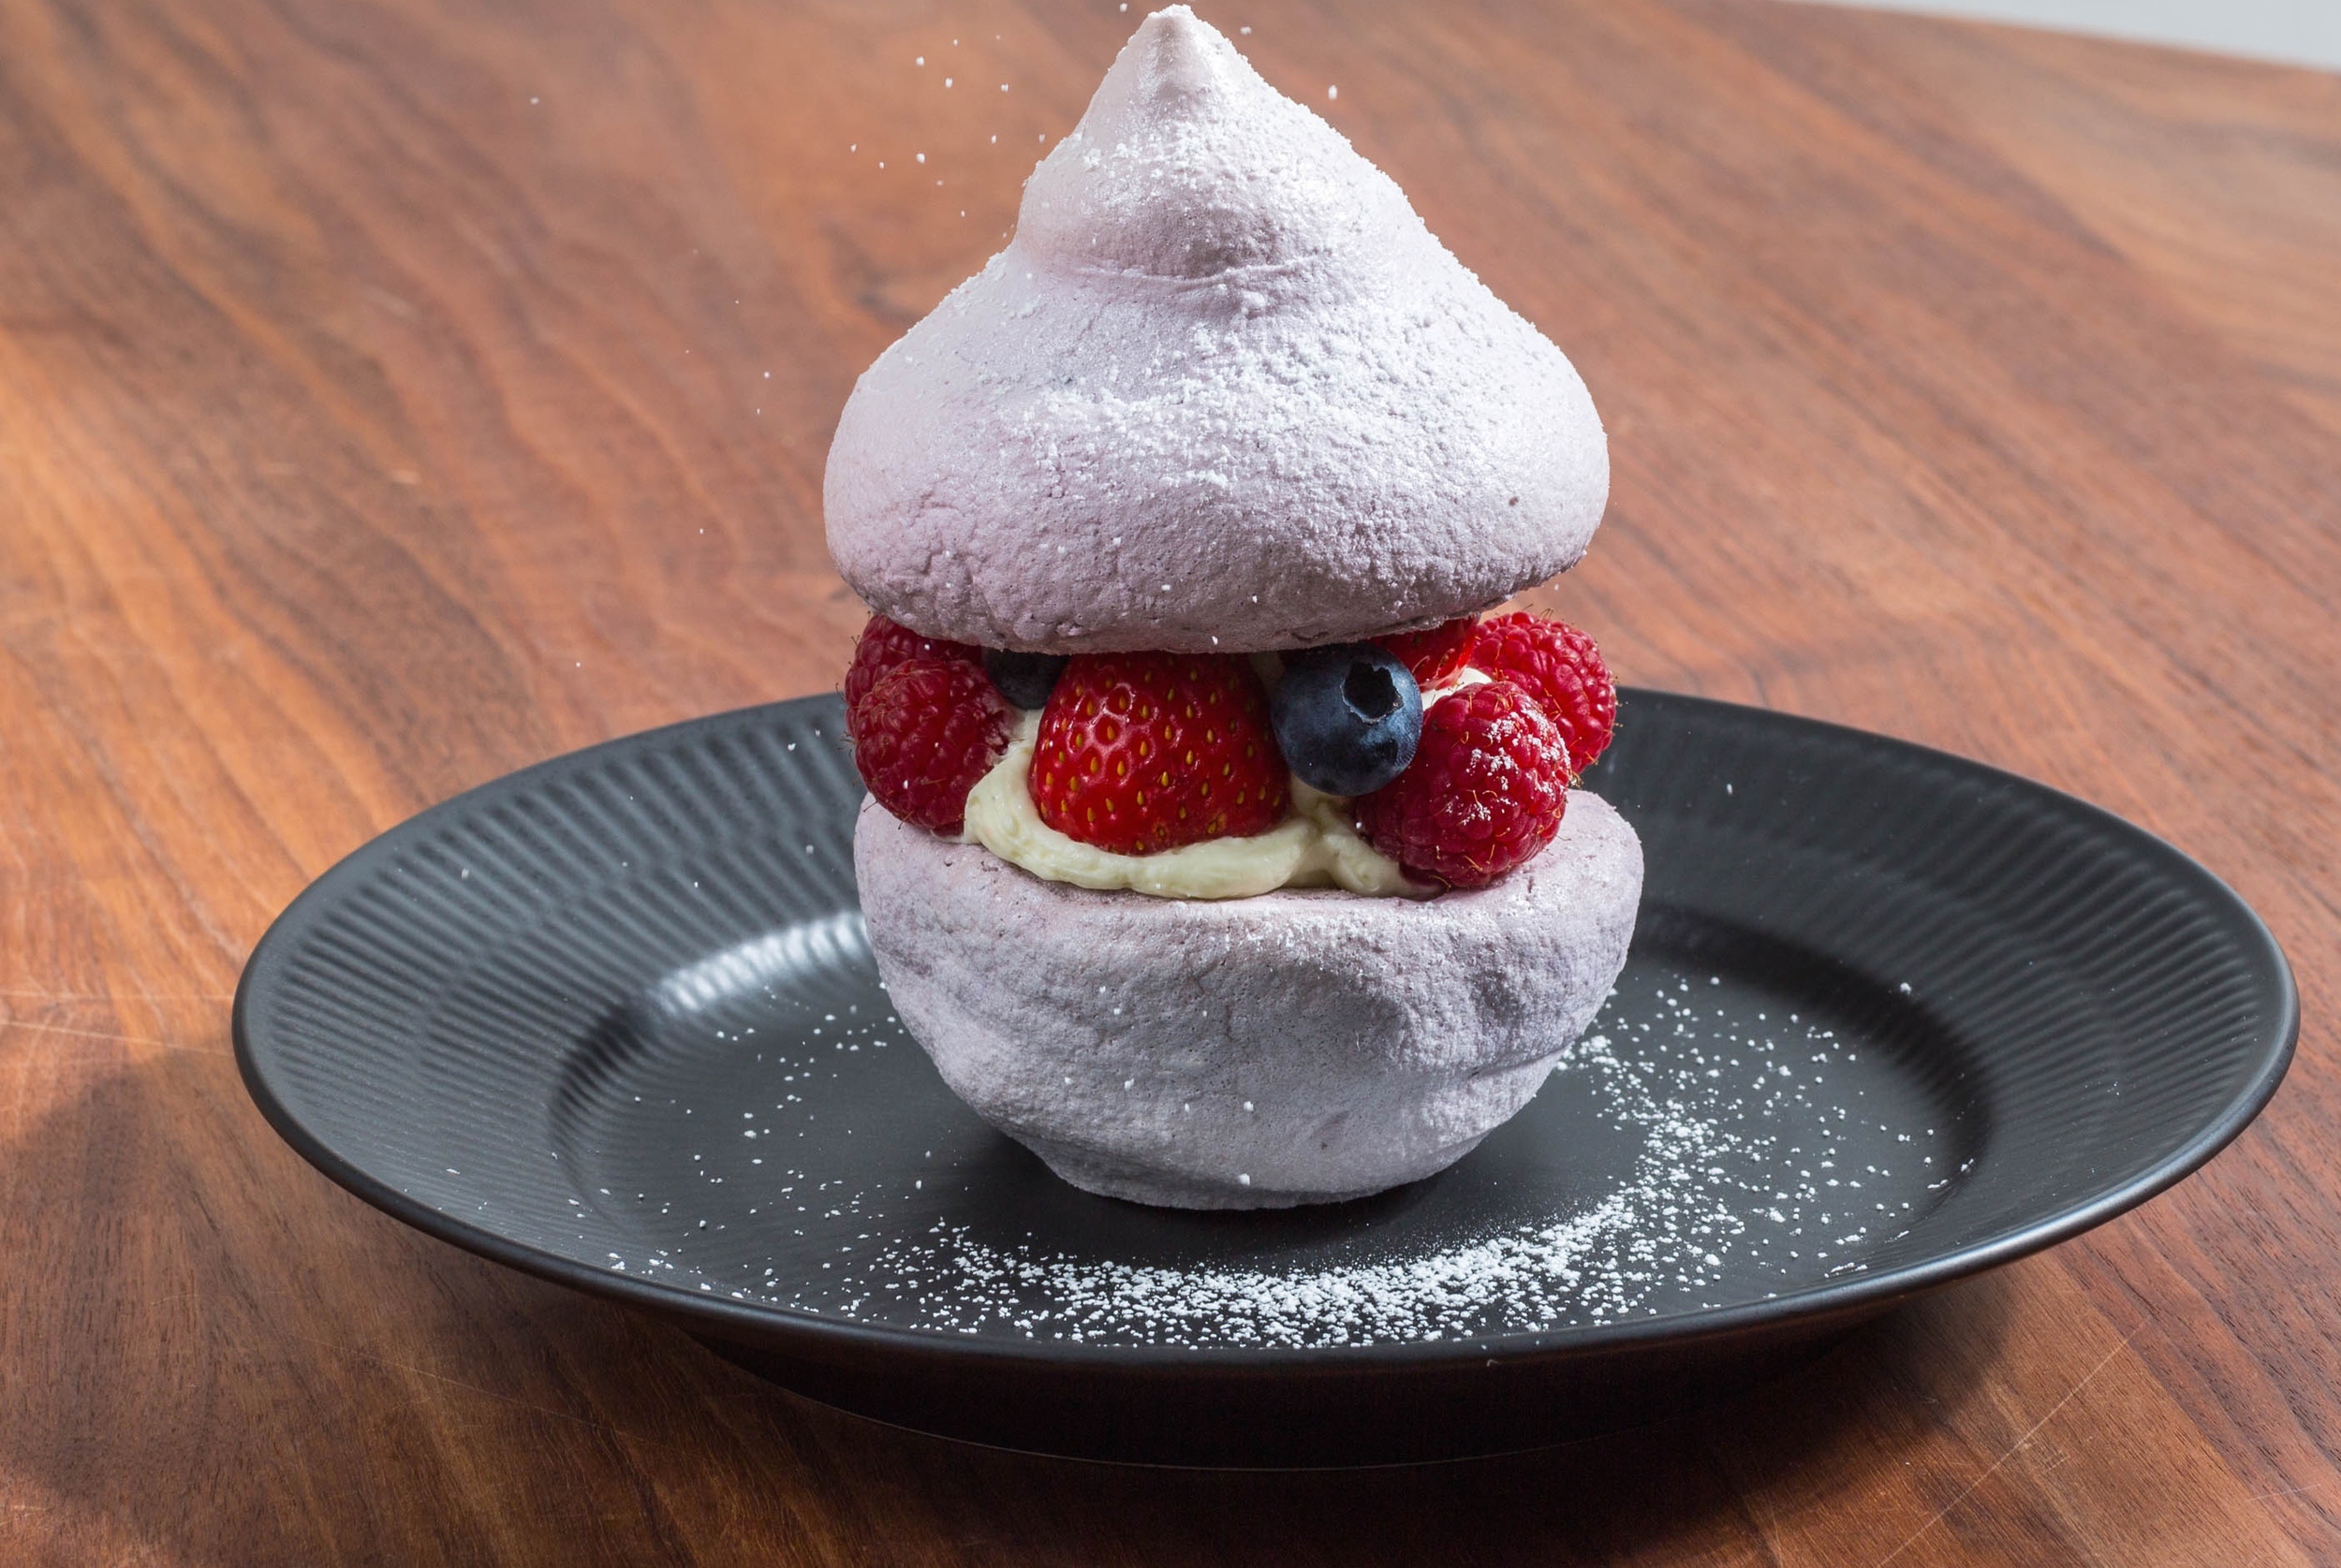
I made pavlovas before but never with this finish. It was meant as a serving sized dessert, but to be honest, it came out as a dessert for sharing with your loved one. 

I love the taste of the meringue with the lemon juice. The kind of pavlova I grew up with, "fuglereder" or birds nests in English, were plain white meringues, and they just tasted sweet, and served as a vessel for whipped cream and fresh berries or canned fruit if you were really unlucky.

I know 3 is a crowd on Valentines Day, but I like to make tree desserts just in case I'll fumble and break one of the meringues. I know this will happen if I don't have a spare. 

Makes 3

Ingredients:

Meringue:

  • 4 egg whites
  • 120 g granulated sugar
  • 55 g confectionary sugar 
  • 1 teaspoon lemon juice, fresh squeezed 
  • pink food coloring

Filling:

Directions:

Meringue:

Preheat oven to 185℉ (85℃). Line a baking sheet with parchment paper. Draw 6 3-inch (7.5 cm) circles about 2-inch (5 cm) apart on the parchment paper, and turn the parchment paper upside down, so you don't get any pencil on the pavlovas.

In the bowl for the stand mixer, beat egg whites until frothy. Add the sugar gradually, a couple tablespoons at a time, while still beating the egg whites. Whip the egg whites until stiff peaks. The egg whites/meringue will become thick and glossy. Gently fold in confectionary sugar and then fold in lemon juice and food coloring. Be careful not to over mix the meringue.

Spoon the meringue into a piping bag with a large round tip, and push the meringue down towards the tip. 

Hold the piping bag at a 90-degree angle about an inch above the parchment paper, pointing at the center of the circle. Pipe with an even pressure until the meringue fills the circle. Ease the pressure on the piping bag and lift the piping bag straight up, making the meringue look like at big teardrop. Repeat for the rest of the circles.

Bake the meringues in the center of the oven for about 25 minutes, you should be able to gently remove the teardrops from the parchment paper. If you can't do this after baking for 25 minutes, then bake them for another 10 minutes. (This is when I knew my oven was broken. I had to bake the pavlova for about an hour before I could handle them)

With  the flat bottom of the meringue facing up, spoon the inside out the inside, leaving a thin dome of meringue. Repeat with the rest of the meringues. Return the meringue domes to the baking sheet, and bake for another 30 minutes, flat side down. This will dry the meringues completely. 

Let the meringues cool to room temperature.

Half of the domes (3) needs to be sanded down, using a microplane grater. This will become the base of the pavlovas.

Assemble:

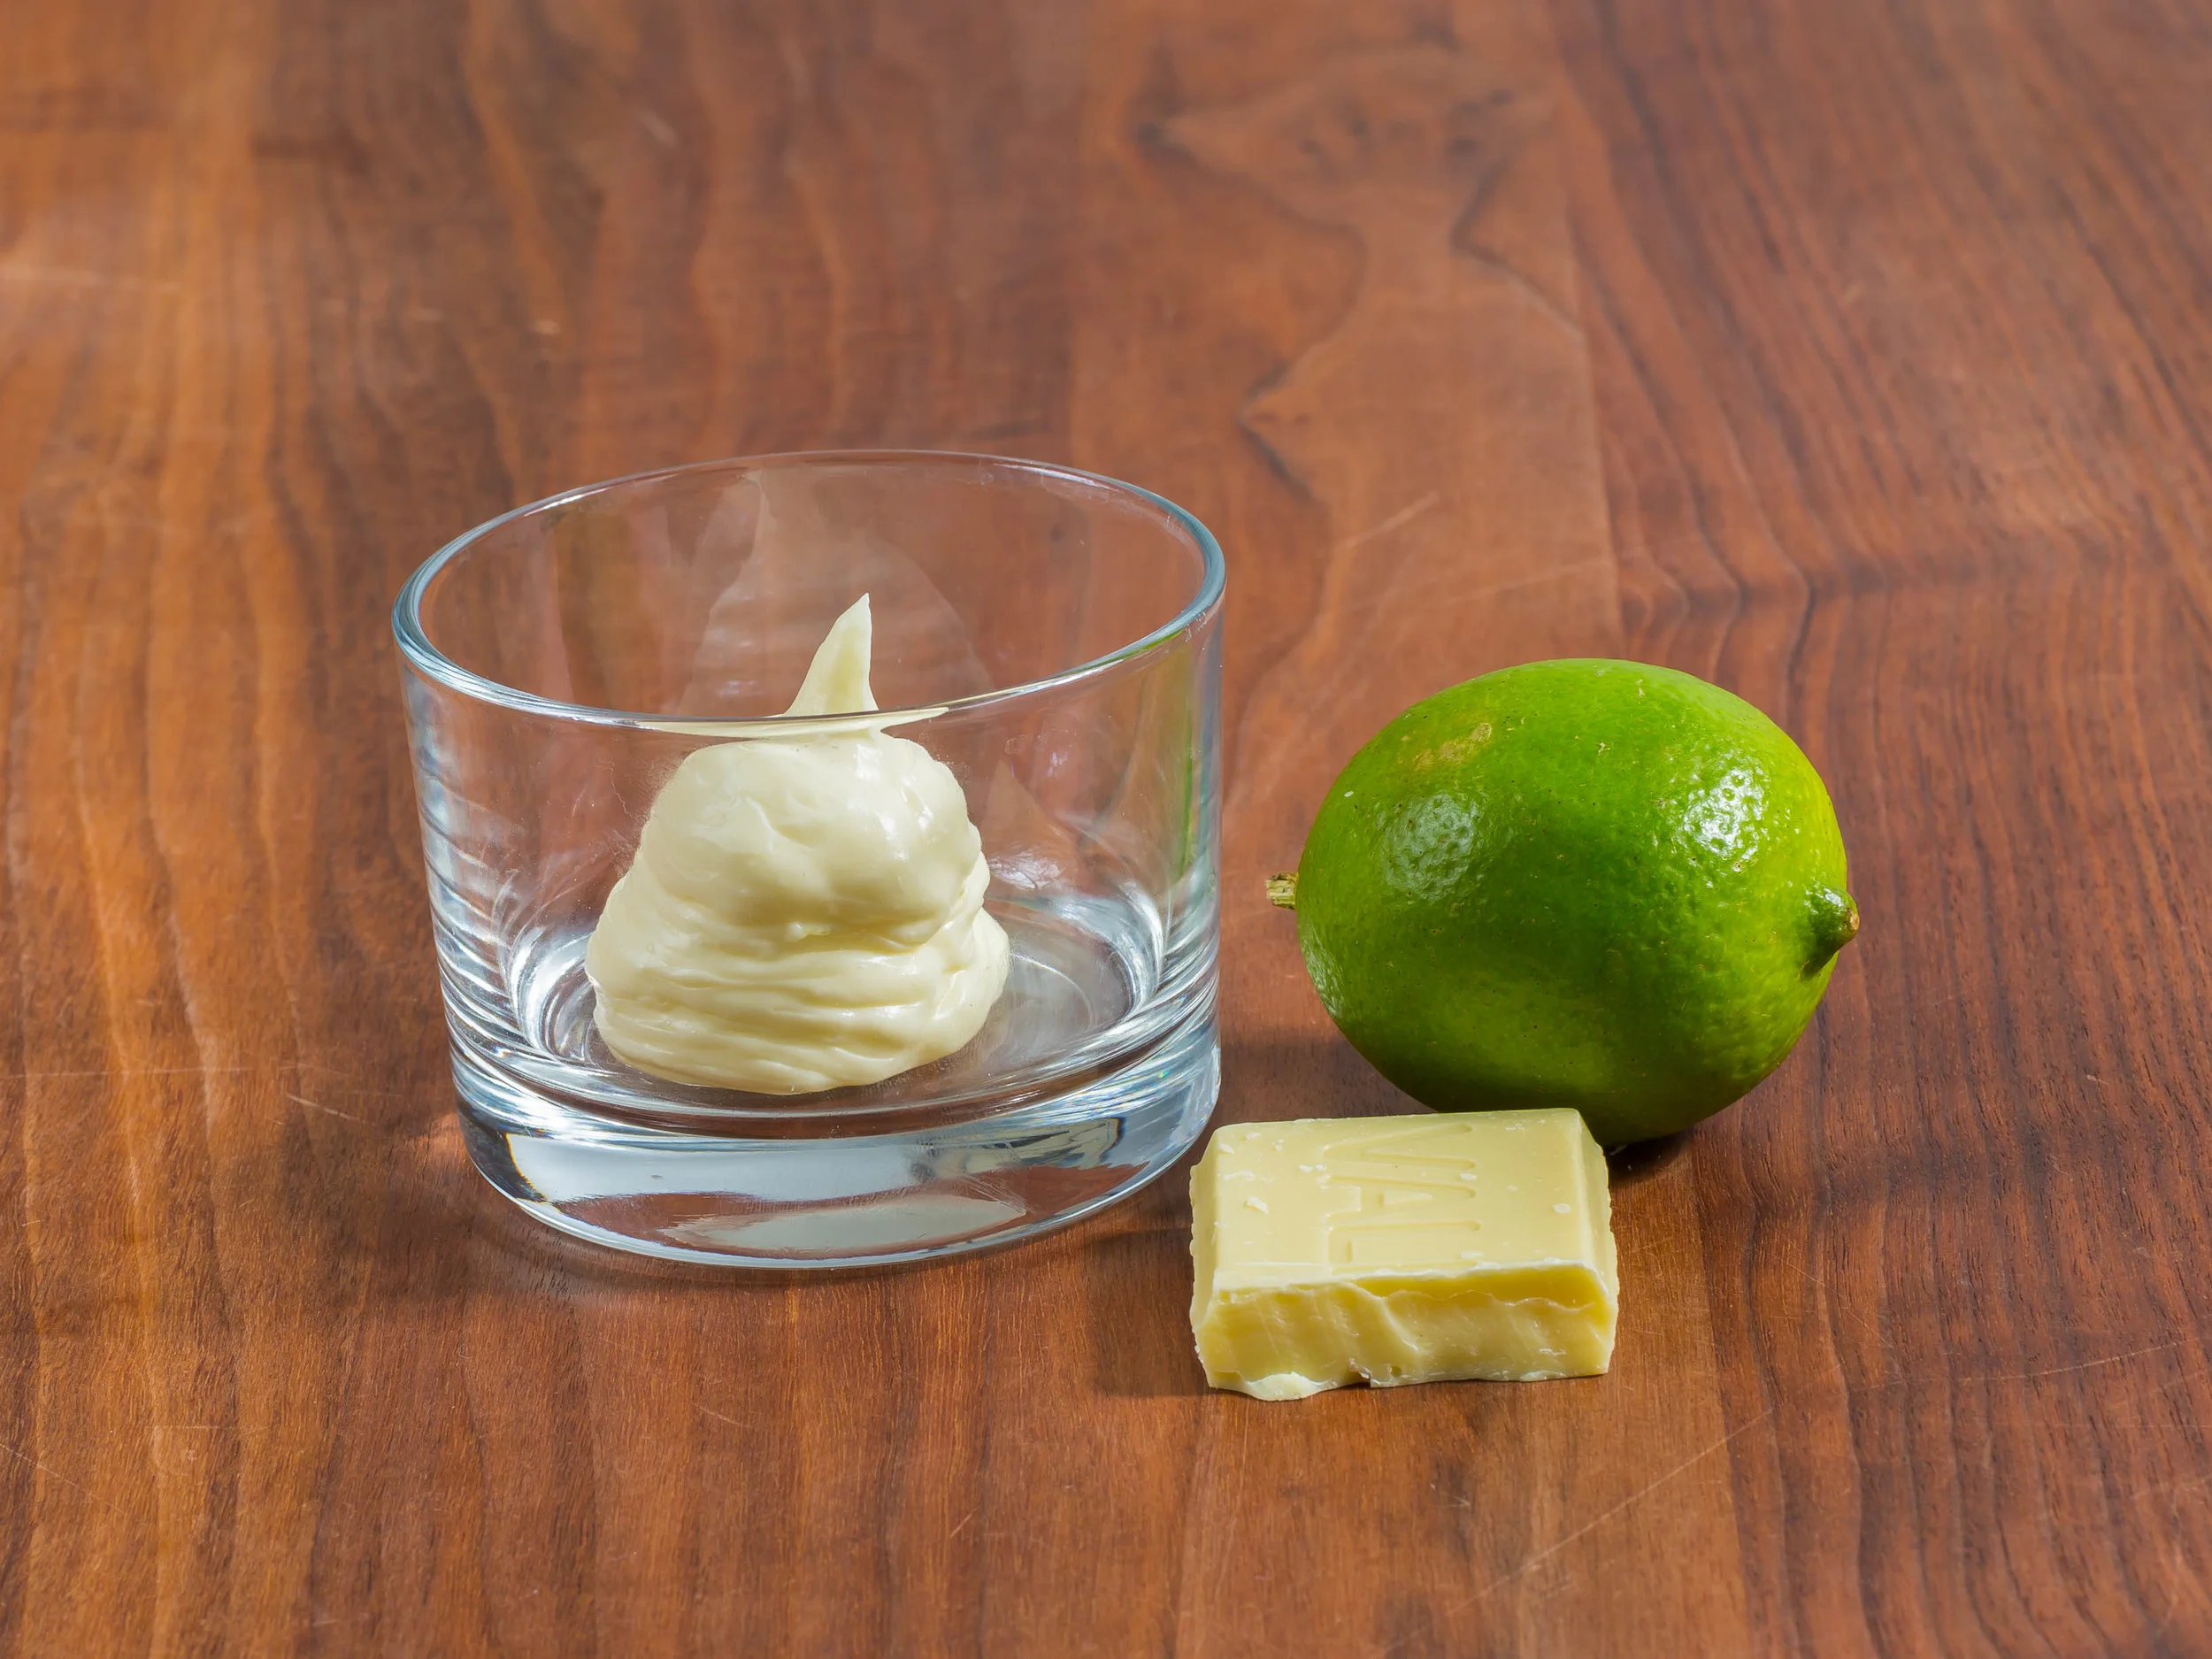
Place the base of the pavlova, hollow side up on a plate. Pipe a big dollop white chocolate/lime ganache in the center filling the base. Place berries and quartered strawberries so they are covering the sides and top of the ganache. Pipe a small dollop ganache on top, to make the top dome stick.

Dust the top with confectionary sugar, and serve immediately.

TIPS:

For at quick dessert: Instead of making the teardrop, you can spread the meringue inside a drawn large circle on the parchment paper. Spread the meringue working from the center towards the edge. You want to make it look like a bowl. Bake it at 300℉ for 90 minutes. Fill the cooled bowl with ganache topped with fresh fruit.

Enjoy!


The Danish version:

Valentines Pavlova/Fuglereder

Ingredienser:

Marengs:

  • 4 æggehvider
  • 120 g sukker
  • 55 g flormelis
  • 1 tsk friskpresset citronsaft
  • pink madfarve (jeg bruger wilton pastafarve)

Fyld:

Fremgangsmåde:

Opvarm ovnen til 85℃.

Tegn 6 cirkler med en diameter på 7,5 cm, ca 5 cm fra hinanden på et stykke bagepapir. Læg bageparpiret på en bageplade med tegningen ned mod pladen, så du ikke får blyant på dine kager. Læg på en bageplade. 

Pisk æggehviderne let til de begynder at blive skummende. Tilsæt sukkeret et par spsk ad gangen, mens du pisker. Pisk æggehviderne til du kan vende skålen på hovedet uden at det løber ud. Marengsen er så tyk og blank. Fold forsigtigt den sigttede flormelis i massen. Når flormelisen er blandet i, vend farve og citronsaften i. Pas på med at over-mikse marengsen. 

Kom marengsen i en sprøjtepose med en stor rund tylle i. Pres marengsen ned til spidsen, og pres eventuelle lufthuller ud. 

Hold sprøjteposen i en 90 graderes vinkel ca 2 cm over bageparpiret. Pres marengsen ud, så den fylder cirklen ud, slip presset på sprøjteposen og løft den lige op, så marengsen ligner en stor dråbe. Gentag for resten af cirklerne.

Bag marengsne i 25-35 minutter indtil de er tørret lidt, så det er muligt for dig at løsne dem fra papiret, uden at ødelægge dem. Du skal have ca 1 cm tørret marengsskal. (Det var her min ovn for alvor stod af, da jeg var nød til at bage dem i næsten en time, før de var til at håndtere.)

Hold marengsdråben med den flade side opad, og skrab det inderste ud. Jeg skar en cirkel med en skarp kniv, så jeg fik en jævn kant. "Indmaden" er stadig en blød marengs. Sæt dråben tilbage på bagepladen og gentag med resten. Bag marengsdråberne med åbningen nedad i yderligere 30 minutter, indtil de er helt tørre. 

Lad marengsdråberne køle helt af.

Haklvdelen af dråberne skal have toppen slebet af med et fint rivejern. Disse skal være bunden af fuglereden.

Samling:

Sæt bunden af fuglereden med hullet opad på tallerken. Sprøjt en stor klat hvid chokolade/lime ganache i, så den fylder skålen ud. Placer bær hele vejen rundt så det dækker ganachen. Kom lidt ekstra ganache på toppen, til at lime "låget" på.  Gentag med de resterende fuglereder. 

Lige før serveringen drysses med lidt flormelis.

TIPS:

For en hurtigere dessert, kan du forme marengsen som en stor skål  og bage den i ca. 90 minutter ved 150℃. Fyld den kølede skål med ganache og frisk frugt.

Velbekomme!

White Chocolate/Lime Ganache

Cake, DessertsTove Balle-PedersenComment
White Chocolate/Lime Ganache 

White Chocolate/Lime Ganache 

This sweet creamy ganache is perfect in a classic layer cake instead of a buttercream or in french macarons. * Next time I'll try with only 1 gelatin sheet, so I get a softer ganache. but otherwise it was perfect. This is the kind of ganache that can be eaten with a spoon, it's that good.

This recipe is adapted from Dominique Ansel's recipe.

Ingredients:

  • 2 gelatin sheets or 2 teaspoons gelatin powder *
  • water for blooming, 2 tablespoons if using gelatin powder
  • 120 g white chocolate (use a good one, like Valrhona)
  • 200 ml heavy whipping cream
  • 1 lime, the zest of
  • 25 g sugar
  • 50 ml freshly squeezed lime juice

Direction:

Soak the gelatin in water, or if using gelatin powder sprinkle over 2 tablespoons water. Let to bloom for 10-15 minutes. 

Chop the chocolate finely and place in a bowl, set aside.

Rub the sugar and zest together between your fingers until the sugar is moist, grainy and very aromatic.

Heat the cream with the aromatic sugar, in a saucepan, to a soft boil. Remove from heat. 

Melt the bloomed gelatin in the hot cream, while whisking. Pour about one-third of the hot cream over the chocolate, and left to sit for 30 seconds. Then whisk until incorporated and melted. Add the rest of the cream and whisk until smooth. 

Let the ganache cool to room temperature, then whisk in the lime juice.

Cover the ganache with plastic wrap pressed directly against the ganache. This will prevent the ganache forming pudding skin. Let the ganache set over night or for at least 3 hours in the refrigerator. 

Whip the ganache on high speed until medium-stiff peaks. Put ganache into a piping bag with a round tip. Push the ganache towards the tip.  Place  the piping bag in the refrigerator until ready to use. (Will only keep  in refrigerator for up to 2 days).  

Use ganache in Valentines Pavlovas or french macarons.

Enjoy!

Habanero Kransekage - Habanero Almond Cake

Cake, Desserts, Holiday, New Year's EveTove Balle-PedersenComment
Habanero Kransekage - Habanero Almond Cake

Habanero Kransekage - Habanero Almond Cake

Happy New Year.

Thank you for visiting my blog. It’s has been a fun year for me with blog. I learned that I do not control what happens after I post. And I do not know what will be a hit and what will be a miss. One thing I do know is, the quality of the photos is getting better. My husband has learned a lot about light, and how to use it.Thank you Michael for helping me, you are the best.

I hope you will keep visiting my blog, and I promise to keep coming up with new recipes and giving old classics a new twist.

I look forward to 2015 and to face all the new challenges this year will bring.  

From my family to yours, have a fantastic 2015, filled with love, light and laughter.

Cheers.

Makes 12

Ingredients:

Kransekage: 

  • 50 g almonds blanched
  • 100 g sugar
  • 1 egg white
  • 250 g marzipan (I used Ren Rå, a 60% almond paste)
  • habanero chili (be cautious with this chili, it is very powerful, taste a teeny-tiny bit to determine how much to use)

Icing:

  • confectionary sugar
  • water, hot
  • orange food coloring

Directions:

Put almonds and sugar into food processor with the steel blade in place and process until finely pulverized. Add the egg whites and process until smooth. Be careful not to heat the mass to more than 95 - 104°F, else the egg white will cook. 

Shred the marzipan and add it, minced habanero and the almond/egg white mixture to a stand mixer fitted with the paddle attachment. Beat it until it's completely smooth and free of lumps. Form the dough into a ball, and refrigerate for 2-3 hours.

Preheat oven for 375℉ (190℃).

Roll the dough into logs as thick as your finger, and cut into 3 inch long pieces. Gently press the top, so you get a peak.  

Bake for about 12 minutes or until golden.  Allow to cool completely before decorating.

Make the icing with small amount of hot water. You want the icing to be a thick paste. Pipe the icing across the top, using a piping bag with a small round tip.

Enjoy the kransekage with a glass of sweet bubbles.