Sweet • Sour • Savory

Food blog on scandinavian style food done right.

Dinner

Chicken with Mustard a la David Lebovitz

Dinner, Meats, PoultryTove Balle-PedersenComment

We eat a lot of chicken in my family. Chicken is very easy to change up with different flavorings, and different cooking methods. So when I got David Lebovitz's cookbook, My Paris Kitchen, the first dish I had to try was "chicken with mustard." 

The flavors of this dish blew me away. I thought the Dijon mustard would give the dish a strong flavor, but oddly enough the flavors was very mellow. I think we have another family favorite here. It is actually perfect for a weeknight dinner. We served it with pasta and quick butter-roasted carrot coins.

Serves 4-6

Ingredients:

  • 140 g Dijon mustard

  • ¼ teaspoon smoked paprika

  • freshly ground black pepper, to taste

  • ½ teaspoon sea salt or kosher salt (optional)

  • 4 chicken thighs and 4 drumsticks (8 pieces total), bone-in, skin-on

  • 100 g (2-3 slices) smoked thick-cut bacon, diced

  • 1 small onion, finely diced

  • 1 teaspoon fresh thyme leaves + some for garnish

  • a little olive oil, for the pan

  • 240 ml (1 cup) white wine, non-oaky

  • 1 tablespoon grainy mustard (I used Maille Old style whole grain dijon mustard)

  • 3 tablespoons Dijon mustard

  • 3 tablespoons crème fraîche

Directions:

Mix the 140 g Dijon mustard with paprika, salt and black pepper in a bowl. Toss the chicken pieces in the mustard mixture, making sure you get mustard in between chicken and chicken skin. Set aside, while you tend to the bacon and onion.

Chop onion and dice bacon. Heat sauté-pan or Dutch oven and add the bacon. Cook the bacon until it just starts to get brown. You are not looking for crispy bacon bites, you need them to stay soft. Remove the bacon from the skillet and let it drain on a plate lined with paper towels. Remove all bacon fat but 1 tablespoon. Add onion to the pan and cook until soft and translucent. Add the thyme and cook for another few minutes. Put the onions on a large plate, with the drained bacon.

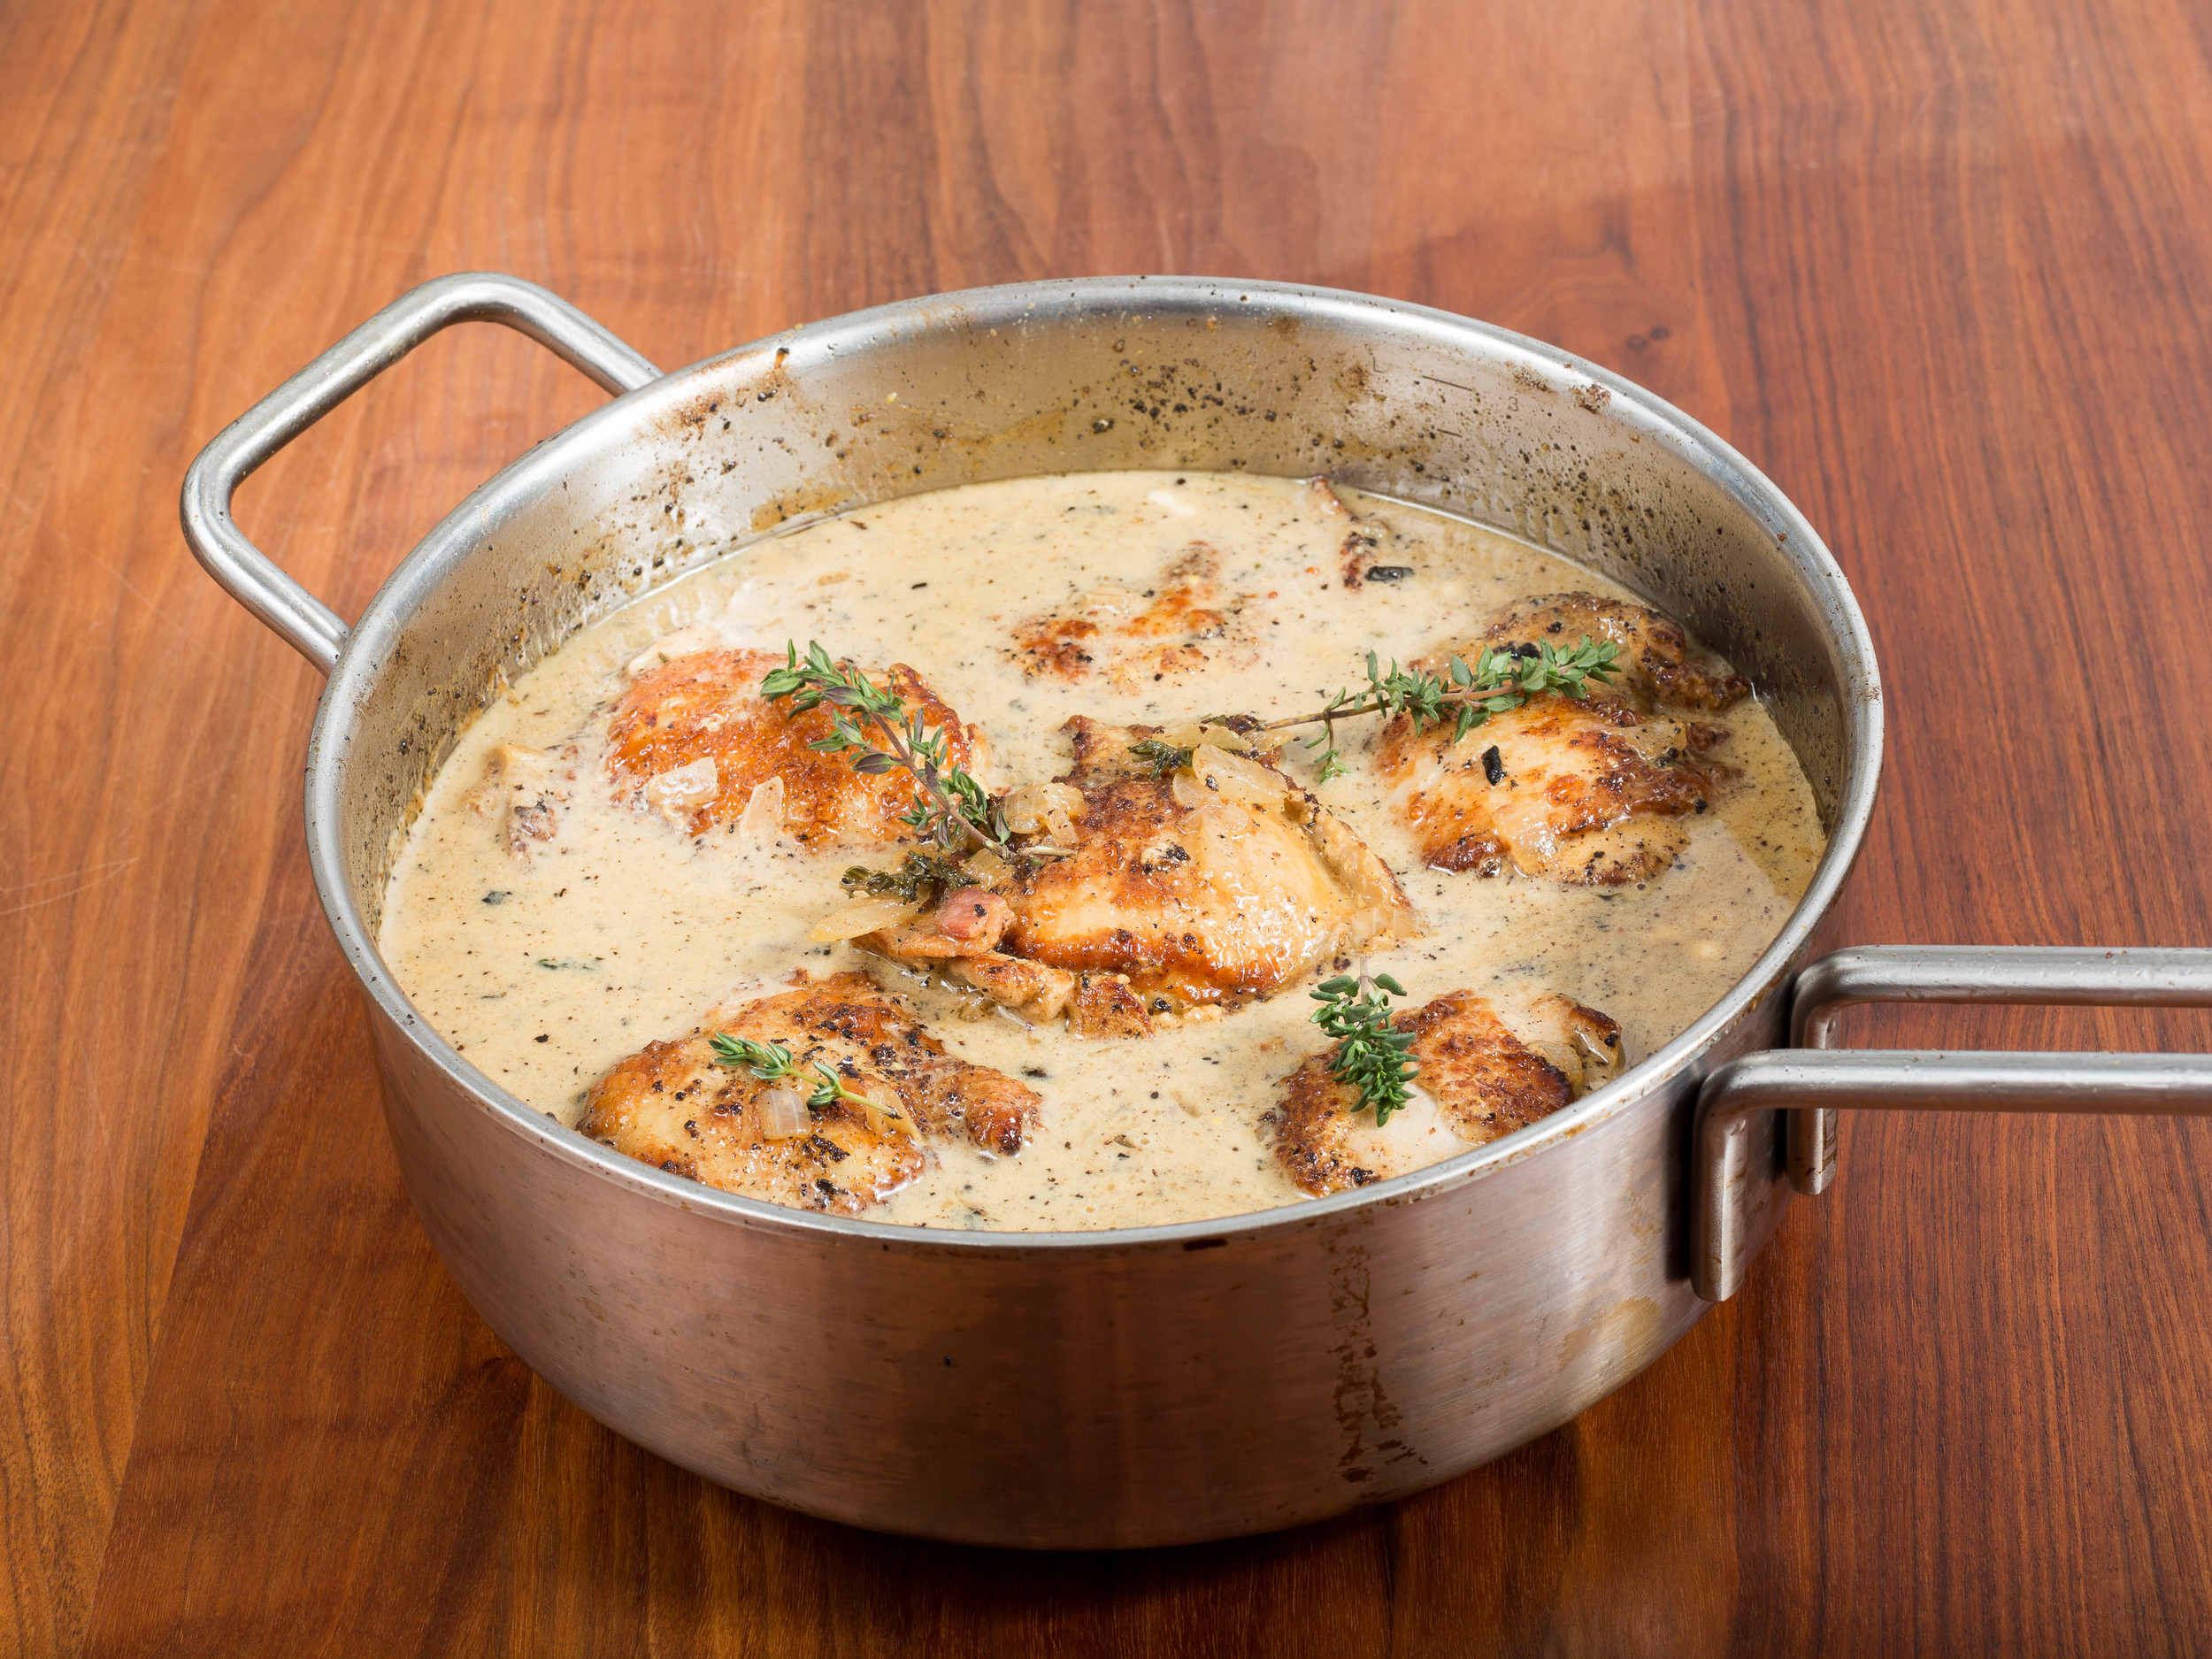
Add a little olive oil to the skillet, if necessary, brown the chicken pieces in a single layer. Be careful not to overcrowd the pan, because this will cause the chicken to steam and not brown, it's better to work in batches. Get a good color all over the chicken. This will help develop the flavor in the dish.  Place the chicken pieces on the plate with onions and bacon. Add the wine to the pot to deglaze it. Scrape of the dark bits of the bottom. Return the chicken, onion and bacon to the pan, and cook it covered for about 15-25 minutes, Check the doneness of the chicken by inserting a knife into the meat next to the bone. You want the juice to come out clear, if red, keep cooking for a few more minutes.

Remove pan from the heat and transfer the chicken to a platter and stir the remaining 3 tablespoons Dijon mustard, the grainy mustard, and the crème fraîche into the sauce. If the sauce has reduced and is quite thick, you can thin it with a little warm water, adding a teaspoon or so at a time. Pour the sauce over the chicken, sprinkle chopped parsley over the top, and serve.

Enjoy!

The Danish version:


Kylling i Sennep a la David Lebovitz


Ingredienser:

  • 140 g Dijon sennep

  • ¼ tsk røget paprika

  • friskkværnet sort peber, efter smag

  • ½ tsk salt

  • 8 stykker kylling med ben og skind, jeg bruger overlår, men underlår duer også

  • 100 g bacon I tern

  • 1 løg, hakket

  • 1 tsk frisk timian blade + lidt til pynt, Jeg bruger 4-6 hele kviste

  • lidt oliven olie til stegning

  • 2½ dl hvidvin

  • 1 spsk grov sennep med tydelige sennepskorn så som Maille grov mild sennep

  • 3 spsk Dijon sennep

  • 3 spsk crème fraîche

Fremgangsmåde:


Bland sennep, paprika, salt og peber i en skål. Kom kyllingestykkerne ned i blandingen. Masser senneppen over hele kyllingen, også ind underskindet. Lad kyllingen stå og marinere imens du forbereder det næste.

Hak løg og bacon i tern. Start med at stege bacon i en tykbundet gryde. Baconen skal kun lige tabe fedtet, og lige have taget lidt farve, det er ikke meningen at det skal blive alt for sprødt. Lad baconen dryppe af på et stykke køkkenrulle. Brug bacon fedtet til at stege løgene bløde i, kom timianen i sammen med løgene. Tag løgene op af gryden.

Kom evt. lidt olivenolie i gryden og brun kyllingestykkerne godt af. Gør det gerne af flere gange for ikke at koge kyllingen. Bruningen er med til at skabe en god dybde til retten. 

Tag kyllingen op af gryden, og deglace den med vinen. Kom alle ingredienserne tilbage i gryden, og lad retten simre i 15-25 minutter, indtil kyllingen er nok.

For at færdiggøre retten tilsættes den grove og dijon sennep og creme fraichen. Hvis sovsen er for tyk, tilsæt lidt vand. Hvis sovsen er for tynd, så jævn den med en lille melbolle.
Server kyllingen med kartofler og lidt gulerødder.

Velbekomme!

Quick Butter Roasted Carrot Coins

Dinner, Sides, VegetablesTove Balle-PedersenComment
Quick Butter Roasted Carrot Coins

Quick Butter Roasted Carrot Coins

These carrot coins are one of my favorite go-to vegetables for a quick weeknight dinner. They are easy to make, they are crunchy and filled with flavor. This time I found some rainbow carrots and used them, this made for a beautiful display of color.

You can use a lot of different herbs and spices to flavor the carrots, normally I use the same spices I use in the rest of the meal, that day.

Serves 4

Ingredients:

  • 8-10 carrots, scrubbed and ends trimmed
  • 1 tablespoon butter or oil
  • 1 clove garlic, minced
  • 2 sprigs thyme, leaves only

Directions:

Cut the carrots in bite-sized coins. Heat the butter in a skillet, Add garlic and thyme when the butter is melted, but before it is browned. Stir the garlic to flavor the butter. Add the carrot coins and cook while stirring until the carrots are softened, but still have a bite. I cooked them for 2-3 minutes. 

Sprinkle with some more thyme and serve with your dinner.

Enjoy!


Tabouli

Salad, DinnerTove Balle-PedersenComment

This salad is very easy and tasty. its was perfect with the falafels. Adding some greens and some tomatoes it was a great meal.

Serves 4-6

Ingredients:

  • 1 bunches finely chopped flat leaf parsley
  •   cup chopped fresh mint
  • ½ cup coarse bulgur, prepared
  • ½ firm tomato, chopped 
  • 1 scallion chopped
  • 2 tablespoons extra Virgin olive oil
  • 2 tablespoons fresh lemon juice
  • salt and pepper to taste
  • 1 pinch teaspoon cayenne pepper

Directions:

Prepare the bulgur according to instructions on the package. Do not over soak the bulgur, you want bulgur to finish softening in the tabouli with the oil and lemon juice.

Chopped parsley and mint finely, and set aside.

In a large bowl mix bulgur, chopped tomato, chopped scallions with lemon juice, salt and pepper. Add the parsley, mint, olive oil and mix it all. Season the tabouli with salt, cayenne, more oil and lemon juice.

Enjoy!

Falafel

Dinner, VegetablesTove Balle-PedersenComment
Falafel, with pita bread and banana milkshake.

Falafel, with pita bread and banana milkshake.

Falafel is the most meaty non-meat dish I know. I have never thought of it as a vegetarian dish, but of cause it is. 

The first time I ever had falafel was on a summer camp with the youth group at my church. We were making it all from scratch, and I remember it as a really great thing. But nevertheless there would go years before I tasted falafels again.

Here in San Francisco Bay Area we have a lot of different falafel places, but I really like Falafel Drive In, in San Jose. They serve their falafels with a banana milkshake, it so yummy, and it helps keep the heat down when I put Sambal Oelek in my falafel pita.  This is my version.

Makes 20-26

Ingredients:

  • 400 g (about 2 cups) dry chickpeas/garbanzo beans
  • 1 small onion, roughly chopped
  • 2 tablespoons chopped fresh parsley
  • 2 tablespoons chopped fresh cilantro
  • 4 cloves garlic 
  • 1¾ teaspoons salt
  • 2 teaspoons cumin
  • 1 teaspoons ground coriander
  • ¼ teaspoons black pepper
  • ¼ teaspoons cayenne pepper
  • ½ teaspoons baking powder
  • ½ teaspoons baking soda
  • 2 tablespoons all-purpose flour
  • Vegetable oil for frying (I used sunflower oil)

Directions:

Pour the chickpeas into a large bowl and cover them by about 3 inches (10 cm) cold water. Let them soak overnight or up to 24 hours. You need a big bowl because they will double in size. Drain and rinse the beans well. 

Pour the beans into a food processor along with the chopped onion, garlic cloves, parsley, cilantro, flour, salt, cumin, ground coriander and cayenne pepper. 

Pulse all ingredients together, scraping down the sides of the bowl to incorporate it all, and getting a uniform chop of the beans. Pulse the mixture until you have a rough, coarse meal the kinda like a fine couscous. You want the mixture to hold together,  but not to turn into hummus. 

Pour the mixture into a bowl and stir it with a fork. Up till this point can be made in advance, just keep the mixture in the refrigerator until ready to fry. Stir in the baking powder and baking soda. Use an ice cream scoop to help getting uniform sized falafel balls. I like mine round, but you can do yours any shape yo like.  

Fill a skillet with vegetable oil to 320-355℉ (160-180℃), I used about a quart (1 liter) this was enough so the falafels were able to be covered while frying. I tried to stay as close to 355℉ (180℃) without getting over that temperature.

Fry the falafels until dark golden, and cooked all the way through. If you make them oval or more flat, they will cook faster than a sphere. I cooked mine for about 3-5 minutes. Once the falafels are fried, remove them from the oil with a slotted spoon and let them drain on a paper towel. The falafels won't be dripping with fat, if the temperature are right. 

Serve the falafels freshly made and hot in pita bread with salad, tomato, hummus, tabouli and with a banana milkshake

Enjoy!

Roasted Garlic and Potato Soup

Appetizer, Dinner, SoupTove Balle-PedersenComment
Roasted Garlic and Potato Soup

Roasted Garlic and Potato Soup

Crispy brussels sprouts - who knew? I first had them New Year's Eve, when we dined at Manresa, a 2 stared Michelin restaurant, on opening night for Manresa after a dreadful fire in July 2014. The crispy brussels sprouts was served on top of a porcini mushroom dish. I really liked the texture and taste. So when I browsed for ideas for a garlic soup and stumbled upon this recipe for garlic-potato soup at the blog How sweet it is  with crispy brussels sprouts on top, I knew I had to try it. 

The soup was a hit in my house, and will be on the menu again soon. 

Served 6-8.

Ingredients:

  • 1 tablespoon olive oil

  • 1 tablespoon butter

  • 1 onion, diced

  • 3 pounds (1.3 kg) russet potatoes, peeled and diced

  • 5 cups (1.25 liter) chicken stock

  • 4 roasted garlic bulbs

  • 200 ml heavy whipping cream

  • salt & pepper to taste

Brussels sprouts crisps:

  • 10 brussels sprouts, clean outer layers only

  • 750 ml vegetables oil, for frying

  • salt and pepper for seasoning

Directions:

Heat oil and butter in a large pot. Cook onions until softened, about 5 minutes. Add the potatoes and enough stock to cover them - I used 5 cups (1.25 liter). Bring it to a simmer, put a lid on and cook until the potatoes are tender and starts to fall apart, about 20 minutes. 

Crispy brussels sprouts:

Remove the outer leaves from the brussels sprouts, carefully clean and dry them, set aside.

Heat vegetable oil to 325-350 ℉ (165-180℃) in a pot. (use a candy thermometer to measure the temperature.) Add the brussels sprouts leaves a few at a time and fry until crispy, about 1-2 minutes. Remove with a slotted spoon and place on a paper towel to drain. Sprinkle with salt and pepper.

Transfer the soup to a blender,* work in batches. Squeeze the roasted garlic cloves into the blender. Puree the soup until totally creamy and smooth. Return the soup to the pot and gently heat it with the cream. Season the soup with salt and pepper. 

Serve the soup in bowls with the crispy brussels spouts on top and sprinkled with red chili flakes.

Enjoy! 

*Be careful when blending hot liquids, it can make the lid pop off, and you may risk getting serious burns on you skin. You can remove the small cap on you blender lid and cover the lid with a clean kitchen towel. You need to hold on to the lid and towel. This will let the steam from the hot soup escape and avoid the lid from popping off. You can also get blenders like the Vitamix, where you can blend hot liquids, without any hassle.