Sweet • Sour • Savory

Food blog on scandinavian style food done right.

Hveder - Hvedeknopper

Bread, HolidayTove Balle-Pedersen1 Comment
Hveder - Hvedeknopper

Hveder - Hvedeknopper

Hveder, or hvedeknopper, is a white bread roll spiced with cardamom. It's an old tradition from 1686 to eat heated rolls the night before "Store Bededag" aka "Prayers day." Store Bededag is the fourth friday after Easter, this year it's May 16th.  Actually it's a consolidation of a bunch of prayer and pendance days. Everybody had the day off on Store Bededag even the bakers. You were actually meant to stop all work, play, travels and all games. To make up for not being able to get any fresh bread on Store Bededag, the bakers made an abundance of hvedeknopper (wheat rolls), to tie people over. And the tradition of eating the toasted hvedeknopper the night before Store Bededag was born. Ok people was meant to save the rolls to the next day, but who can resist a fresh-baked roll?

The tradition stayed but nowadays the day is one of days used for the confirmation of the young people in the church - a big day for family parties.

Makes 18-20 hvedeknopper

Ingredients:

  • 50 g confectionary sugar

  • 10 g salt

  • 50 g live yeast (4 teaspoon dry yeast)

  • 1 egg

  • 75 g butter, room temperature

  • 5-10 g cardamom

  • 2½ dl (1 cup +1tablespoon) water, finger-warm

  • 550-600 g all-purpose flour

Directions:

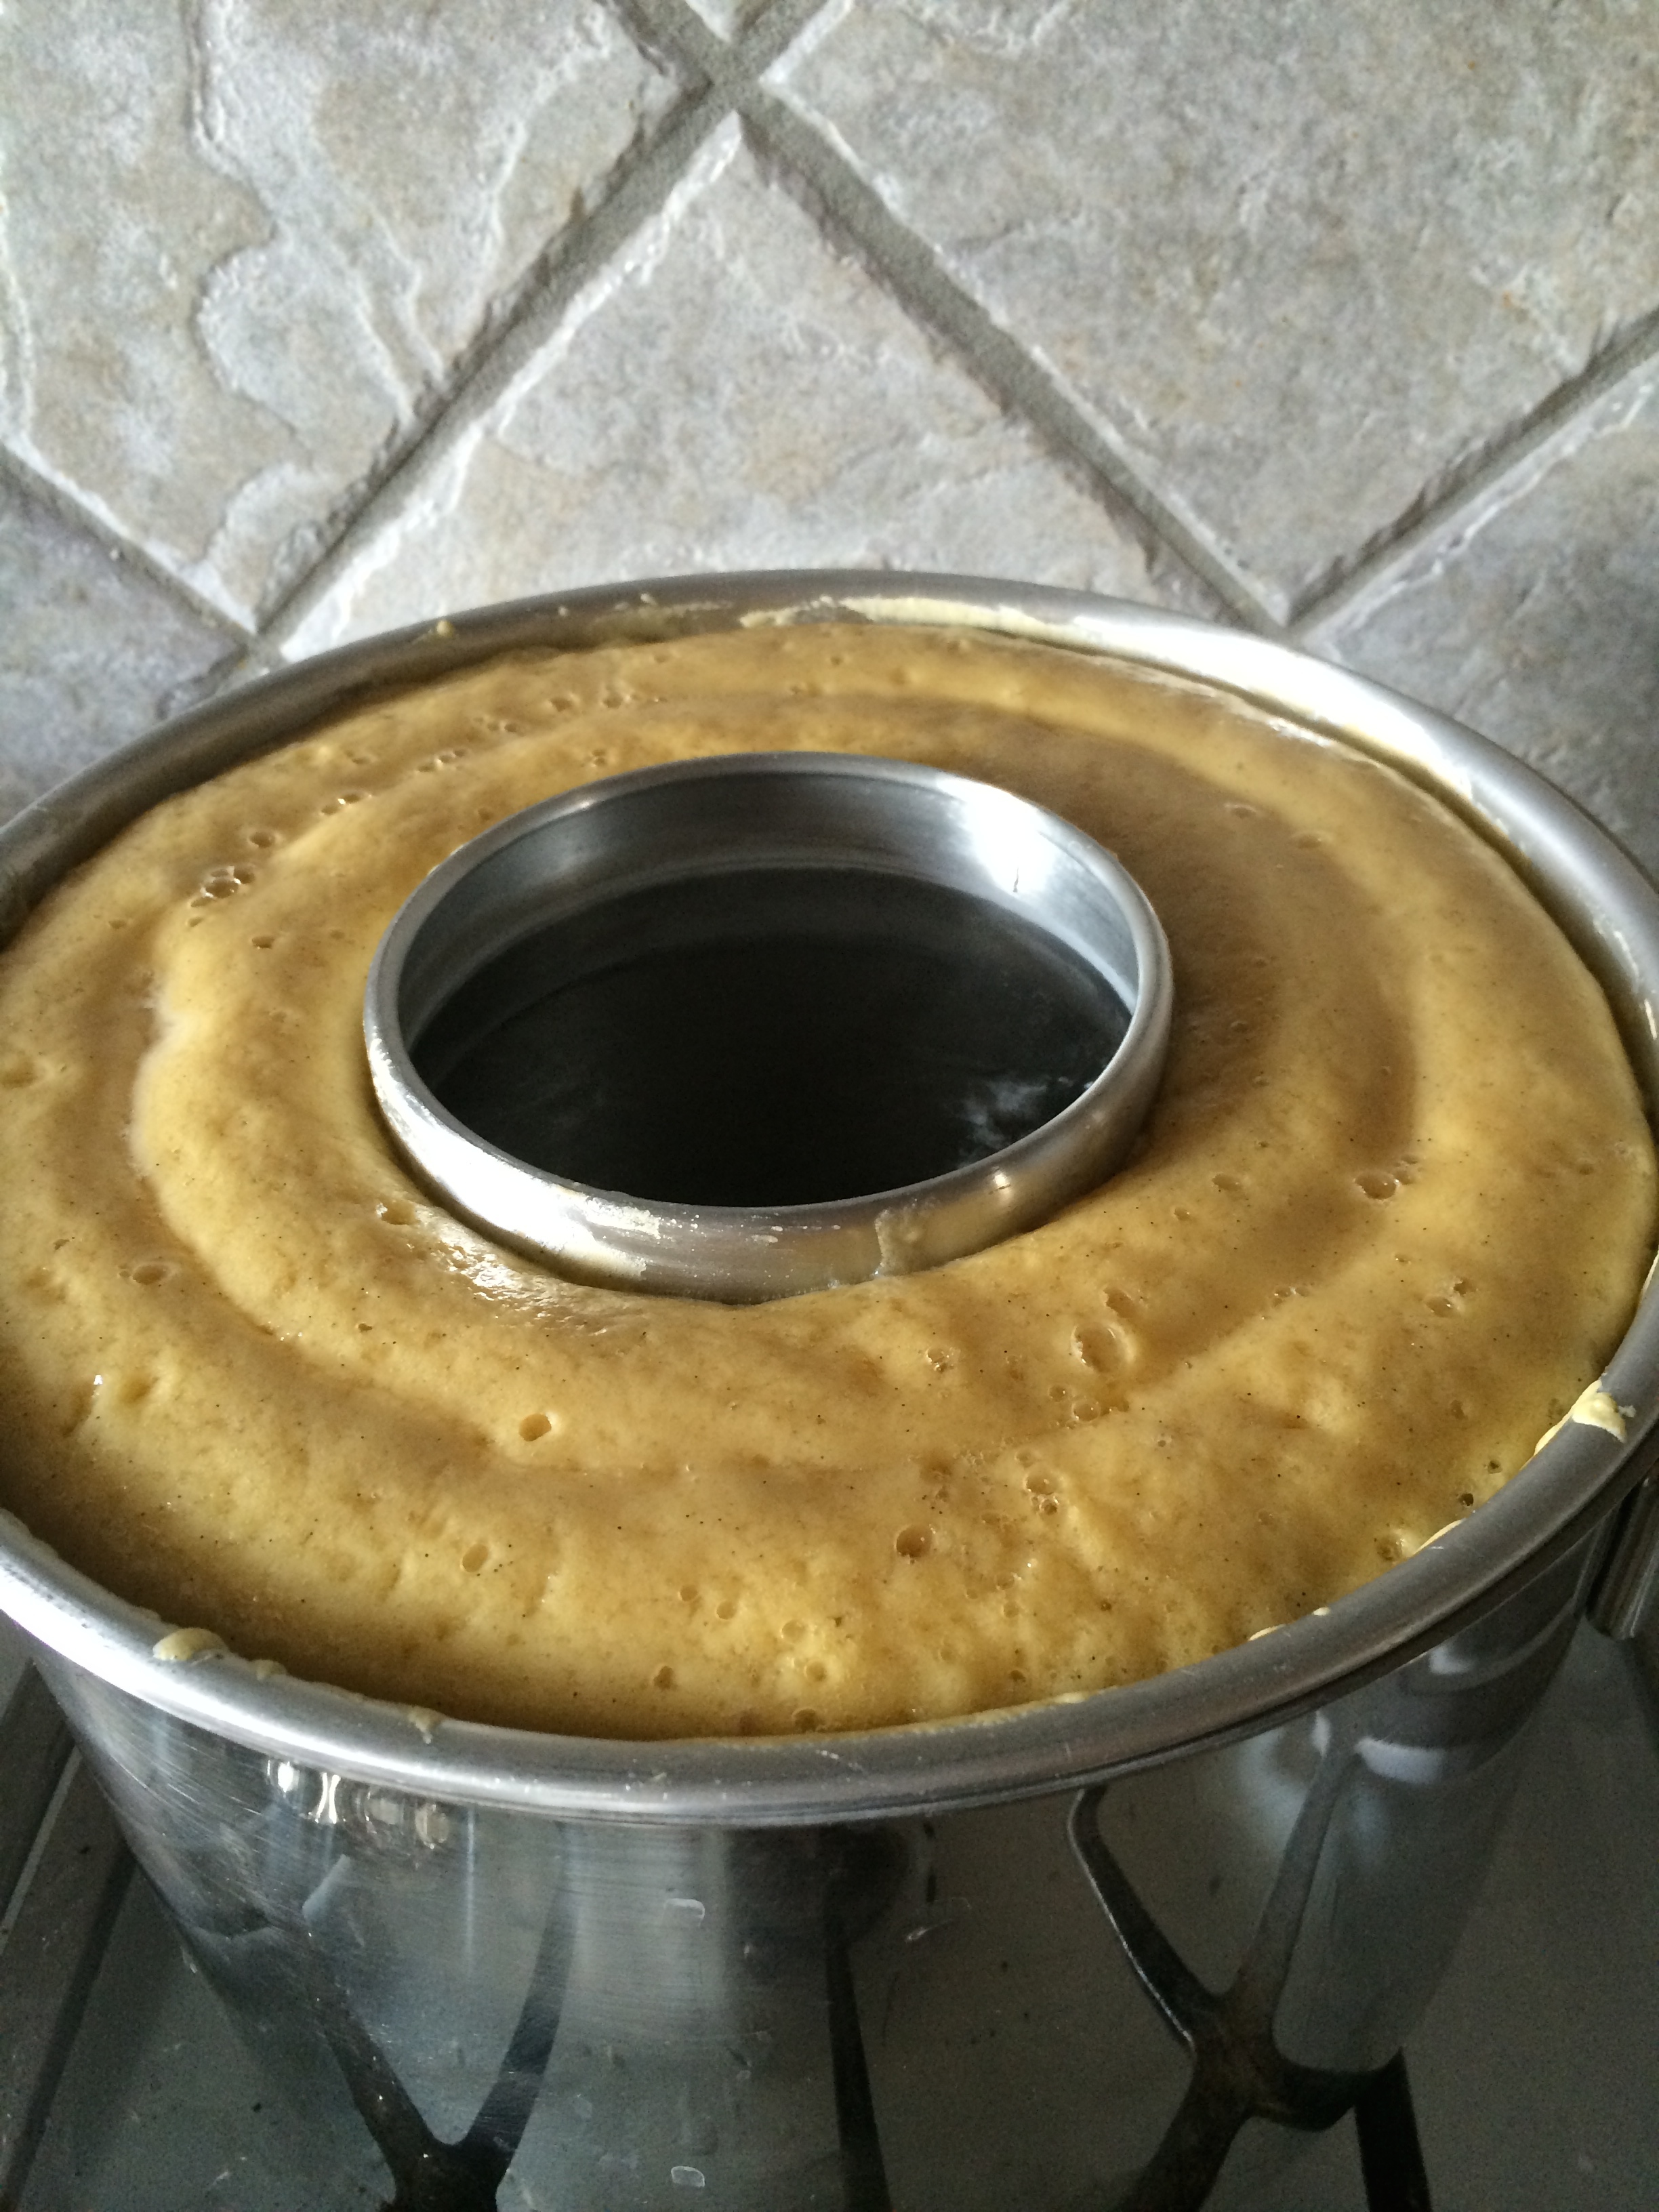
In a large bowl dissolve the yeast in the water. (Add a teaspoon sugar if you are using dry yeast, and wait until it starts to foam.) Mix in the butter, sugar and egg. Add salt and cardamom to a small part of the flour, and add that to the water-mixture. Add the flour a little at a time, until you have a soft dough. You might not need it all. Knead the dough for about 7-10 minutes until the dough is shinny and elastic. Let the dough rise covered for about 20 minutes.  

Hveder - Hvedeknopper

Hveder - Hvedeknopper

Pour the dough onto a lightly floured workspace, fold the dough over 3-4 times and divide the dough into 18-20 small balls. Place the balls only about 1 cm (about ⅓-½ inch) apart on a parchment paper lined baking sheet. Cover the dough balls with a dampen kitchen towel, and let them rise for another 60 minutes. They are meant to grow into each other, you want the soft sides on your rolls, when you pull them apart.

Preheat the oven for 400℉ (200℃).

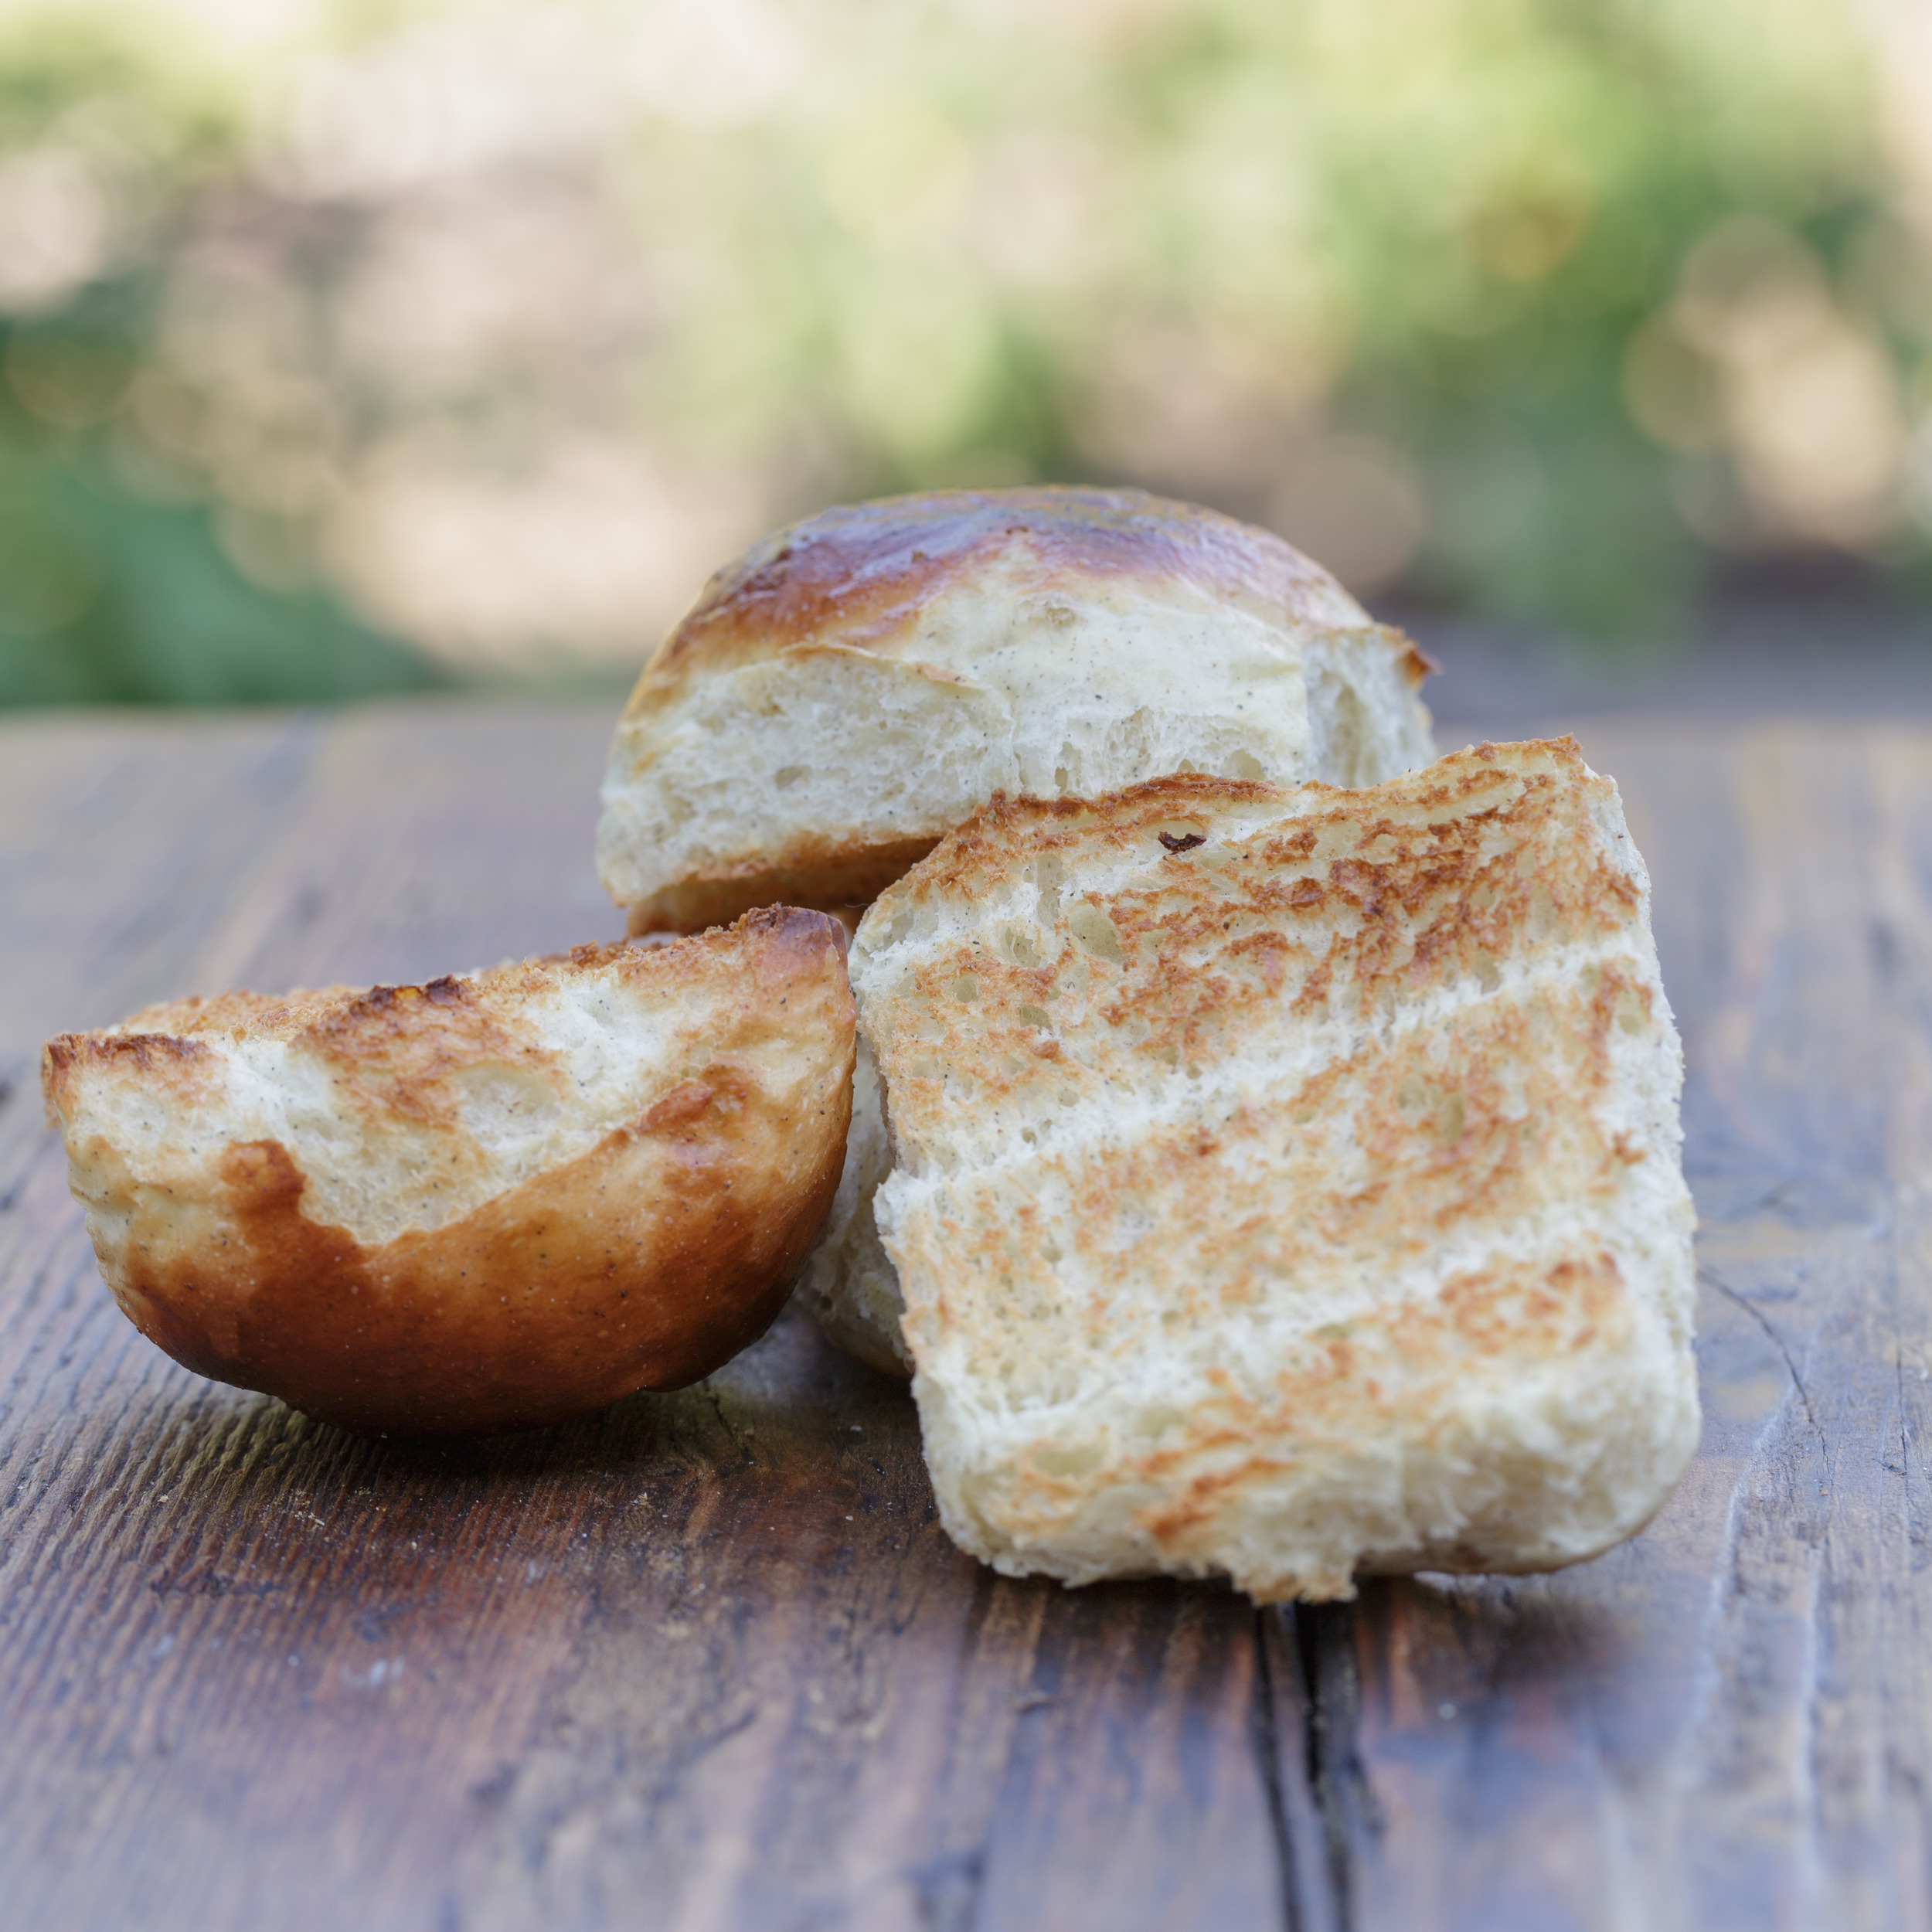
Bake the hvedeknopper/rolls for 15-20 minutes until they are dark golden brown. Let them cool on a wire rack.

Before serving, cut them in half and toast them. Serve them hot with butter and jam or with a good cheese.

Enjoy!


The Danish version:

Hveder - Hvedeknopper

18-20 stk.

Ingredienser:

  • 50 g flormelis

  • 10 g salt

  • 50 g gær (4 tsk tørgær/11,8 g)

  • 1 æg

  • 75 g smør

  • 5-10 g kardemomme

  • 2 ½ dl lunkent vand

  • 550-600 g mel

Fremgangsmåde:

Opløs gæren i vandet. Hvis du bruger tørgær, kom en smule sukker i vandet og vent et par minutter indtil gæren skummer. Tilsæt smør, flormelis og æg, og rør det sammen til det er blandet godt sammen. Bland kardemomme og salt i lidt af melet og tilsæt det til vandet. Tilsæt resten af melet lidt ad gangen og ælt dejen indtil den er blank og elastisk, ca. 6-10 minutter. Lad dejen hæve tildækket et lunt sted ca i 20 minutter.

Form 20 boller som sættes tæt på en bageplade med ca. 1 cm afstand. Læg et fugtigt viskestykke over og lad dem efterhæve i ca 1 time. Bag hvederne ved 200℃ i omkring 15-20 minutter, indtil de er mørk gyldne. Lad hvederne køle af på bagerist.

Før serveringen flæk hvederne og rist dem i en brødrister eller i ovnen med skærefladen opad ved 230 grader i ca. 5 minutter.

Server hvederne med koldt smør og marmelade eller en god ost.

Velbekomme!

Source: Lagkagehuset

Rhubarb Crumble with Liquorice Marzipan

Cake, Desserts, LiquoriceTove Balle-PedersenComment
Rhubarb Crumble with Liquorice Marzipan

Rhubarb Crumble with Liquorice Marzipan

I was told to make more recipes with rhubarb, and of course I complied. This one is for you Vibs.

Ingredients:

Crumble:

  • 75 g brown sugar
  • 40 g all-purpose flour
  • 40 g rolled oats
  • slivered almonds
  • 60 g butter, salted, and chilled
  • ¼ teaspoon fine liquorice powder

Directions:

Preheat oven to 425℉ (220℃). 

Wash and slice the rhubarb and mix them with sugar, cornstarch and liquorice powder. Set aside while making the crumble. 

Mix brown sugar, flour, oats and liquorice in large bowl. Add chilled butter, using your fingers, blend butter into mixture until coarse crumbs form, then mix in the almonds. 

Divide rhubarb mixture among 3-4 ramekins. Sprinkle the liquorice marzipan on top of the rhubarb. Divide oat mixture among dishes, sprinkling it evenly.

Place ramekins on a parchment paper lined baking sheet. Bake for 10 minutes. Reduce oven temperature to 350℉ (175℃), and continue baking until the crisp topping is golden brown and rhubarb filling is bubbling at edges, about 15-20 minutes longer. Let the crumbles cool for a while before serving.

Serve crumbles with a scoop of vanilla ice cream or some cream fraiche.

Enjoy!

The Danish version:

Rababercrumble med lakridsmarcipan

Ingredienser:

Crumble:

  • 75 g brun farin
  • 40 g hvedemel
  • 40 g havregryn
  • mandelflager
  • 60 g koldt smør, saltet
  • ¼ tsk fine liquorice powder

Fremgangsmåde:

Opvarm ovnen til 220℃. 

Vask og skær rabarber i små stykker, og bland dem med sukker, maizena og lakrid pulver. Sæt til side, mens crumblen laves.

Bland brun farin, hvedemel, havregryn og lakrid i en stor skål. Tilføj smørret,og brug fingrene til at smuldre smøret i blandingen. Bland mandlerne i tilsidst. 

Fordel rabarberne i 3-4 ramekiner, drys lakridsmarzipan ovenpå. Fordel havregrynsblandingen i et jævnt lag over rabarberne.

Placer ramekinerne på en bageplade med bagepapir. Bag kagerne i 10 minutter. Reducer herefter ovntemperaturen til 175℃, og fortsæt bagningen indtil de er gyldent brune og rabarberblandingen bobler i kanten, ca 15-20 længere. Lad crumblen køle et godt stykke tid før servering.

Server crumblen med en kugle vanilleis eller cream fraiche.

Velbekomme!

Roasted Cauliflower

Dinner, Sides, VegetablesTove Balle-Pedersen1 Comment
Roasted Cauliflower

Roasted Cauliflower

One of my favorite vegetables is cauliflower. It's very versatile, I use it as rice, raw in salads, boiled, roasted, everything goes with Cauliflower. 

These roasted cauliflower florets are a perfect side for a roasted chicken. 

Ingredients:

  • 1 medium cauliflower, cut into florets
  • olive oil
  • 1 teaspoon lemon pepper
  • ½ teaspoon cumin
  • salt
  • shaved parmesan 
  • (capers)

Directions:

Preheat the oven to 475℉ (250℃).

Place the cauliflower florets on a baking sheet. Drizzle the cauliflower with olive oil, and season with the lemon pepper, cumin and salt. Place baking sheet in the oven and cook for 18-25 minutes, stirring occasionally to ensure even roasting. I like a good caramelization on the cauliflower, so I put them in the oven before the oven is preheated all the way.

Remove cauliflower from the oven and sprinkle with the Parmesan and some capers (if you have some). Serve immediately while still warm.

Enjoy!


The Danish Version:

Ristet Blomkål

Ingredienser:

  • 1 medium blomkål, skåret i buketter
  • olivenolie
  • 1 tsk citronpeber
  • ½ tsk spidskommen
  • salt
  • høvlet parmesan 
  • kapers

Fremgangsmåde:

Varm ovnen op til 250℃.

Kom blomkålsbuketterne i et ovnfast fad i ét lag, eller læg dem spredt på en bareplade. Hæld olivenolien henover. Drys citronpeber, spidskommen of salt på, og vend det hele rundt så alle buketterne er dækkede. (dette kan også gøres i en frysepose før man kommer blomkålen i fadet/på pladen.

Kom blomkålen i ovnen og bag dem i ca 18-25 minutter, vend dem rundt undervejs, så de får en jævn farve. 

Tag blomkålen ud af ovnen og kom parmesan og kapers (hvis du har nogle) henover, og server den straks.

Velbekomme.

Boil cake - No-bake cake

CakeTove Balle-PedersenComment
Boil cake - No-bake cake

Boil cake - No-bake cake

Boil a cake - it sound crazy. But my mom boiled this cake all through my childhood. In my school we had a class-gathering in the classroom the last day before our christmas- and summer break. We all had to bring some kind of snack, and I always brought this Boil cake. 

Actually it's just at pound cake "baked" in a French Savarin Pan floating in a big pot of soft simmering water. It is a bit tricky to make, because if any water get into the batter the cake is ruined. But when you get the hang of it, the result is a very juicy and soft cake without any dark brown caramelization. My mom topped the cake with an icing made from confectionary sugar, orange juice and orange zest. 

Ingredient: 

  • 200 g Butter (salted and soft)

  • 150 g sugar

  • 2 teaspoon vanilla paste

  • 4 eggs

  • 200 g all-purpose flour

  • 1 teaspoon baking powder

Icing: 

  • confectionary sugar

  • 1 orange (some of the juice and zest)

Directions: 

Fill a large pot with water and bring it to a simmer. The French Savarin pan should be able to float freely in the pot. Well, my pot was not large enough, but it works anyway.

In a large mixing bowl, cream the butter and sugar until very light and fluffy, mix in the vanilla paste. Add the eggs one at a time, and mix just until fully incorporated. Fold in the dry ingredients. 

Boiling of the cake.

Boiling of the cake.

Pour the batter into the Pan.

Place the pan in the pot and DO NOT put a lid on. The condensation will drip into the batter and ruin the cake. 

Boil the cake for about 50-60 minutes until a cake tester comes out clean.

Remove the pan from the water, and let the cake cool somewhat before removing it from the pan. 

Mix confectionary sugar with orange zest, and just enough juice to make a paste. Pour the icing over the cake.

Enjoy!


The Danish version:

Kogekage

Ingredienser:

  • 200 g smør (saltet of stuetemperatur)

  • 150 g sukker

  • 2 tsk vanilla paste eller kornene fra en vanillestang

  • 4 æg

  • 200 g hvedemel

  • 1 tsk bagepulver

Glasur: 

  • flormelis

  • 1 appelsin (skallen og noget af saften)

Fremgangsmåde:

Fyld en stor bred gryde med vand, og varm det op til det næsten koger. Gryden skal være så stor, at en randform kan flyde i gryden. Ok, min randform hviler på kanten, hvilket virker fint.

Rør smør og sukker sammen til det er blegt og skummende. Tilsæt æggene et ad gangen og derefter vanillien. Bland bagepulveret med melet og kom det i dejen. Fordel dejen i formen og kom formen over i gryden. Pas på at der ikke kommer vand ned i formen, for så er kagen ødelagt. Der skal IKKE låg på gryden, da kondensen vil gøre kagen meget svampet, hvilet ikke er rart.

Kog kagen i 50-60 minutter til kagen er færdig, og der ikke hænger noget ved, når du stikker en nål i kagen. 

Fjern kagen fra gryden og lad den køle lidt af inden du vender kagen ud af formen.

Lav glasuren af appelsinsaft, flormelis og revet appelsinskal, og kom den over den afkølede kage.

Velbekomme! 


Maple Plank Salmon

Dinner, Fish & seafood, BBQTove Balle-PedersenComment
Maple Plank Salmon

Maple Plank Salmon

Have you ever grilled salmon on a plank? It's actually really easy, and it brings a lot of great flavor to the salmon. The most important thing is to soak the plank for one or two hours before grilling. You can soak the plank in water, cider, or even wine. 😃

I have had planks lying in the my kitchen cabinets for a very long time, I've totally forgot all about them. But on my last few runs to Whole Foods Market, I've wanted to try their Cedar Plank Salmon. But I opted to try making my own, Hawaiian inspired salmon.

Here is my take.

Serves 2-3 people

Ingredients:

  • 1 food-safe maple plank (you can use any kind of food-safe planks)
  • 1 salmon fillet, or 2-3 portion sized
  • salt & white pepper
  • lemon juice

Topping:

  • 2 thin slices fresh pineapple, finely chopped
  • 1 teaspoon lemon curd
  • ½ jalapeño, minced
  • 1 teaspoon lemon juice
  • ¼ cup macadamia nuts
  • salt & white pepper
  • sprinkle of red pepper flakes

Directions:

Soak the plank in water for about two hours, making sure that it stay submerged.

Abut 15 minutes before you are ready to cook, preheat the grill/BBQ to 375-400℉ (190-200℃). You want to cook the salmon over direct heat.

Maple Plank Salmon ready for the grill/BBQ

Maple Plank Salmon ready for the grill/BBQ

Remove skin and bones from the fillet. You can let the skin stay on the fish, but I always remove it.
Drip some lemon juice over the fish, and season it with salt and white pepper. Place the fillet on the plank, and make the topping. If the filet has a thin tapered belly edge, tuck the edge under to get a more even thickness of the filet. This prevent the thin part to overcook. 

Mix the topping and spread it evenly over the fillet.

Cook for about 12-18 minutes with the lid closed, until the salmon is done (when the salmon is no longer translucent but uniformly pink in the center. Small fillets will cook more quickly than larger cuts. 

(Check the doneness by inserting a knife in the center and peek inside.)

You can reuse the planks until they become overly charred, cracked, or impossible to clean. 

Enjoy!