Sweet • Sour • Savory

Food blog on scandinavian style food done right.

Sauce,Vegetables

Ratatouille

Dinner, Sides, vegan, Vegetables, VegetarianTove Balle-Pedersen2 Comments

Ratatouille.

Ratatouille is a French vegetable stew. Back in the days it was characterized as peasant food, because vegetables were cheap.

In this version the vegetables are thinly sliced, and arranged nicely in the tomato sauce. I looks like it takes forever, but if you slice all the vegetables first, it only takes a few minutes, and looks like a million dollars.

We often have ratatouille as a side dish or served with rice and a slice of some good bread. Sprinkle some fresh shaved parmesan cheese on the ratatouille as you serve it, and it takes it over the top. Another advantage by cooking it like this is, that you get some nice caramelization of the vegetables, which gives added flavor to the dish.
Pick good quality vegetables, because this is a rather simple dish, and the vegetables are the stars, so the better the vegetables the better the dish. I normally use canned tomatoes for the sauce, but you can easily substitute it with crushed fresh tomatoes, it might even be better.

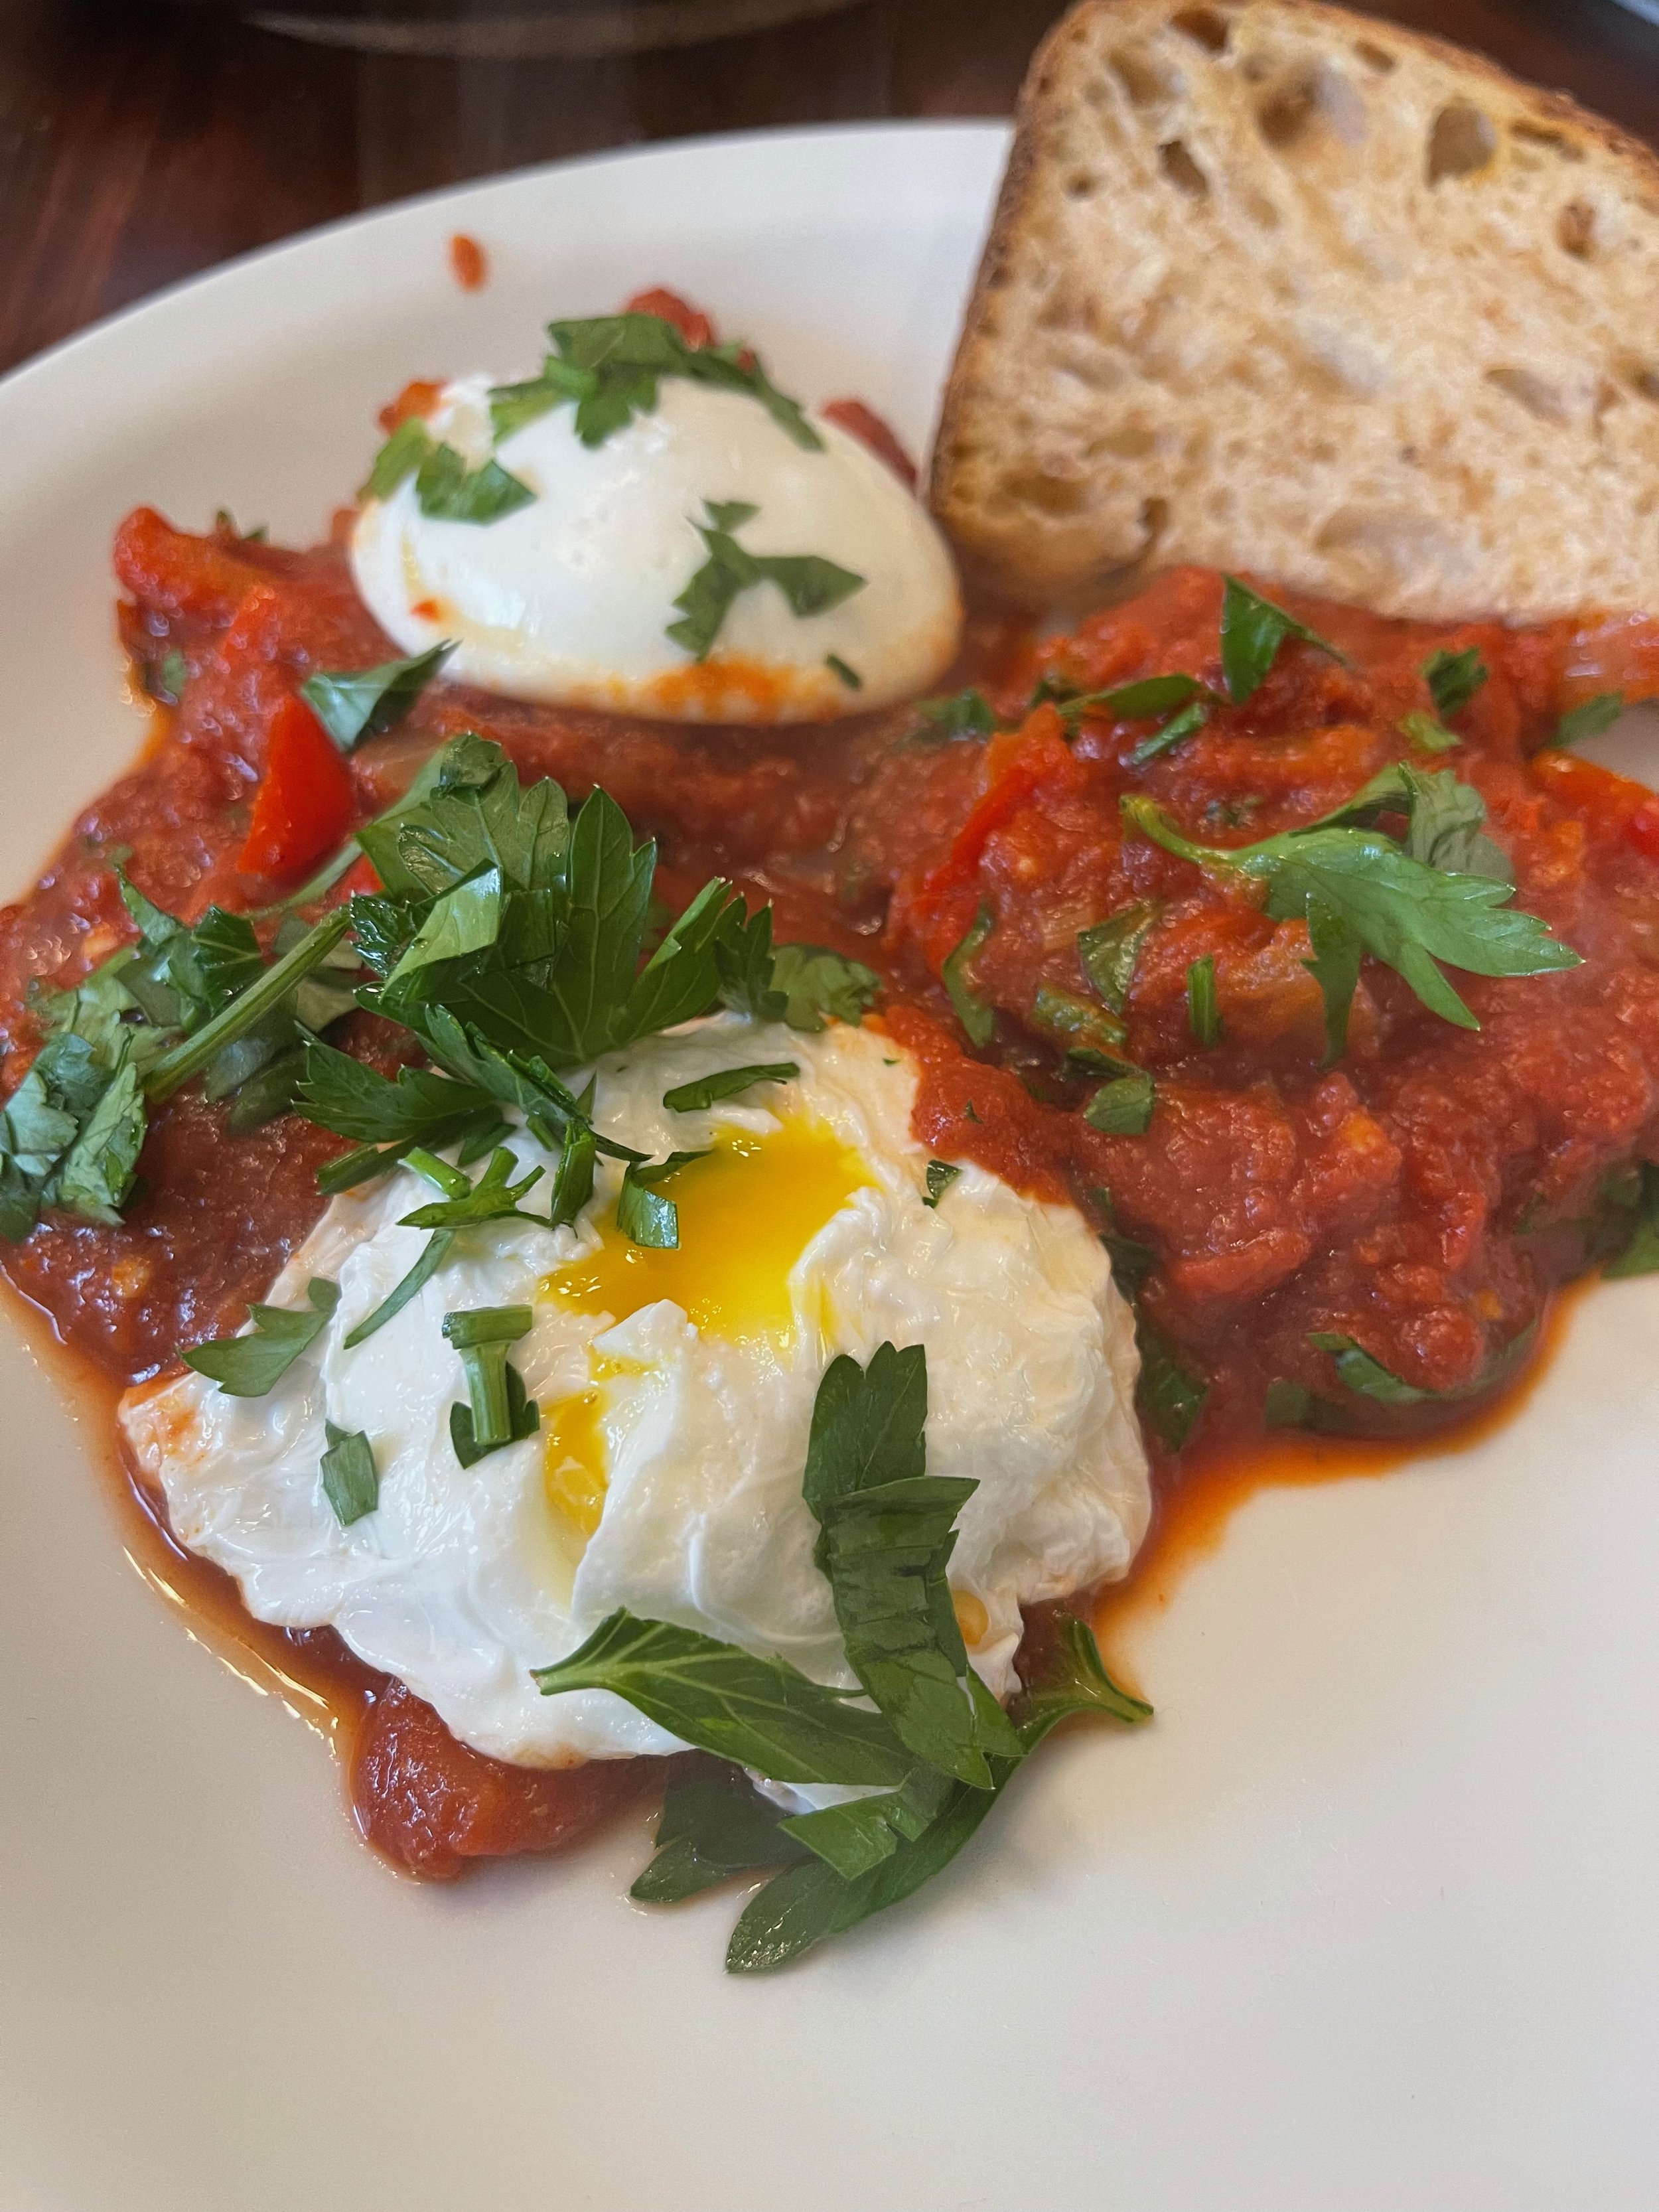
Leftovers will keep a day or two in the refrigerator, and are fantastic as breakfast with a poached egg, kinda like a Shakshuka.


Serves 3-4 as a side

Ingredients:

  • 1 can crushed tomatoes

  • 1 tablespoon extra virgin olive oil

  • ¼ teaspoon apple cider vinegar

  • 2 cloves garlic, minced

  • 1 tablespoon fresh basil, about 3-4 large leaves, sliced

  • 1 teaspoon herbs de Provence spice mix

  • ¼ teaspoon salt

  • ¼ teaspoon freshly grounded black pepper

  • ¼ teaspoon chili powder

  • 1 medium red onion, thinly sliced

  • 1-2 large zucchini, I used both summer squash and zucchini

  • 1 Japanese eggplant, or regular eggplant, with quartered slices

  • 3-4 large fresh tomatoes, sliced

  • 2-3 small bell peppers, sliced

Instructions:

Preheat oven to 350℉ (180℃). Lightly grease a 9" baking dish and set aside. I used a round dish here, but any ovenproof dish will do.

In a mixing bowl, combine the crushed tomatoes, oil and vinegar, and stir in salt and the other spices.

Pour the tomato mixture into the prepared baking dish in an even layer..

Ratatouille ready to serve.

Stack the veggie slices in alternating patters, you don't have to go all OCD on this, it will be pretty no matter how you do this. The most important thing is to spread the onions around, so it spreads its flavor throughout.

Sprinkle a little olive oil on top to encourage the caramelization of the vegetables.

Bake for about an hour, until the tomato sauce is bubbling and the veggies are tender, but not mushy.

Serve the ratatouille hot or warm.

Enjoy!

Shakshuka a la the Danes

Breakfast, Brunch, Vegetables, VegetarianTove Balle-PedersenComment

Shakshuka a la the Danes

Shakshuka is a spicy sauce of tomatoes and other vegetables with poached eggs originating from North Africa, Tunisia. I first had it at a humus place, and remember it as kinda bland. But I liked the idea of the dish, and my version of the dish is not even close to bland. After serving this to my husband, it went into his top of breakfast dishes. I poach the eggs separately, so I can make a large pot of the sauce, even adding whatever vegetables I have on hand, and freeze it in smaller portions. By doing this Shakshuka becomes a quick breakfast, just heating the sauce, and poaching the eggs.

Serves 2-3.

Ingredients:

  • 1 onion, diced

  • 1 red bell pepper, diced

  • 2 garlic clove, minced

  • 1 can diced tomatoes

  • 1½ teaspoon cumin

  • ¼ teaspoon cayenne pepper or red chili flakes

  • 1 teaspoon paprika (½ mild and ½ smoked)

  • salt, to taste

Topping

Directions:

In a deep frying pan, heat the oil and cook the onion and bell pepper for around 5 minutes, until the onion is translucent. Stir in the spices and garlic and cook for a couple more minutes. Add the tomatoes and season with salt and pepper to taste. Let the sauce simmer gently for 15 minutes, letting the sauce thicken a bit.

(For the traditional shakshuka make up 4 hollows in the sauce, and crack an egg in each one, cover the pan with a lid and cook for another 5-8 minutes until the desired doneness of the eggs.)

I make poached eggs and serve them on top, because I think it’s easier to control.

Now, with a large spoon, make four hollows at the points of the compass in the mixture.

Just before serving place the poached eggs on top, and sprinkle with chopped chili and parsley.

Serve the dish immediately with a slice of good bread, preferably toasted.

Enjoy!

Hasselback Potatoes

Dinner, Holiday, VegetablesTove Balle-PedersenComment
071630C5-B4AB-4616-82B4-83F26B0A4DD5.jpeg

Hasselback potatoes is a Swedish dish invented in the 1950’s created at the Hasselbacken restaurant in Stockholm. And they were very popular during the 70’s and 80’s, but do no deserve to be forgotten. Personally i love them for their crispy outer and creamy center.

Normally I won’t add any flavors to the butter, but fresh herbs like rosemary and thyme goes really well with the potatoes, as do garlic. If you like another flavor profile, you can use other types of fat or oil, like olive oil and duck fat.

Serves 3-4 depending on the size of the potatoes.

Ingredients:

8-10 potatoes, the size of a golf ball, I used Yukon Gold potatoes

60 g salted butter (About ½ stick)

salt

Direction:

7B48BC0D-9765-429A-8C3D-1445CAE86953.jpeg

Preheat the oven to 400℉ (200℃), and line a large rimmed baking sheet with parchment paper, set a side.
Place a potato up against a handle of a wooden spoon. Slice the potato into thin slices, not cutting all the way through. The handle of the spoon helps you not slicing the whole way through. Repeat with the remaining potatoes.

Place the potatoes on the baking sheet and brush them with the melted butter, making sure to get in between all the slices. Sprinkle with salt. Bake potatoes for about 55 to 60 minutes, brush the potatoes with more butter every 20 minutes. Bake until crisp and tender.

Serve them as a side.

Enjoy!

Preserved Cherries - Syltede Kirsebær

Preserve, Sauce, JamTove Balle-PedersenComment
Preserved Cherries, here on some Risalamande.

Preserved Cherries, here on some Risalamande.

2020 has been a strange year, we all had to adapt and have to live without a lot of things we take for granted. A lot of parties and gatherings were canceled, friends and loved ones we couldn’t hug. Personally I was going to have a big party for my fiftieth birthday, with friends and families from Denmark coming here to celebrate. I don’t think I have to tell, that didn’t happen. I hope to postpone the party, and I’ll stay 49 until that happens.

I think 2020 also became the year, a lot of people learned to bake sourdough bread, that is one of the good things to come out of the pandemic.

Now we are getting close to my favorite time of the year - Christmas. I love all the lights and decorations, all the treats and cookies. I hope this holiday season will bring you a lot of joy too, even though we have to do some thing’s differently, let’s make this December extra special.

On this first Sunday in Advent I want to share these preserved cherries with you.

Growing up I was accustomed to my moms homemade everything. But even she slacked and started buying things, to make her life easier. But some tings remain in your memory as the best and real taste of something. Preserved cherries comes to mind. We had a cherry tree in our allotment (kolonihave), filled with dark tart cherries. Cherries you wouldn’t steal of the tree as a kid, or you would only do it once. But my mom made the best preserved cherries, perfect for the traditional Danish Christmas dessert Risalamande. She even cracked the pits from the cherries and put the kernels in the preserving syrup, giving it a strong almond taste. This was the real taste of Christmas. And this was the taste I rediscovered after making these preserved cherries for the very first time.

Makes 4 jars.

Ingredients:

  • 680 g pitted tart cherries, I used frozen

  • 525 g sugar

  • 50 ml water

  • 50 ml amaretto liquor

  • 40 ml vinegar

  • 1 vanilla bean

Directions:

Split open the vanilla bean and scrape the seeds out. Spread the seeds in some of the sugar, this helps with distribution of the seeds.

In a large pot add water, sugar, vinegar, amaretto, vanilla bean (seeds and pod), cherries, and warm it up slowly until it starts to boil lightly. Remove pot from the heat, and set it aside to cool and marinate for a few hours.

Prepare the jars and lids, scolding them and swirl some 100 proof vodka in them, set aside.

Bring the cherries to a boil, remove from heat, and bring them to a boil again, do that one more time, and scoop the cherries into the 4 prepared jars. Bring the liquid to a boil again, and let it boil and reduce for 5-7 minutes, before pouring over the cherries. Close jars and let then cool. Clean the outside of the jars and place them in a cool and dark place for about 20-30 days fore serving.

The preserved cherries will keep 3-5 months in a cool dark place and about 20 days opened.

Serve the prepared cherries on Risalamande, ice cream or other desserts or cakes. The syrup taste fantastic diluted with water or in drinks.

Enjoy!

Spinach and Feta Pie a la Spanakopita

Lunch, Sides, Vegetables, Vegetarian, DinnerTove Balle-PedersenComment
Spinach and Feta Pie a la Spanakopita

Spinach and Feta Pie a la Spanakopita

This is a simplification of the traditional Greek Spanakopita, a spinach feta pie or hand pie. It’s perfect for a lunch or light dinner. The crispness of the filo dough with the soft creamy filling is a great combination. An absolute favorite in my house.

Serves 4,

Ingredients:

  • 100 g pine nuts, dry roasted

  • 400 g baby spinach

  • olive oil for sautéing the spinach

  • 5 eggs

  • 275 g feta cheese, crumbled

  • 1 lemon, the zest of

  • 1 pinch of cayenne pepper

  • 9-10 sheets of filo dough (Store bought) defrosted according to instruction on packaging

  • ~50 g melted butter for brushing the filo dough

Directions:

Preheat the oven for the 400℉ (200℃).

Take out a 10-inch skillet, and sauté the spinach over medium heat until it is all wilted, take off the heat.

Mix eggs, feta cheese, pine nuts, lemon zest, and cayenne. When the spinach is cooled a bit, add it to the egg mixture. Dry off the pan you used for the spinach, set aside.

Place the filo dough under a damp tea towel, this will help to keep the filo dough soft and workable.

Place a large piece of parchment paper on the kitchen counter. I crumble the parchment paper first, and straighten it out again, this way it’s easier for the parchment paper to fit in the skillet. Brush some melted butter on the parchment paper. Place 4 sheets of the filo dough on top of the parchment paper in a rectangle, you want them to overlap a bit. Gently brush with melted butter, and repeat with 3-4 more layers of filo dough. Carefully transfer the parchment paper with the filo dough into the skillet, so the dough is hanging out over the edges of the skillet. Pour in the egg mixture in an even layer. Gently fold the filo doughs edges in over the filling. Brush the edges with a little more butter, and bake the pie for 18-20 minutes until the dough is golden and crisp, and the filling is set.

Serve the pie warm with a simple salad on the side.

Enjoy!