Sweet • Sour • Savory

Food blog on scandinavian style food done right.

Breakfast

Easy Sourdough bread

Bread, Breakfast, BrunchTove Balle-PedersenComment
Easy Sourdough bread

Easy Sourdough bread

My favorite sourdough bread is the Basic Country Bread a la Tartine, but It is time consuming. I have been trying to make a cheat version, with the same good result. This is the closest I have been able to get to it. And I’m very satisfied with the result.


Makes 2 loafs.

Ingredients:

Leaven:

  • 3 tablespoons (55 g) sourdough starter

  • 150 g water

  • 140 g all-purpose flour

  • 25 g whole wheat flour

Bread:

  • 250 g leaven - save the rest as your new sourdough starter

  • 710 g water

  • 800 g all-purpose flour

  • 200 g whole wheat flour

  • 20 g salt

  • 50 g water

Directions:

Feed your starter the night before you want to bake.

Day 1 morning

Mix the ingredients in a medium bowl, and let it sit covered on the kitchen counter for 7-8 hours. To test leaven's readiness, drop a spoonful into a bowl of room-temperature water. If it sinks, it is not ready and needs more time to ferment and ripen. If it floats, it's ready to use.

Save your leftover leaven.  It will be your starter/sourdogh for next time you bake. Read here how to feed and keep a sourdough starter.

Mixing the dough - 5pm day 1

Pour the warm water into a the bowl for your stand mixer, adding leaven, stir to disperse. Add flours and mix dough until no dry flour remain. Let rest covered for about 30 minutes. Add salt and remaining 50 grams warm water, and head the dough for about 5-6 minutes. Transfer the dough to a medium plastic container or a glass bowl. Cover with lid or kitchen towel. (I use a dough-rising bucket like this. Let the dough rise for about 2-3 hours.

Shaping the dough - 8-9 pm day 1

Gently pull the dough out of container, onto an un-floured surface, using a dough spatula. Lightly flour the top of the dough and use a bench knife to cut the dough into 2 equal pieces. As you cut the first piece, use the bench knife to flip it over, so the floured side now rest on the work surface. Do the same with the second piece of dough.

While working with the dough you want to incorporate as little flour as possible. Work each piece into a round using scraper and one hand. Tension will build as the dough slightly anchors to the surface as you rotate it. By the end, the dough should have a taut, smooth surface. Dust tops off rounds with flour, cover with a tea towel, and let rest on the work surface for 20 to 30 minutes.

The final shaping:

To form the loaf's, carefully turn the dough onto a lightly floured surface with the floured side down, using the bench knife. Now the underside is facing up. Be careful not to deflate the dough. This final shaping builds up tension inside each loaf, so it holds its form and rises substantially when baked. This is called "oven spring."

Fold the third of the dough closest to you up and over the middle third of the round. Stretch out the dough horizontally to your right and fold this right third over the center. Stretch the dough to your left and fold this third over the previous fold. You are now starting to get a neat package. Stretch out the third of the dough farthest from you and fold this flap toward you, over the previous folds, and anchor it in place with your fingers. Then grab the dough nearest to you and wrap it up and over, while rolling the whole package away from you, that the smooth underside of the loaf now is on the top and all the seams are on the bottom. Let the shaped loaf rest on the counter for a minute. Fold the other loaf the same way.

Line two baskets with clean tea towels generously dusted with rice flour. These bowls will hold the fermenting dough overnight in the fridge to proof. Using the dough scraper, transfer each round to a basket, smooth side down, with seam centered and facing up. Cover the dough loosely with tea towel, and place it in a large ziplock bag - do not close the bag. Let the dough rest in the refrigerator overnight.

Baking the Bread - day 2.

Pull the loves out of the refrigerator, removing the bowls from the ziplock bag. Let the bowls on the kitchen counter while you preheat the oven and dutch/French oven to 500℉ (260℃), with rack in lowest position.

Flip one bread into hot dutch/french oven. Score top twice using a razor blade matfer lame. Cover with lid. Return to oven, and reduce oven temperature to 450℉ (232℃). Bake for 20 minutes.

Carefully remove lid and continue to bake until crust is deep golden brown, 20 to 25 minutes more.

Transfer loaf to a wire rack. It will feel light and sound hollow when tapped. Mix the topping and spread it on top of the hot crust, then let the loaf cool. Letting the bread cool, is the hardest thing.

To bake the second loaf, raise oven temperature to 500℉ (260℃), wipe out dutch/French oven with a dry kitchen towel, and reheat with lid for about 10-20 minutes.

Enjoy!

Sourdough Bread with Olives

Bread, Breakfast, BrunchTove Balle-PedersenComment
Sourdough Bread with Olives

Sourdough Bread with Olives

It’s no secret in my neighborhood that I love to bake. So now and then a neighbor nudge me to bake some bread. So in honor of my olive-loving neighbor, I tried a, for me, new filling for my sourdough breads - olives. Prior to this I’ve used artichoke/parmesan or walnuts with big success. So even though I still love the walnut one very much, the olive bread comes in as a very close second. It’s really good!!

But if you are the type of person that love nutella or pålægschokolade (thin slices of chocolate, used on bread in Denmark) this bread will not be the best option for you. But if you are a chocolate covered olives kind og guy - well go right ahead.. 😂

This bread is great to have with cheese, cold cuts, soups or simply with some butter.

Makes 2 breads.

Ingredients:

Leaven:

875E9078-62E1-43E4-89B2-E44B1C31D187_1_201_a.jpeg
  • 3 tablespoons sourdough starter (fed 8 hours prior)

  • 200 g water (78℉/25℃)

  • 100 g all-purpose flour

  • 100 g whole wheat flour

Bread dough:

  • 720 g water (80℉/27℃)

  • 250 g leaven

  • 800 g all-purpose flour

  • 200 g whole wheat flour

  • 20 g salt

  • 50 g water

Filling:

  • 375 g pitted olives, I used ⅓ green olives

  • zest of 2 lemons

Sprinkles:

  • rice flour

Directions

Prepare the Leaven - 8am day 1.

The man in the cup - testing the readiness of the leaven. Here you see it floating on the water.

The man in the cup - testing the readiness of the leaven. Here you see it floating on the water.

Mix the ingredients in a medium bowl, and let it sit covered on the kitchen counter for 7-8 hours. To test leaven's readiness, drop a spoonful into a bowl of room-temperature water. If it sinks, it is not ready and needs more time to ferment and ripen. If it floats, it's ready to use.

Save your leftover leaven.  It will be your starter/sourdogh for next time you bake. Read here how to feed and keep a sourdough starter.


Mixing the dough - 5pm day 1.

Pour the warm water into a large mixing bowl, adding leaven, stir to disperse. Add flours and mix dough with your hands until no dry flour remain. Let rest covered with a tea towel on the counter for about 30 minutes. Mix in salt and remaining 50 grams warm water with your hands. Transfer the dough to a medium plastic container or a glass bowl. Cover with lid or kitchen towel. (I use a dough-rising bucket like this.)

I use the folding technique from the basic country bread a la Tartine during the fermentation. Instead of kneading the dough, I stretch and fold the dough, by reaching my hand under the dough and pull one side up and over onto itself. This will help build up the gluten network. The rise is temperature sensitive. As a rule, warmer dough ferments faster. Robertson tries to maintain the dough at 78℉ to 82℉ to accomplish the bulk fermentation in 3 to 4 hours. I ferment my dough in my oven on the proof setting, 85℉/29.5℃. I add the filling during the folding, by adding a little at a time, so the distribution will be evenly.

Do the fold every 30 minutes during the 3 hours.


Shaping the dough - 8-9 pm day 1.

Gently pull the dough out of container, onto an un-floured surface, using a dough spatula. Lightly flour the top of the dough and use a bench knife to cut the dough into 2 equal pieces. As you cut the first piece, use the bench knife to flip it over, so the floured side now rest on the work surface. Do the same with the second piece of dough.

While working with the dough you want to incorporate as little flour as possible. Work each piece into a round using scraper and one hand. Tension will build as the dough slightly anchors to the surface as you rotate it. By the end, the dough should have a taut, smooth surface. Dust tops off rounds with flour, cover with a tea towel, and let rest on the work surface for 20 to 30 minutes. During this stage, (bench rest), each round will relax and spread into a thick pancake shape. The edges should appear fat and rounded, not flat or "dripping" off the edge. If the dough is flat or the dough is spreading too much, the dough has not developed a strong enough gluten network during the bulk fermentation. To correct this, shape the dough into a round for a second time and let it sit to rest covered once more.

The final shaping:

To form the loaf's, carefully turn the dough onto a lightly floured surface with the floured side down, using the bench knife. Now the underside is facing up. Be careful not to deflate the dough. This final shaping builds up tension inside each loaf, so it holds its form and rises substantially when baked. This is called "oven spring."

Fold the third of the dough closest to you up and over the middle third of the round. Stretch out the dough horizontally to your right and fold this right third over the center. Stretch the dough to your left and fold this third over the previous fold. You are now starting to get a neat package. Stretch out the third of the dough farthest from you and fold this flap toward you, over the previous folds, and anchor it in place with your fingers. Then grab the dough nearest to you and wrap it up and over, while rolling the whole package away from you, that the smooth underside of the loaf now is on the top and all the seams are on the bottom. Let the shaped loaf rest on the counter for a minute. Fold the other loaf the same way.

Line two baskets with clean tea towels generously dusted with rice flour. These bowls will hold the fermenting dough overnight in the fridge to proof. Using the dough scraper, transfer each round to a basket, smooth side down, with seam centered and facing up. Cover the dough loosely with tea towel, and place it in a large ziplock bag - do not close the bag. Let the dough rest in the refrigerator overnight.

Baking the Bread - day 2.

Pull the loves out of the refrigerator, removing the bowls from the ziplock bag. Let the bowls on the kitchen counter while you preheat the oven and dutch/French oven to 500℉ (260℃), with rack in lowest position.

Flip one bread into hot dutch/french oven. Score top twice using a razor blade matfer lame. Cover with lid. Return to oven, and reduce oven temperature to 450℉ (232℃). Bake for 20 minutes.

Carefully remove lid and continue to bake until crust is deep golden brown, 20 to 25 minutes more.

Transfer loaf to a wire rack. It will feel light and sound hollow when tapped. Mix the topping and spread it on top of the hot crust, then let the loaf cool. Letting the bread cool, is the hardest thing.

To bake the second loaf, raise oven temperature to 500℉ (260℃), wipe out dutch/French oven with a dry kitchen towel, and reheat with lid for about 10-20 minutes.

Enjoy!

A look inside.

A look inside.

Panettone French Toast

Breakfast, Brunch, Christmas, HolidayTove Balle-PedersenComment
Panettone French Toast

Panettone French Toast

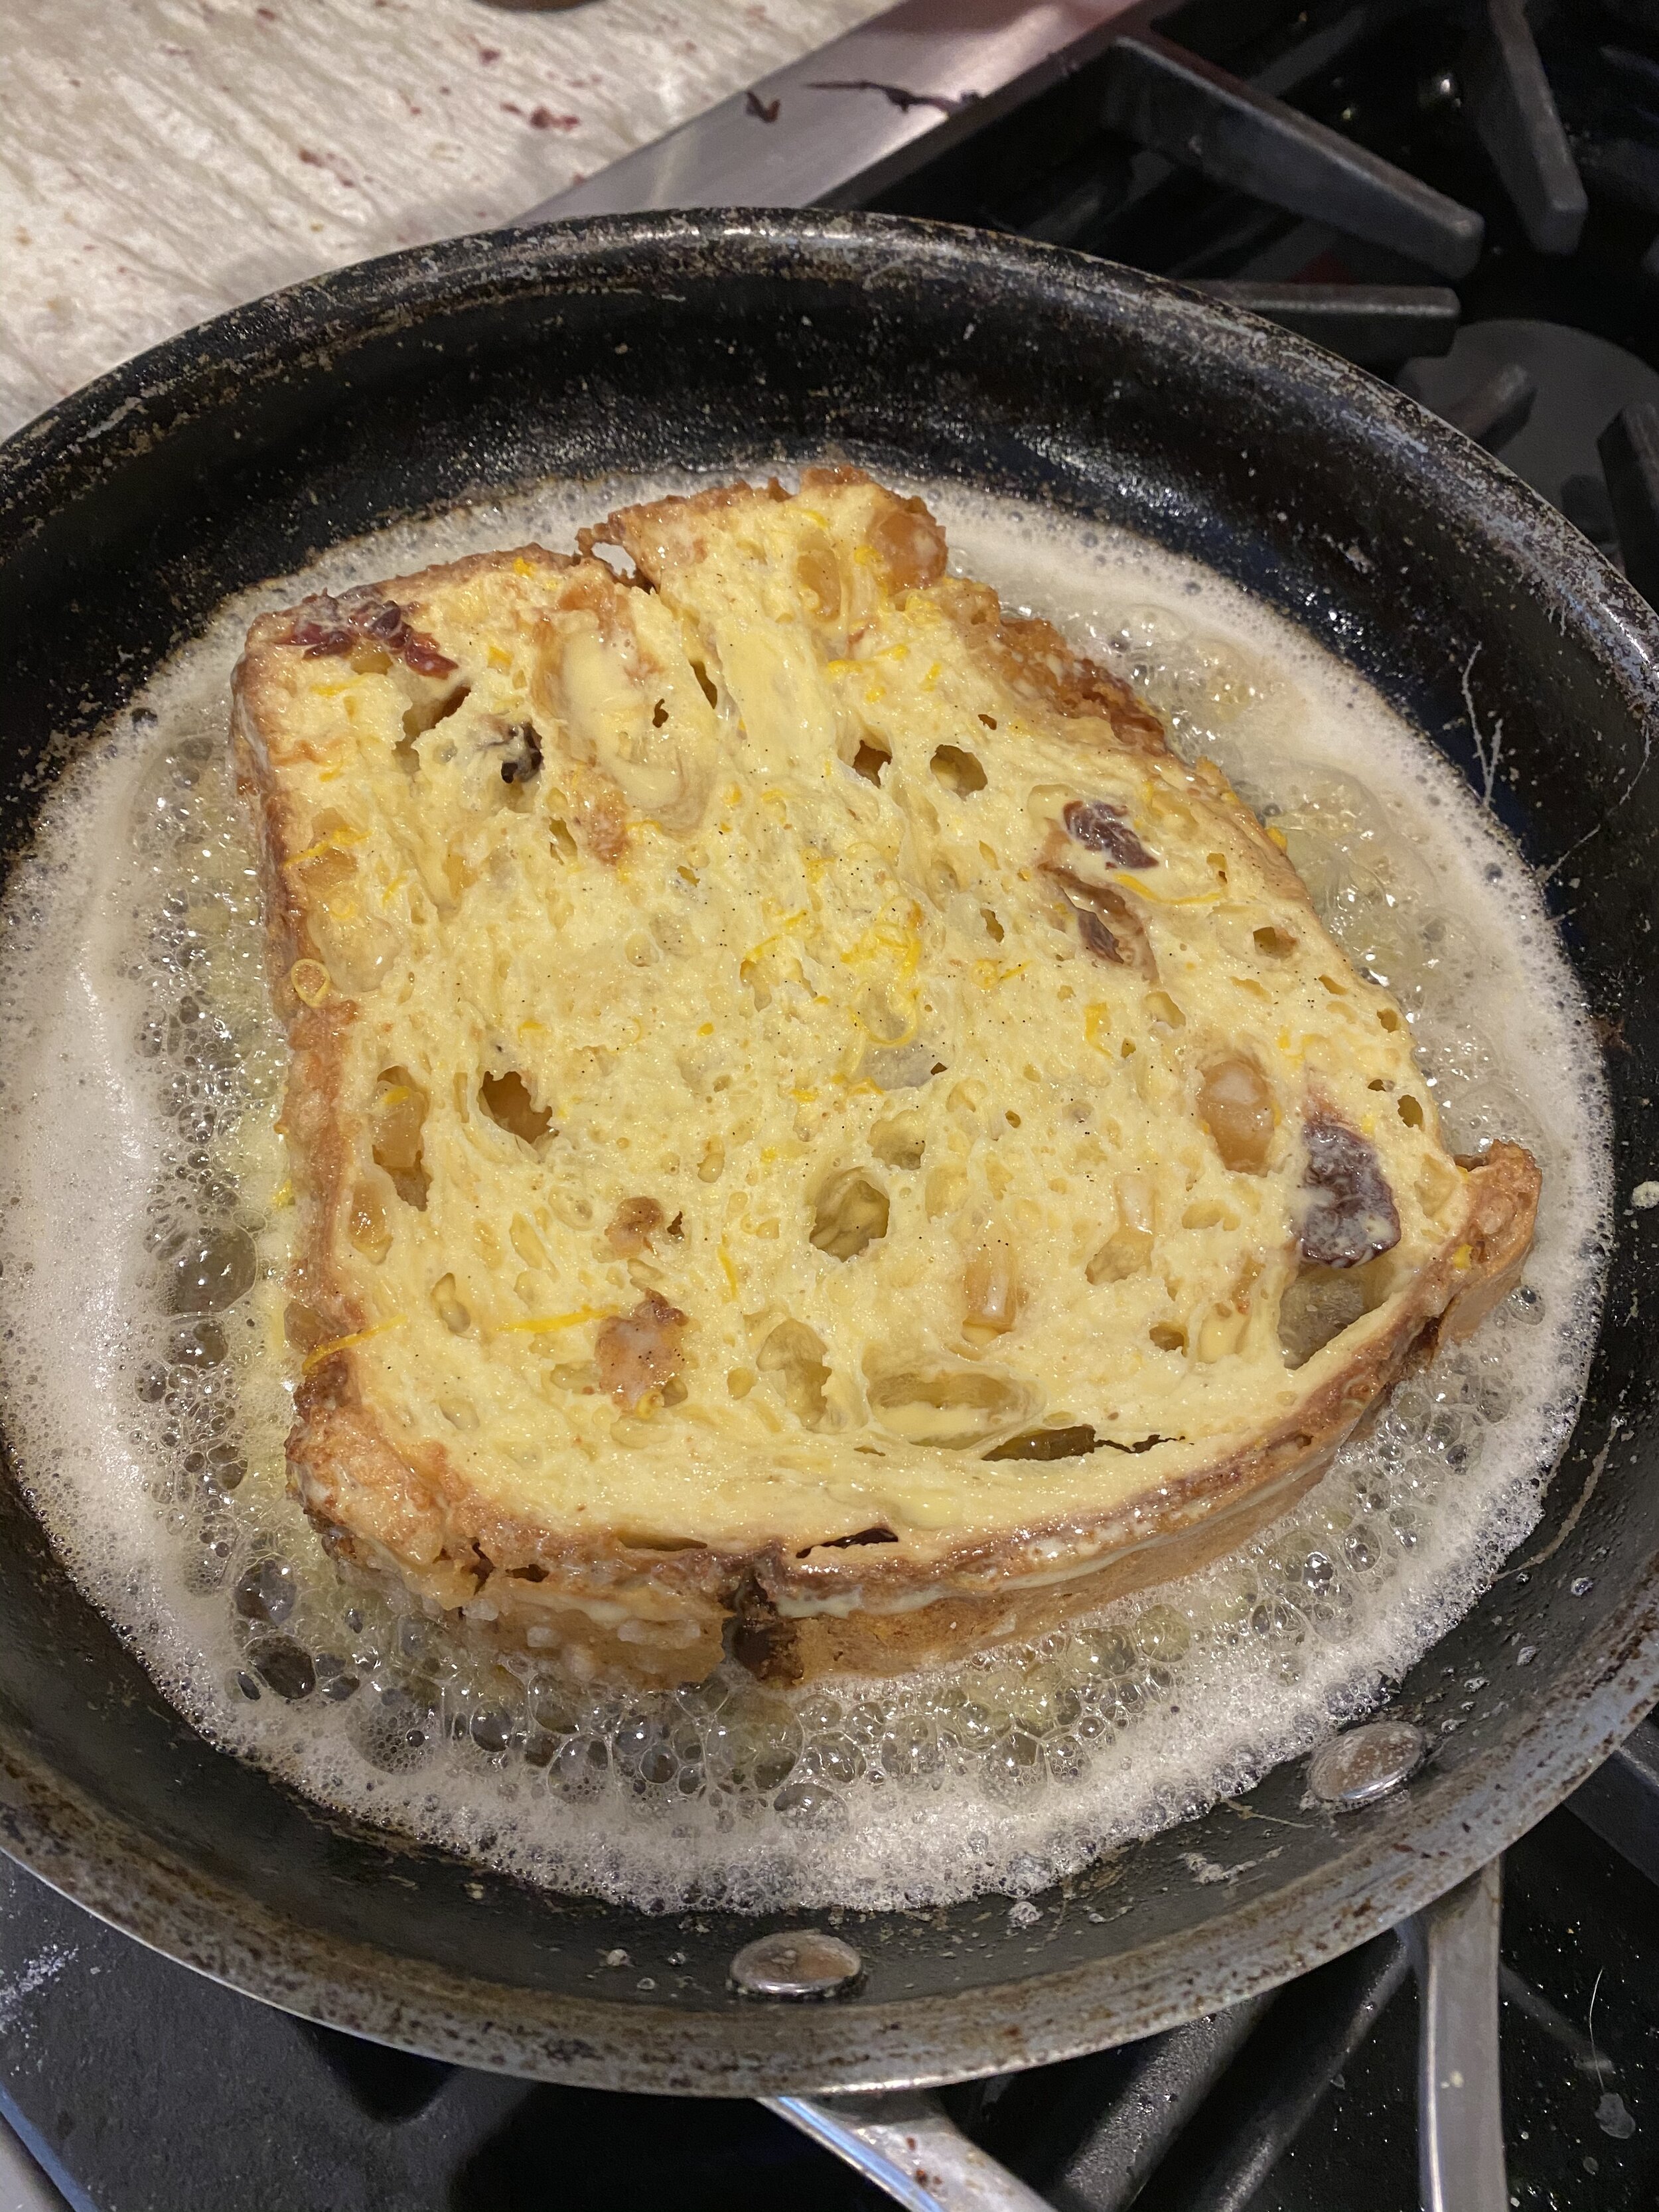
The past few years we bought a panettone from Manresa Bread for Christmas. This traditional Italian Christmas bread is a mix between a bread and a cake. I’ve see the ones at the grocery stores for years, but it was first when I got interested in sourdough bread baking and saw the panettone at our Local Manresa Bread store, I wanted to try it. It is as yummy in the morning with coffee as it is in the afternoon with a glass of something sweet. But the panettone is a large bread/cake, so I wanted to see if you could use the leftovers in another way, and here, French Toast a very good option. I do like French toast, but often it is very sweet and I find it to lack texture. But the panettone version add a more complex flavor profile and the breads own texture and the dried berries make it a very delicious breakfast. But I like a bit of salt with my sweets in the morning, so we added some bacon to our plates, and it was just perfect. when serving people with a larger appetite, add a sunny side up egg to the mix.

Serves 2.

Ingredients:

  • 1 large slice Panettone (1-inch/2-3 cm) thick (I used a ginger lemon cherry panttone from Manresa Bread)

  • 1 egg

  • 4 tablespoons heavy whipping cream

  • ½ teaspoon vanilla

  • 1 lemon, the zest of

  • 1 pinch salt

Directions:

723E7C65-4146-4C6A-8900-B4CCB369436E.jpeg

In a wide, shallow bowl, beat the egg, cream, vanilla, and salt together with a whisk until well-combined. Place the bread slice in the custard and gently press it down to help the bread absorb the custard, then flip it over and do the same to the other side of the bread. 

Heat a good amount of butter in a large skillet over medium heat. Add the custard-soaked bread to the pan and cook until it’s browned, it takes about a minute. Flip the bread and fry on the other side until it is browned. Serve the French toast immediately with a light sprinkle of powdered sugar and a drizzle of marble syrup. I served with a couple of slices of bacon, to bring some saltiness to the plate.

Enjoy!

Ciabatta Bread Rolls

Breakfast, Bread, BrunchTove Balle-PedersenComment
Ciabatta Bread Rolls

Ciabatta Bread Rolls

Ciabatta is one of the best breads for sandwiches, and I wonder why it took me so long to bake them. This recipe is made with a preferment (poolish), that you preferably can start the day before you bake the bread, it will give your rolls more flavor. But to be honest starting the poolish in the morning, worked fine today.

Makes 8-10 rolls.

Ingredients:

Poolish:

  • 200 g all-purpose flour

  • 200 g water, room temperature

  • 1 g dry yeast

Ciabatta:

  • Poolish from above

  • 200 g water, room temperature

  • 200 g all-purpose flour

  • 100 g manitoba flour (high protein flour)

  • 8 g salt

Directions:

Poolish:

Stir all ingredients together in a mixing bowl. The dough should be very soft and sticky, looking like a thick batter. Cover the bowl with plastic wrap and let sit at room temperature for 3-4 hours, until the poolish is bubbly. Refrigerate the poolish. The slow fermenting at low temperature will help develop flavor and texture. The poolish will keep up to 3 days in the refrigerator. Remove the poolish from the refrigerator prior to making the ciabatta dough.

I didn’t make my poolish in advance, so I only fermented my poolish for 4 hour on the kitchen counter at about 20℃ (68℉).

Ciabatta:

Dilute the poolish with the rest of the water, and transfer it all to the bowl of the stand mixer. Add flour and salt.

Using the paddle attachment knead the dough for about 5 minutes, starting on low for the first 60-90 seconds. The kneading is complete when the dough pulls away from the sides of the bowl. Wet your hands when handling the dough, because it’s very sticky.

Oil a wide bowl with some olive oil. Place the dough into the oiled bowl, and let it rise covered for 3 x 45 minutes.

With wet hands fold the dough for 5-6 times, and let the dough rise another 45 minutes and repeat the fold. Let the dough rise for the last 45 minutes.

Gently flour a bakers couche (or a clean flour sac) and the work surface.

Turn the dough out onto the well floured surface, be careful not to deflate it. A simple way to do this is turning the bowl upside down just over the counter and letting gravity help you. Sprinkle a fair amount of flour on the dough, and gently form the dough into an rectangle.

Making the rolls: Divide the into 2 logs using a bench scraper, and divide each into 4-5 pieces/rolls. Sprinkle with additional flour, so you have no bare dough visible. Use the bench scraper to get under the roll and carefully lifting it onto the couche with generous spacing between them. Bunch the cloth in between rolls to make a small wall. Sprinkle with more flour, and cover the rolls with a clean tea towel. Let the rolls rise for about 20 minutes.

Heat the oven with a pizza/baking stone to 445℉ (230℃), Have a jelly roll pan at the lower shelve, so you can pour some hot water into it, to make steam in the oven.

Use a baking peel and parchment paper to transfer the rolls into the oven. Pour about 1 cup water in the jelly roll pan, and quickly close the oven door. Bake 4-5 rolls at a time for about 18 minutes until done and deep golden brown.

Let the rolls cool on a wire rack before serving.

Enjoy!

Romsnegle - Rum Rolls

Bread, Breakfast, Brunch, Cake, Holiday, techniqueTove Balle-Pedersen1 Comment
Romsnegle - Rum Rolls

Romsnegle - Rum Rolls

Romsnegle is a stable at a Danish baker's shop, much like the regular danish (spandauer). This is much like a cinnamon roll made with puff pastry dough and with another filling and icing. Same, - but totally different. This sweet filling pairs so well with the (imitation) rum icing. Ohh so yummy.

Making these rolls with puff pastry makes for a flakier and softer roll. Of cause this is a time consuming bake. But well worth the effort.

The Danish pastry is a laminated yeast dough much like the French croissant. There are many ways to make this lamination. The amount of layers are different from country to country and from baker to baker. You get the flaky layers by folding sheets of dough with butter. 

One of the more important things in puff pastry is the butter. You want to use a european style butter. The European butter contains less liquid and more milk fats than American butter. Most people opt for unsalted butter, but I always use salted butter in my baking.

There are different kinds of folding/turning when it comes to pastry and croissant dough:

Letter fold or Single turn: Dough folded in thirds, like you would do a letter going into an envelope. (I did this for this recipe.)

1. Turn: makes 3 layers of butter

2. Turn: makes 9 layers of butter

3. Turn: makes 27 layers of butter.

Book fold or double turn: Dough folded to the middle and folded again on the middle like a book. This makes 4 layers per fold or turn as they are called.

1. Turn: makes 4 layers of butter

2. Turn: makes 16 layers of butter

3. Turn: makes 64 layers of butter

Some people claim that any more layers than 3 turns using a letter fold, will make the dough like a brioche instead of providing the flaky layers. The 3 turns makes 27 layers. You can mix the folding methods to get the amount of layer you want.


Makes 20.

Ingredients:

Dough:

  • 375 g all-purpose flour

  • 200 ml milk

  • 25 g live yeast or 2 teaspoons dry yeast

  • 45 g sugar

  • 50 g butter, salted and soft

  • 1 egg

Butter block:

  • 350 g butter, cold (use a European style butter, it contains less water, than the American butter)

  • all-purpose flour for dusting

Remonce:

  • 100 g butter, salted and soft

  • 100 g sugar

  • 70 g marzipan

  • 1 teaspoon vanilla bean paste

  • 1 tablespoon all-purpose flour

Icing:

  • 1 egg white (pasteurized)

  • Confectionery (powdered) sugar

  • 1-2 teaspoon imitation rum

multicolored sprinkles

Directions:

Dough:

Heat the milk to lukewarm (99℉/37℃). Dissolve the yeast in the warm milk. Add the sugar. If using dry yeast, let the yeast wake up for about 5-10 minutes, until creating a foam on top. Incorporate the egg.

Mix in half of the flour, forming a sticky dough. Mix in the softened butter. Finally mix in the rest of the flour and knead the dough until you have at shiny, slightly sticky and elastic dough, for about 3-5 minutes.

Place the dough on a very lightly floured surface. Using a bench scraper and one hand, work the dough into a round. The tension will build as the dough achieves to the surface as you rotate it.

Place the dough back in the bowl and let it rise until doubled in size, for about 60 minutes.

Butter block: 

Place the cold butter on a well floured surface. With your palms press the butter a little flat. Using a rolling pin pound on the butter to flatten it. Fold the butter into its self, and keep pounding and folding until the butter has the same consistency as the dough. You want to end up with a 15x15 cm / 6x6 inch square of soft but still cold butter. If the butter is too warm or too hard, it will be hard to roll it out in the dough, and it might make holes in the dough, instead of the lamination.

Laminating

Laminating

Laminating:

Place dough  on a lightly floured surface, roll 4 wings out from the center, leaving a center (15x15 cm / 6x6 inch), the same size as the butter block.

Place the butter block over the center, fold the wings over the butter, making sure not getting too much flour in between the layers. Turn the dough over, so the seams are facing down.

Roll the dough to a rectangle, 3 times as long as the hight. Keep it lightly floured so the dough do not stick to the surface. Make sure to roll the dough with straight edges. This will ease the folding.

Making a fold.

Making a fold.

1. Turn: Fold the rectangle in thirds, like a letter. Now you have 3 layers of butter. Place the dough in the freezer for about 20 minutes to cool the butter again.

Repeat this 2 times, making 3 turns and ending up with 27 layers of butter. Let the dough rest on the kitchen counter for 10-20 minutes. (If your kitchen is warm, do the resting in the refrigerator.)

Now the dough is ready to use as a puff pastry for sweet or savory dishes.

If you want to make sweet pastries, you want to make the 3. Turn on a surface sprinkled with about 100 g granulated sugar, and sprinkle another 100 g granulated sugar on top. This will make the dough sweeter and more crispy.

Remonce: 

Mix the all the ingredients so you end up with a soft fluffy mixture. You want to have a soft mixture, so you won't rip the dough, while spreading the remonce. The added flour will prevent the filling to ooze out of the rolls while baking.

Making the rolls.

Making the rolls.

Making the rolls:

Turn the dough out onto a lightly floured surface, and roll it to a large rectangle (16x16 inches/40x40 cm).

Spread the filling in a thin layer onto the dough, leaving a thin edge closest to your self, without filling.

Line 2-3 bakings sheets with parchment paper.

Roll the dough into a large log. Cut the log into 20 slices. When you place the slices on the prepared baking sheets, tuck the lose ends under the roll, and give the roll a little press.  Leave a good spacing between them, so they can spread out without "growing" together. Cover the rolls with a tea towel to rise for about 20 minutes.

Preheat the oven to 355℉ (180℃).

Bake the rolls for 14-16 minutes until deep golden brown.

Let the rolls cool completely, before icing.

Enjoy!

Tips:

The unbaked pastry can be frozen just, after shaping, individually, and can be baked straight out of the freezer, just add about 5 more minutes to the baking time.