Sweet • Sour • Savory

Food blog on scandinavian style food done right.

December 1 st.

ChristmasTove Balle-PedersenComment
Decorating.

Decorating.

Happy December - Christmas is approaching 🎄🎅🏼

Here we go again, December 1 st. sneaked up on me again. This year I have no excuses. I didn't move, we didn't host Thanksgiving. Next year I will set an calendar alarm to warn me mid november, to see if that helps.

I started my Christmas cookie production today. I always treat my friends with a little box of homemade cookies, when we go to events during the holiday season. And People you normally tip. Americans tip everybody. Mailman, hairdresser, doctors, teachers, and and and.... eeeeeeverybody. This is still kinda new to me. But I still try to learn the unspoken rules here 9 years in. Most important person on my cookie list is my husbands boss. I do not dare skipping him 😉😉

This year I just want to bake all the basic Danish Christmas cookies like Vanillekranse, håkonskager, pebernødder, Danish gingerbread cookies, and Chocolate Biscotti. There might be more in the works, but let's see what happens.

I hope you want to join me on my December Journey into Christmas classics in sweets, cookies and food.

Happy December 🎄

Croissants

Bread, Breakfast, Brunch, Desserts, techniqueTove Balle-PedersenComment
Croissant.JPG

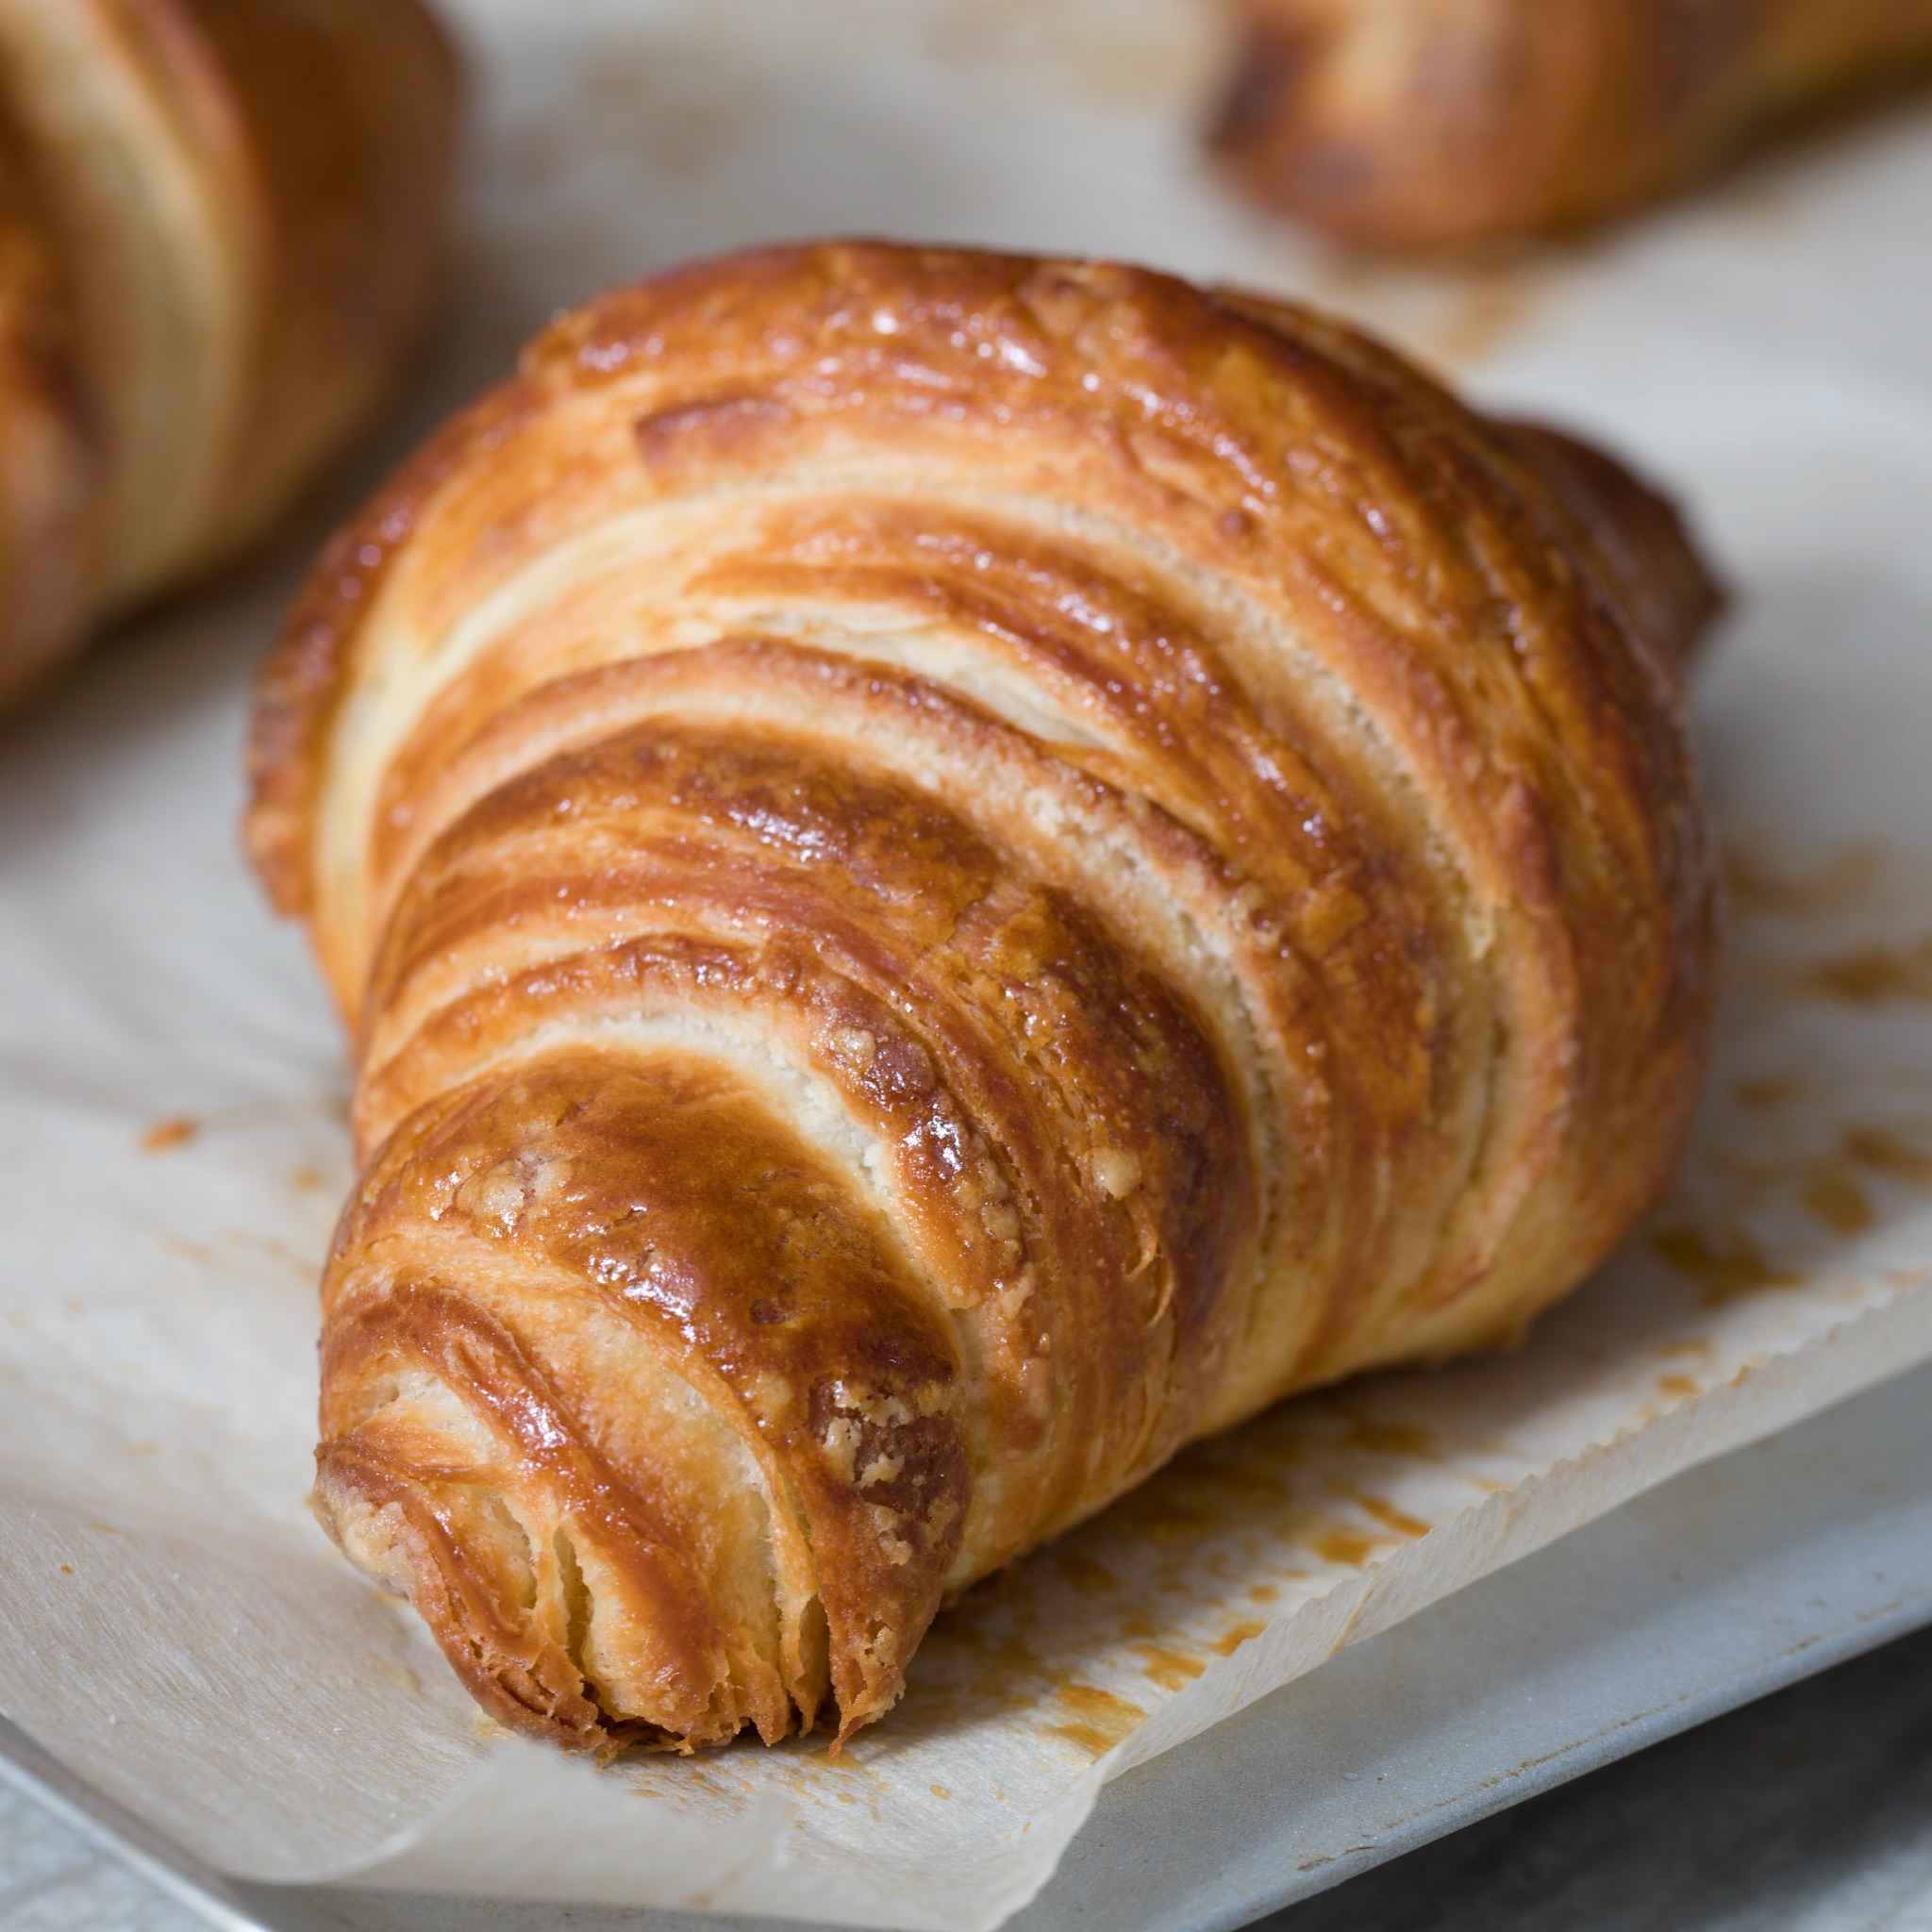
Croissants are made from a yeasted dough laminated with butter. It is so so good.

The trick is to keep the dough and the butter at the same temperature and texture, to prevent soft butter bleeding out of the dough. A too cold dough will crack a bit, so you are looking for a firm but yet soft dough.

There are different kinds of folding/turning when it comes to pastry and croissant dough. 

Letter fold or Single turn: Dough folded in thirds, like you would do a letter going into an envelope. (I did that for this recipe.)

1. Turn: makes 3 layers of butter

2. Turn: makes 9 layers of butter

3. Turn: makes 27 layers of butter.

Book fold or double turn: Dough folded to the middle and folded again on the middle like a book. This makes 4 layers per fold or turn as they are called.

1. Turn: makes 4 layers of butter

2. Turn: makes 16 layers of butter

3. Turn: makes 64 layers of butter

You can mix the folding methods to get the amount of layer you want. Theoretically you can make how many layers you want, but making too many layers makes you end up with a brioche dough, made the hardest way possible 😉.   

At the croissant class I attended I learned that Manresa Bread use 2 double turns (16 layers) for regular croissants, and 3 single turns (27 layers) for chocolate croissants. For traditional Danish pastry you normally use 3 single turns, giving the desired 27 layers of butter. If you are looking for a traditional puff pastry, you need 144 layers


Makes this 20-24 croissants. 

Ingredients:

Dough/Détrempe:

  • 750 g bread flour

  • 200 g water, lukewarm

  • 187.5 g milk

  • 90 g sugar

  • 22.5 g salt

  • 65 g live yeast (15 g dry yeast)

  • 7.5 g malt powder

  • 37.5 g butter, room temperature

Beurrage (butter):

  • 450 g cold butter

  • all-purpose flour for dusting

Directions:

Dough/Détrempe:

Mix the milk with the water, dissolve the yeast in this mixture. Add the sugar. If using dry yeast, let the yeast wake up for about 5-10 minutes, until creating a foam on top. 

Mix in half of the flour and malt powder, forming a sticky dough. Mix in the softened butter. Finally mix in the rest of the flour and knead the dough until you have a shiny, slightly sticky and elastic dough, for about 3-5 minutes. The dough will be a bit on the dry/tough side.
Shape dough into a ball and place it in a dough rising bucket, or another large covered container. Let the dough fermented overnight, this will give you a good flavor.

Beurrage (butter):

Place the cold butter on a well floured surface. With your palms press the butter a little flat. Using a rolling pin pound on the butter to flatten it. Fold the butter into it self, and keep pounding and folding until the butter has the same consistency as the dough. You want to end up with a 30x32 cm (11x12.5 inch) sheet of soft but still cold butter. If the butter is too warm or too hard, it will be hard to roll it out in the dough, and it might make holes in the dough, instead of the lamination.
If you don't want to add any flour to your butter, you can pound and roll out the butter between sheets of parchment paper. Chill the butter while you roll out the dough. 

Laminating:

Place dough on a lightly floured surface, roll it out to 62x32 cm (24.5x12.5 inch), so the dough is the width of the butter, but a little over double in length. Clearly I rolled my dough longer than necessary, but it worked fine anyway. Place the butter on the dough, and wrap it with the dough, pinching the edges, meeting in the middle of the dough, together. Chill the dough package covered in the refrigerator for about 15-20 minutes, before starting the folding/turning.

croissant.jpg

Roll the dough to a rectangle, 3-4 times as long as the height. Keep it lightly floured so the dough do not stick to the surface. Make sure to roll the dough with straightedges. This will ease the folding.

Fold the far edges into the middle and fold again on the middle like a book. Now you have 4 layers of butter. Place the covered dough in the freezer for about 20 minutes to cool the butter again, and to relax the gluten.

Repeat this one more time, making 2 double (book) turns and ending up with 16 layers of butter. If you want to use this dough for Danish pastry or chocolate croissants, I would make 3 single turns, so you end up with 27 layers.

Before shaping the croissants you want the dough to rest covered in the refrigerator for at least 45-60 minutes. And letting it sit covered for 5 minutes on the kitchen counter, letting the butter to soften up a bit.

Shaping the croissants:

fullsizeoutput_1eef.jpeg

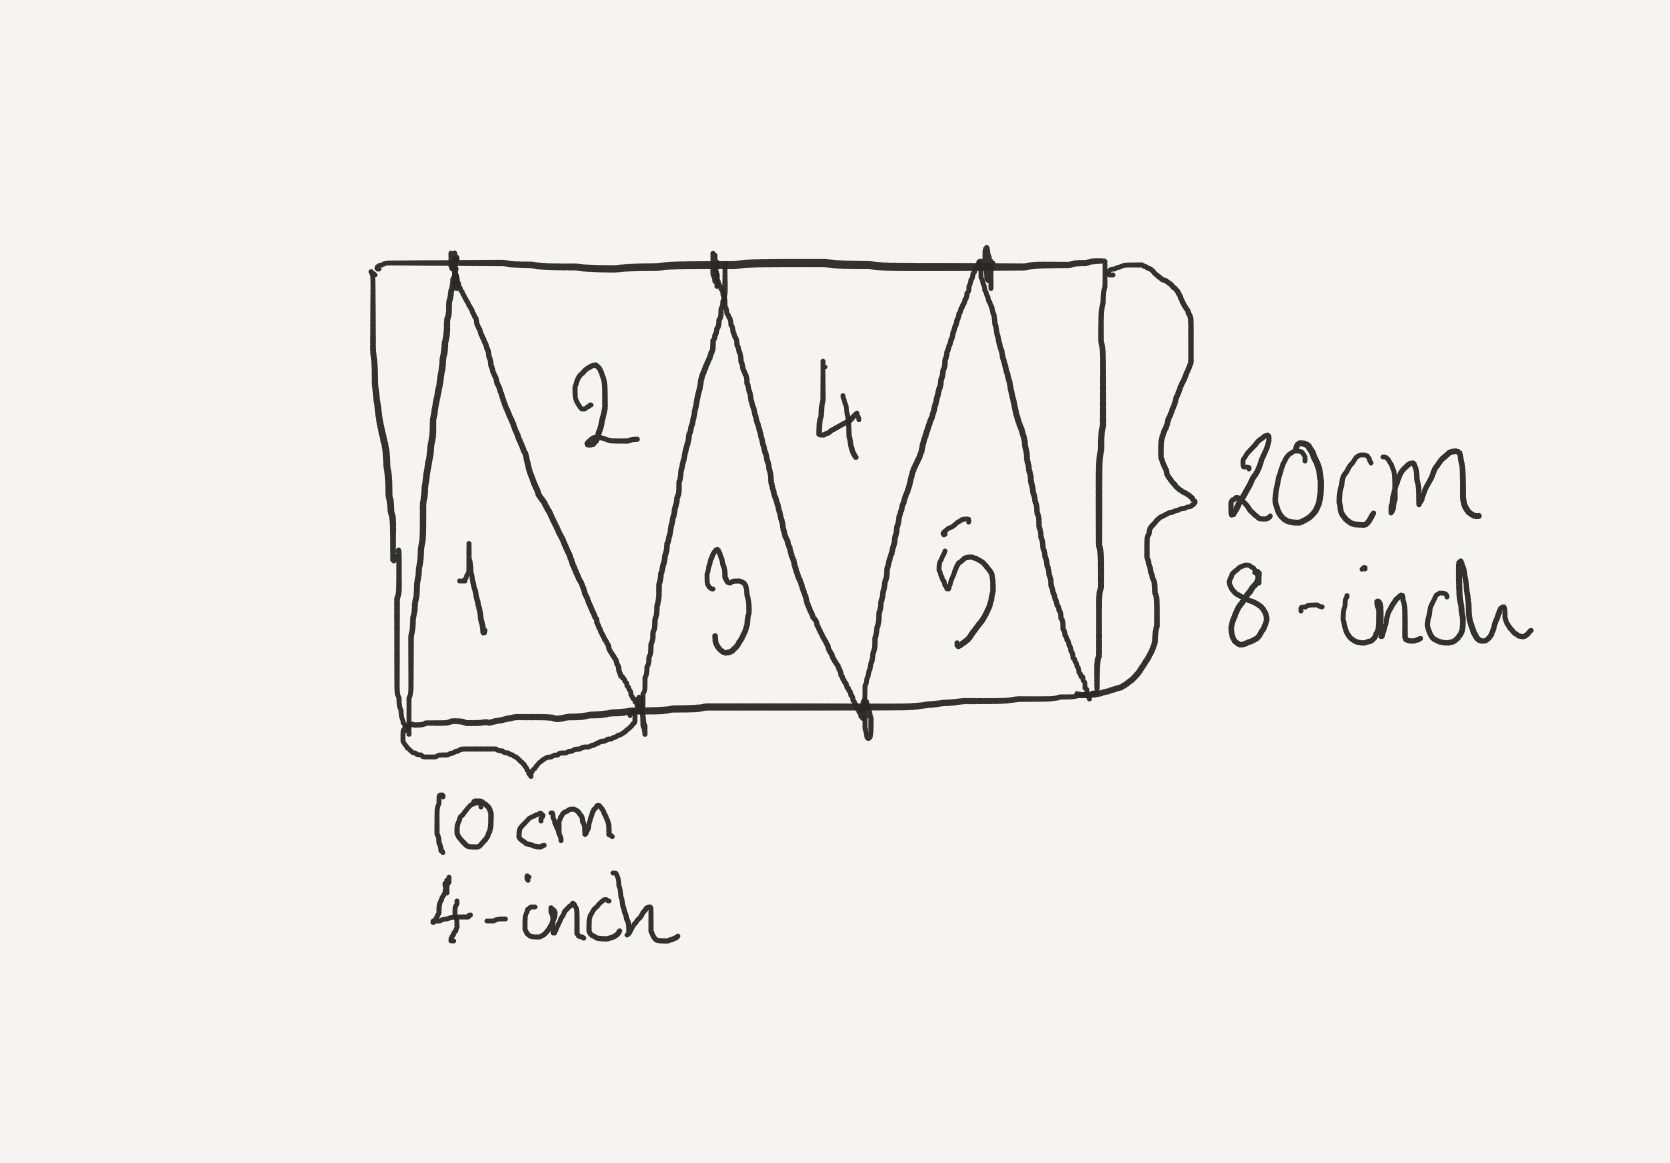
Roll half the dough out to a 20x40 cm (8x16 inch) rectangle. Using a knife or pizza slicer to cut the dough. Cut the croissant triangles as shown in the picture. (you get 7, not 5 croissants from the dough, I missed the last 2 in the picture, sorry). Let the dough rest covered 5 minutes to relax the gluten a bit. 
Stretch the triangle, so you elongate it, be careful not to rip the dough. Roll the dough towards the tip of the triangle, making sure that the tip is on the underside of the croissant.Place the croissant on a parchment paper lined baking sheet, spaced at least 5 cm (2 inch) apart.

Proof the croissant covered at maximum 85℉ (29.5℃) for 45-60 minutes until doubled in size. I have a proof setting on my oven, so I can use that, with a cup of boiling water sitting next to the baking sheet. But you can also proof the croissant on the kitchen counter, in a large air filled plastic bag.

Presheat oven to 350℉  (177℃) convection or 375℉ (190℃) foer non-convection.

Gently brush the croissants with egg wash, covering the exposed surfaces not allowing the egg wash to drip or pool.

Bake the croissants for 15-20 minutes, until golden brown. Let the croissants on the baking sheet on the kitchen counter. 

Serve the croissants within a day. 

Enjoy!

y7P8gX3USIuet5IT8olPPg.jpg


Tip:

The unbaked pastry can be frozen just, after shaping, individually, and can be baked straight out of the freezer, just add about 5 more minutes to the baking time.


Tip:

Leftover croissants can be used for almond croissants. Make some frangipan (125 g almond flour, 125 g butter, 125 g powdered sugar, 12 g all-purpose flour and 1 large egg, all mixed together) and smear it inside the croissant, and on top, before baking it for xx minutes.


Chili Con Carne a la me

Beef, Dinner, Simmer FoodTove Balle-PedersenComment
Chili Con Carne a la me.

Chili Con Carne a la me.

This chili con carne is my version of a chili. You will find more original recipes out there. But this is the way I like it. Years ago I started out with the recipe my mom used, not spicy at all. Through the years my version became more spicy, more smokey and got more colors and beans. And one thing is for sure, we never had any toppings on my moms chili.

Serves 8-10.

Ingredients:

  • 2 pounds ground beef 
  • 2 onions, chopped
  • olive oil
  • 5 garlic cloves, minced
  • 1 can tomato paste
  • 4 cans (15 oz) diced tomatoes
  • 1 can chipotle in adobo sauce, chop the chipotles, use less if you do not like it spicy
  • 2 tablespoons unsweetened cocoa powder, I use Valrhona 
  • 4-6 bell peppers, bite-sized diced
  • 6 cans beans, rinsed, I used black beans white beans, and red kidney beans
  • salt & pepper

Toppings:

  • sour cream
  • jalapeno, sliced
  • scallions, sliced
  • cheddar cheese
  • cilantro

Directions:

Heat olive oil in a large pot. I use my large slow cooker, where the insert goes on the stovetop.  Sauté the onions until they are golden brown. Take the onions out and into a little bowl. 

Add a little more oil to the pot and brown the ground beef, crumbling the meat with a wooden spoon. Try not to stir it to much, the more you move the meat around, the more you cool down the pan. And you want the meat to get some searing and color. When the meat is browned, add the tomato paste, letting it get some heat, to get a sweeter and deeper tomato flavor. Then add the garlic, onions, diced tomatoes, cocoa and the chipotle with the sauce. Season with salt and pepper. 
Here you can add more spices like paprika, cayenne, cumin or chili powder. Before I fell in love with chipotle, I used fresh jalapeños and some smoked paprika in my chilies.
Let the chili cook covered at a low simmer for 2-4 hours, stirring occasionally. I set my slow cooker to 8 hours on low.  

After 2-4 hours, (6 hours in slow cooker), add the bell peppers and after another 30 minutes add the rinsed beans, and let it simmer for yet another 30 minutes, before it is ready for the final seasoning and serving. 

Serve the chili with toppings to your likings and a few slices of good baguette.

Enjoy!
 

Oven Roasted Chicken with Chickpeas

Dinner, Meats, PoultryTove Balle-PedersenComment
Oven Roasted Chicken with Chickpeas.

Oven Roasted Chicken with Chickpeas.

I love a one-pot dinner or in this case one-bakingpan dinner, well if you serve it with steamed rice, you need to make those too. The yogurt helps making the chicken juicy and making the skin nice and crispy. I did not add the chili or the jalapeño, but I think this dish need a spicier note.

This recipe is kinda like an Indian-style chicken dish, without the spiciness. If you like spicy food add some chili powder og a sliced fresh chili to the chickpea mixture. The recipe is a adapted from a New York Times recipe.

Serves 4.

Ingredients:

  • 8-10 chicken thighs, bone-in and skin-on

Marinade:

  • ¾ cup (1¾ dl) greek yogurt
  • 2 tablespoons lemon juice
  • 2 tablespoons water
  • 1 teaspoon ground turmeric
  • 1 teaspoon ground cumin
  • 2 teaspoon salt 
  • ½ teaspoon fresh ground pepper

Chickpeas and cauliflower:

  • 1 cauliflower, in florets
  • ½ red onion, sliced
  • 2 cans of chickpeas (garbanzo beans)
  • 2 tablespoon olive oil
  • 1 teaspoon ground turmeric 
  • 1 teaspoon ground cumin
  • ½ teaspoon chili powder - optional
  • 1 tablespoon fennel seeds
  • salt & pepper

Lemony onions:

  • ½ red onion, sliced
  • 2 tablespoons lemon juice
  • salt 

Yoghurt sauce:

  • ¾ cup (1¾ dl) greek yogurt
  • 1 tablespoon lemon juice
  • ½ jalapeno, grated - only if you like spicy food
  • fresh mint, chopped
  • fresh coriander, chopped
  • salt to taste

Sprinkle with:

  • fresh mint, chopped
  • fresh coriander, chopped

Directions:

In a ziplock bag mix the marinade and add chicken making sure to coat it evenly. Let the chicken marinate overnight in the refrigerator or at least 30 minutes at room temperature.

Preheat the oven to 400 ℉ (200℃).

Scrape the excess marinade off the chicken, and place the chicken parts on a parchment paper lined baking sheet. Bake the chicken for 15 minutes. Next time I might just roast the chicken for 10 minutes before adding the chickpeas, to make it a little crisper.

Mix olive oil, chickpeas, cauliflower florets, fennel seed, cumin, turmeric, chili, half the red onion slices, salt and pepper. Making sure to get the oil and seasoning all over the chick peas and cauliflower. Place chickpeas and cauliflower florets round the chicken on the baking sheet. Bake for another 25-35 minutes until the chicken is crisp and tender, tossing the chickpeas mixture occasionally. 

Meanwhile mix the ingredients for the lemony onions, and set aside. Make the yogurt sauce and refrigerate. 

When the chicken is ready, sprinkle the lemony onions, mint and cilantro. Serve with steamed rice and Yogurt sauce. 

Enjoy!

Bourbon Apple Pie with Bourbon Whipped Cream

Cake, Brunch, Desserts, Holiday, ThanksgivingTove Balle-PedersenComment
Bourbon Apple Pie

Bourbon Apple Pie

Most people like Apple pie, but adding bourbon, just makes the pie a little better. It's not like you get drunk by having a piece of pie. The pie filling get so hot, that the liquor from the bourbon evaporate in the oven. But off course having the bourbon whipped cream will be classified as an adult dessert. This pie is a serious contender in any Thanksgiving pie-off.

Makes 1 pie (9 inch).

INGREDIENTS:

Pie Crust:

  • 260 g butter, salted and cold

  • 360 g all-purpose flour

  • 2 tablespoons confectionary sugar (powdered sugar)

  • 75 ml water, ice-cold

Filling:

  • 6-7 apples*,

  • 100 g butter

  • 120 g sugar

  • 75 g brown sugar

  • 50 g water

  • 3 tablespoon cornstarch

  • 1 teaspoon vanilla bean paste

  • 3 tablespoons bourbon

  • 30 g all-purpose flour

  • 1½ tsk cinnamon

  • 1 egg yolk for brushing the crust

Bourbon Whipped Cream:

  • 1 cup (2½ dl) heavy whipping cream

  • 1 teaspoon vanilla bean paste

  • 2-3 tablespoons confectionary sugar (powdered sugar)

  • 2 tablespoons bourbon

DIRECTIONS: 

Crust:

Cube the butter and place it in the refrigerator.

Put the flour and sugar in the food processor and pulse just until combined. Add the cold butter pieces and pulse until the mixture looks like small coarse crumbs. Drizzle the water over the flour and pulse again until the dough just comes together.

Divide the dough in two discs and wrap them separately in plastic wrap. Refrigerate the dough for 3 hours.

On a floured work surface roll the dough out to about ⅒ inch thickness. You want the dough yo be larger than your pie pan, so you end up with a ⅓ inch overhang on a 9 inch pan. Place the pan with the dough in the refrigerator, until ready to fill.

Preheat the oven to 430℉ (220℃).

Filling:

Mix flour, cinnamon in a bowl and set aside. Melt butter, sugars in a saucepan. Mix the water with the cornstarch, and pour it in the butter/sugar mixture. Add vanilla and the flour/cinnamon, stir the mixture while the sauce thickens. Take the sauce off the heat and stir in the bourbon.

Peel, core and slice the apples in thin slices. Do not soak the apples in water, this will make the filling to watery. Place the apple slices in the pie pan, and pour the sauce over the apples.

Brush the edges with egg wash. Roll out the rest of the dough for the lid, as thin as the other part. Place the lid on top, and firmly press the edges together to seal them. you can do this by hand or with a fork. Use the excess dough to cut out decorations for the pie. 

Optional: brush the lid with egg wash and sprinkle with sugar on top.

Cut 4-8 slids in the dough lid, to allow the steam to escape during baking. 

Bake the pie in the middle of the oven for 15 minutes. Lower the heat to 360℉ (180℃) and bake it for another 50 minutes until the pie is a deep golden brown. 

Let the pie cool completely, before slicing. This part is the hardest. The smell of this delicious apple pie, makes you want to dive in immediately. But if you let it cool first, and then reheat, it will make the slicing so much easier. 

Apple-Pie-Served.JPG

Bourbon Whipped Cream:

Whip the cold cream to soft peaks. Whisk in vanilla, sugar and bourbon.

Serve the pie with bourbon whipped cream or some vanilla ice cream.

Enjoy!