Sweet • Sour • Savory

Food blog on scandinavian style food done right.

technique

Croissants

Bread, Breakfast, Brunch, Desserts, techniqueTove Balle-PedersenComment
Croissant.JPG

Croissants are made from a yeasted dough laminated with butter. It is so so good.

The trick is to keep the dough and the butter at the same temperature and texture, to prevent soft butter bleeding out of the dough. A too cold dough will crack a bit, so you are looking for a firm but yet soft dough.

There are different kinds of folding/turning when it comes to pastry and croissant dough. 

Letter fold or Single turn: Dough folded in thirds, like you would do a letter going into an envelope. (I did that for this recipe.)

1. Turn: makes 3 layers of butter

2. Turn: makes 9 layers of butter

3. Turn: makes 27 layers of butter.

Book fold or double turn: Dough folded to the middle and folded again on the middle like a book. This makes 4 layers per fold or turn as they are called.

1. Turn: makes 4 layers of butter

2. Turn: makes 16 layers of butter

3. Turn: makes 64 layers of butter

You can mix the folding methods to get the amount of layer you want. Theoretically you can make how many layers you want, but making too many layers makes you end up with a brioche dough, made the hardest way possible 😉.   

At the croissant class I attended I learned that Manresa Bread use 2 double turns (16 layers) for regular croissants, and 3 single turns (27 layers) for chocolate croissants. For traditional Danish pastry you normally use 3 single turns, giving the desired 27 layers of butter. If you are looking for a traditional puff pastry, you need 144 layers


Makes this 20-24 croissants. 

Ingredients:

Dough/Détrempe:

  • 750 g bread flour

  • 200 g water, lukewarm

  • 187.5 g milk

  • 90 g sugar

  • 22.5 g salt

  • 65 g live yeast (15 g dry yeast)

  • 7.5 g malt powder

  • 37.5 g butter, room temperature

Beurrage (butter):

  • 450 g cold butter

  • all-purpose flour for dusting

Directions:

Dough/Détrempe:

Mix the milk with the water, dissolve the yeast in this mixture. Add the sugar. If using dry yeast, let the yeast wake up for about 5-10 minutes, until creating a foam on top. 

Mix in half of the flour and malt powder, forming a sticky dough. Mix in the softened butter. Finally mix in the rest of the flour and knead the dough until you have a shiny, slightly sticky and elastic dough, for about 3-5 minutes. The dough will be a bit on the dry/tough side.
Shape dough into a ball and place it in a dough rising bucket, or another large covered container. Let the dough fermented overnight, this will give you a good flavor.

Beurrage (butter):

Place the cold butter on a well floured surface. With your palms press the butter a little flat. Using a rolling pin pound on the butter to flatten it. Fold the butter into it self, and keep pounding and folding until the butter has the same consistency as the dough. You want to end up with a 30x32 cm (11x12.5 inch) sheet of soft but still cold butter. If the butter is too warm or too hard, it will be hard to roll it out in the dough, and it might make holes in the dough, instead of the lamination.
If you don't want to add any flour to your butter, you can pound and roll out the butter between sheets of parchment paper. Chill the butter while you roll out the dough. 

Laminating:

Place dough on a lightly floured surface, roll it out to 62x32 cm (24.5x12.5 inch), so the dough is the width of the butter, but a little over double in length. Clearly I rolled my dough longer than necessary, but it worked fine anyway. Place the butter on the dough, and wrap it with the dough, pinching the edges, meeting in the middle of the dough, together. Chill the dough package covered in the refrigerator for about 15-20 minutes, before starting the folding/turning.

croissant.jpg

Roll the dough to a rectangle, 3-4 times as long as the height. Keep it lightly floured so the dough do not stick to the surface. Make sure to roll the dough with straightedges. This will ease the folding.

Fold the far edges into the middle and fold again on the middle like a book. Now you have 4 layers of butter. Place the covered dough in the freezer for about 20 minutes to cool the butter again, and to relax the gluten.

Repeat this one more time, making 2 double (book) turns and ending up with 16 layers of butter. If you want to use this dough for Danish pastry or chocolate croissants, I would make 3 single turns, so you end up with 27 layers.

Before shaping the croissants you want the dough to rest covered in the refrigerator for at least 45-60 minutes. And letting it sit covered for 5 minutes on the kitchen counter, letting the butter to soften up a bit.

Shaping the croissants:

fullsizeoutput_1eef.jpeg

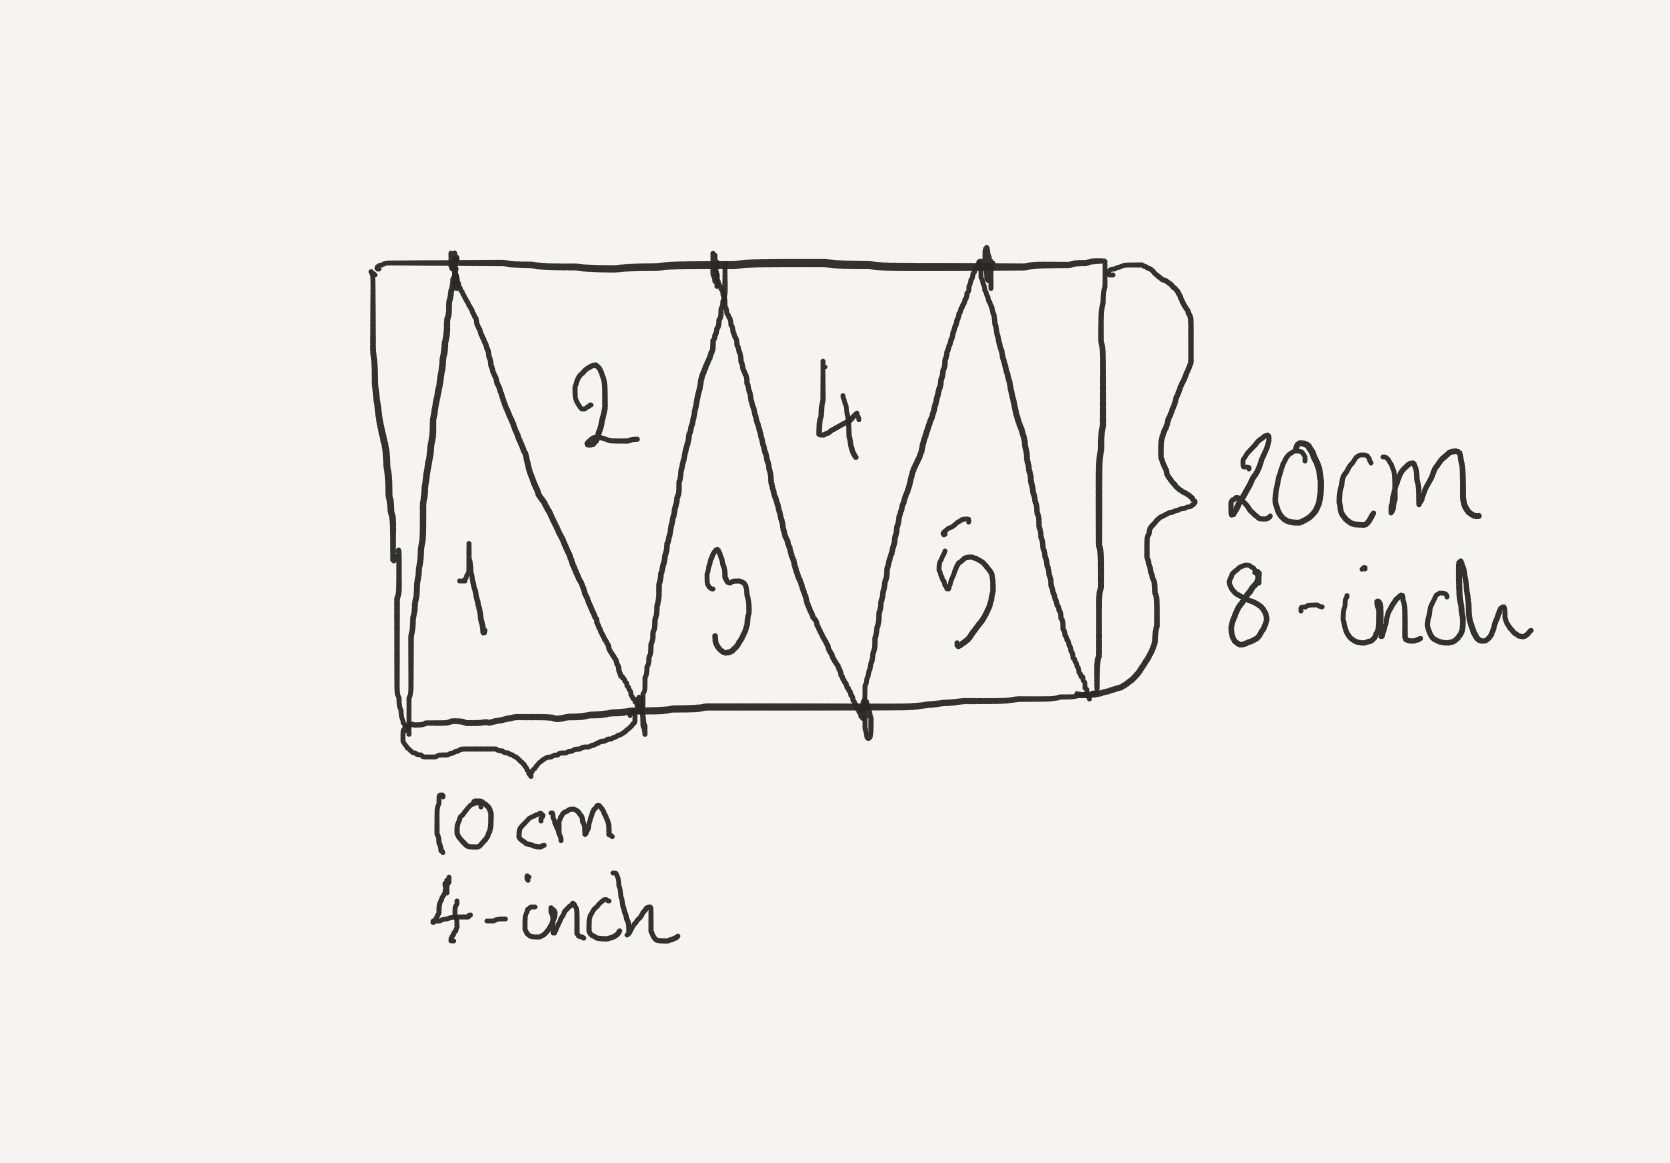
Roll half the dough out to a 20x40 cm (8x16 inch) rectangle. Using a knife or pizza slicer to cut the dough. Cut the croissant triangles as shown in the picture. (you get 7, not 5 croissants from the dough, I missed the last 2 in the picture, sorry). Let the dough rest covered 5 minutes to relax the gluten a bit. 
Stretch the triangle, so you elongate it, be careful not to rip the dough. Roll the dough towards the tip of the triangle, making sure that the tip is on the underside of the croissant.Place the croissant on a parchment paper lined baking sheet, spaced at least 5 cm (2 inch) apart.

Proof the croissant covered at maximum 85℉ (29.5℃) for 45-60 minutes until doubled in size. I have a proof setting on my oven, so I can use that, with a cup of boiling water sitting next to the baking sheet. But you can also proof the croissant on the kitchen counter, in a large air filled plastic bag.

Presheat oven to 350℉  (177℃) convection or 375℉ (190℃) foer non-convection.

Gently brush the croissants with egg wash, covering the exposed surfaces not allowing the egg wash to drip or pool.

Bake the croissants for 15-20 minutes, until golden brown. Let the croissants on the baking sheet on the kitchen counter. 

Serve the croissants within a day. 

Enjoy!

y7P8gX3USIuet5IT8olPPg.jpg


Tip:

The unbaked pastry can be frozen just, after shaping, individually, and can be baked straight out of the freezer, just add about 5 more minutes to the baking time.


Tip:

Leftover croissants can be used for almond croissants. Make some frangipan (125 g almond flour, 125 g butter, 125 g powdered sugar, 12 g all-purpose flour and 1 large egg, all mixed together) and smear it inside the croissant, and on top, before baking it for xx minutes.


How to Cook the Perfect Steak

Beef, Dinner, Meats, techniqueTove Balle-Pedersen1 Comment
The Perfect Steak

The Perfect Steak

In my family we like a good steak. We have been trying to find the best technique to get the perfect prepared steak every time. We have been sous vide-ing steaks, the nerdy way to getting a  steak with the same color and temperature all the way trough the steak. But not all people have the equipment to cook sous vide, even though it's become more affordable the last couple of years.

I think it's a lot of work and effort, making a water bath and vacuuming the steak, for just ONE steak. The time aspect is another thing. Sous vide 2 hours at 131℉/55℃, or 8 minutes in a skillet at high heat. If we were having company, I would make it sous vide for making more than 3 steaks.

A few years ago we started to slice up the cooked steak, and sharing just one steak. Somehow I think a steak is more enjoyable thinly sliced. I know some people likes a large steak for themselves, go ahead and indulge. But I find less is more, when you get a good quality meat.

I alway buy grass-fed boneless ribeye steaks at Whole Foods Market. They are about an inch (3 cm) thick, with a good marbling. 

After a lot of trials, I perfected my steak-cooking-skills, and this is how I cook the perfect steak.

Serves 1-2.

Ingredients:

  • 1 ribeye steak
  • olive oil
  • salt & pepper
  • 1-2 teaspoons butter, cold and salted
  • 1 garlic clove, thinly sliced
  • 1-2 sprigs of thyme

Directions:

Let the Steak get to room temperature. 

Pad the steak dry with a paper towel, and season it with a good amount of salt and some cracked pepper.

Heat oil in a skillet over high heat. Sear the steak on both sides, and keep turning the steak every 20-30 second, still over high heat. This will cook the steak faster than just flipping the steak just once. 

By flipping just once, the steak won't cook faster or more evenly, it's just easier. Generally you can say, that the more you turn the steak, the faster and more uniformly it will cook. Of cause within limits. When you sear food the surface touching the skillet, will quickly get hot, dehydrate, caramelize and get well done and overcooked. The overcooked part will act as an insulation layer between the heat source and the rest of the food. Resulting in longer cooking time and sometimes even burn food. By flipping the steak more often, you get a cooling of the searing surface, helping to heat up the center of the steak, and getting less of an insulating layer. 

Keep cooking and turning until just under the preferred doneness. (Rare: 130℉/54℃, Medium-Rare: 135℉/57℃, Medium:  146℉/63℃, Well done:  155℉/68℃.)  Generally I cook the steak until it has a dark sear, and the steak has some give to it, about 8 minutes in total, this will result in a medium to medium rare steak.

Turn off the heat, add butter, thyme and garlic. Baste or turn the steak in the now seasoned butter, and let it rest for a few minutes.

Slice the steak in thin slices, and serve immediately.

Enjoy!


Starting a Sourdough

technique, BreadTove Balle-PedersenComment

I often use sourdough in my baking. Personally I think that a young sourdough gives bread a nice delicate taste, and a chewy  crumb. You might think that sourdough breads are very acidic, and the San Francisco kind is very acidic. Too acidic to my taste. But after tasting Basic country bread from Tartine, I knew, I had to bake this mild sourdough bread. My relationship with sourdough started there and then.
Initially I bought a sourdough online to get started right away. Maybe because I thought it would be difficult to make your own. But now I do believe, that I need a recipe for sourdough here on my blog. 

I started up a new sourdough after Claus Meyers recipe. Meyer has been a pioneer in the Danish kitchen. And right now he is trying to build up a Danish/Nordic style bakery restaurant at Grand Central Station i New York. His bakery is already among the 12 best bakeries in NY according to Zagat. 

Here is how to start a sourdough from scratch.

Ingredients:

  • 350 ml (1½ cup) water
  • ½ cup all-purpose flour
  • ½ cup whole wheat flour
  • ½ cup dark rye flour

Directions:

Mix all the ingredients in a plastic jar, make sure you don't have any lumps in the "batter." Let the sourdough sit on the kitchen counter for 4-5 days, with the lid loosely placed on top. Whisk the "batter" 1-2 times every day. 

After the 4 days the batter is starting to bubble and get an acidic smell, this means that the sourdough is ready to use. If the batter isn't sour yet, let it sit on the counter for another 1-2 days. 

Now you have a few options. Do you want to have your sourdough living on the kitchen counter? This is recommended if you bake every day or every other day. You need to feed the sourdough every 5-6 days, and you need to bake with the sourdough the first 8-24 hours after the feeding*.

You can keep your sourdough in the refrigerator in between feeding, this is recommended if you do not bake with it all the time. Read more about keeping and feeding a sourdough here: Sourdough - Keeping and Feeding.

* Feeding: take ½ cup sourdough (discard the rest), ½ cup all-purpose flour, ½ cup whole wheat flour and 1 cup water. Mix it well and let it sit covered on the kitchen counter for minimum 8 hour before using. 

Sourdough - Keeping and Feeding

techniqueTove Balle-PedersenComment
A Sourdough man in a cup

A Sourdough man in a cup

I often use sourdough in my baking. I like the texture and flavor the sourdough give baked goods. I started using my sourdoughs 5 years ago, and they are still going strong. I was somewhat unsure how to start my sourdough, so I bought it online at KingArthurFlour.com. I divided it in two, feeding one with rye flour (for Danish rye bread) and one with whole wheat (for breads like Basic country bread a la Tartine). I bake with a young sourdough, which means it has fermented for about 8 hours, making for a mild flavor-profile. The longer the fermentation the more sour you bread becomes.

Many are afraid to bake with sourdough, because they have to maintain and feed it. But here are my tips and tricks to maintain a sourdough. 

Feeding:

Feed the starter every 2-3 weeks or about 8 hours before you need it for baking. If you bake everyday you don’t have to feed the sourdough before using.

If you have a liquid on top of the sourdough, discard this. If you mix it in, your sourdough get way to sour. Discard about half the sourdough before feeding, so you feed about ½-1 cup sourdough. I do not measure this. I just discard about half and do the feeding directly in the storage container.

Rye sourdough:                    

  • ½-1 cup sourdough

  • ½ cup dark rye flour

  • ½ cup all-purpose flour

  • 1 cup water

 Wheat sourdough:

  • ½-1 cup sourdough

  • ½ cup whole wheat flour

  • ½ cup all-purpose flour

  • 1 cup water

Directions:

Mix well, so all the flour is wet, let stand on the kitchen table for about 8 hour or overnight, fermenting. The sourdough will now be bubbling and smell kinda like beer. Now you can use the sourdough for baking, or store it in the refrigerator. 

When baking save about ½-1 cup of the fed sourdough for your next bake, this will be your new starter.

Keeping:

Keep the sourdough in the refrigerator in a closed container, double the size of the volume of the sourdough. The sourdough will keep in the refrigerator for 2-3 weeks with no feeding. With the long rest in the refrigerator you will have a dark liquid on top, discard this before feeding. (This will keep the sourdough from becoming to acidic.)

If you think your sourdough is gotten too sour to your taste. Just feed the sourdough 2-3 days in a row. This will freshen up the sourdough, and eliminate the harsh acidity you might have in the sourdough. 

Generally I only use "young" sourdough, meaning a newly fed sourdough in my baking.

Rygeost - Danish Smoked Cheese

Lunch, technique, cheeseTove Balle-Pedersen1 Comment
Rygeost - Danish Smoked Cheese

Rygeost - Danish Smoked Cheese

Rygeost, Danish smoked cheese is a local tradition from the island of Funen or Fyn as it is called in Denmark. Rygeost is a smoked fresh cheese, so it is a soft, and fairly spreadable cheese. You can use the cheese on pizza, in mayonnaise based salads or with seafood. But more traditionally you will eat it as an open-faced sandwich on a slice of rye bread, with sliced radishes and chives on top.

Ingredients:

Equipment for smoking:

  • 1 charcoal starter (chimney)
  • 2-3 handfuls dry straw (if you have straws from oat or wheat, you will get the best favor)

Directions:

In a large pot heat whole milk and buttermilk to 26℃/79℉. Pour the mixture into a scalded plastic container, mix in the rennet and put a lid on. Let the mixture stand at room temperature for 21-24 hours.

After 21-24 hours, cut the coagulated milk (cheese curds) with a knife in small cubes, this will help releasing the whey from the curds.

Scoop the cheese curds into a strainer/colander lined with cheesecloth. Let the cheese drain for 2 hours before adding the salt. Let the cheese drain for another 5-7 hours. The fresh cheese will hold for 3-4 days in the refrigerator without adding anything else. The whey (liquid) can be used for baking bread.

Smoking:

Place the cheese in a strainer or on some kind of grate. Place the grate on top of a charcoal starter (chimney) filled with dry straws/hay. Light the hay from the bottom of the starter, and smoke the cheese for just about 60 seconds. The cheese is quickly flashed with the hay smoke to produce the unique flavor. Place the cheese upside-down on a plate with the smoke-lines up. Sprinkle with caraway seeds.

Serve the smoked cheese on a slice of Danish rye bread with sliced radishes and chives.

Enjoy!