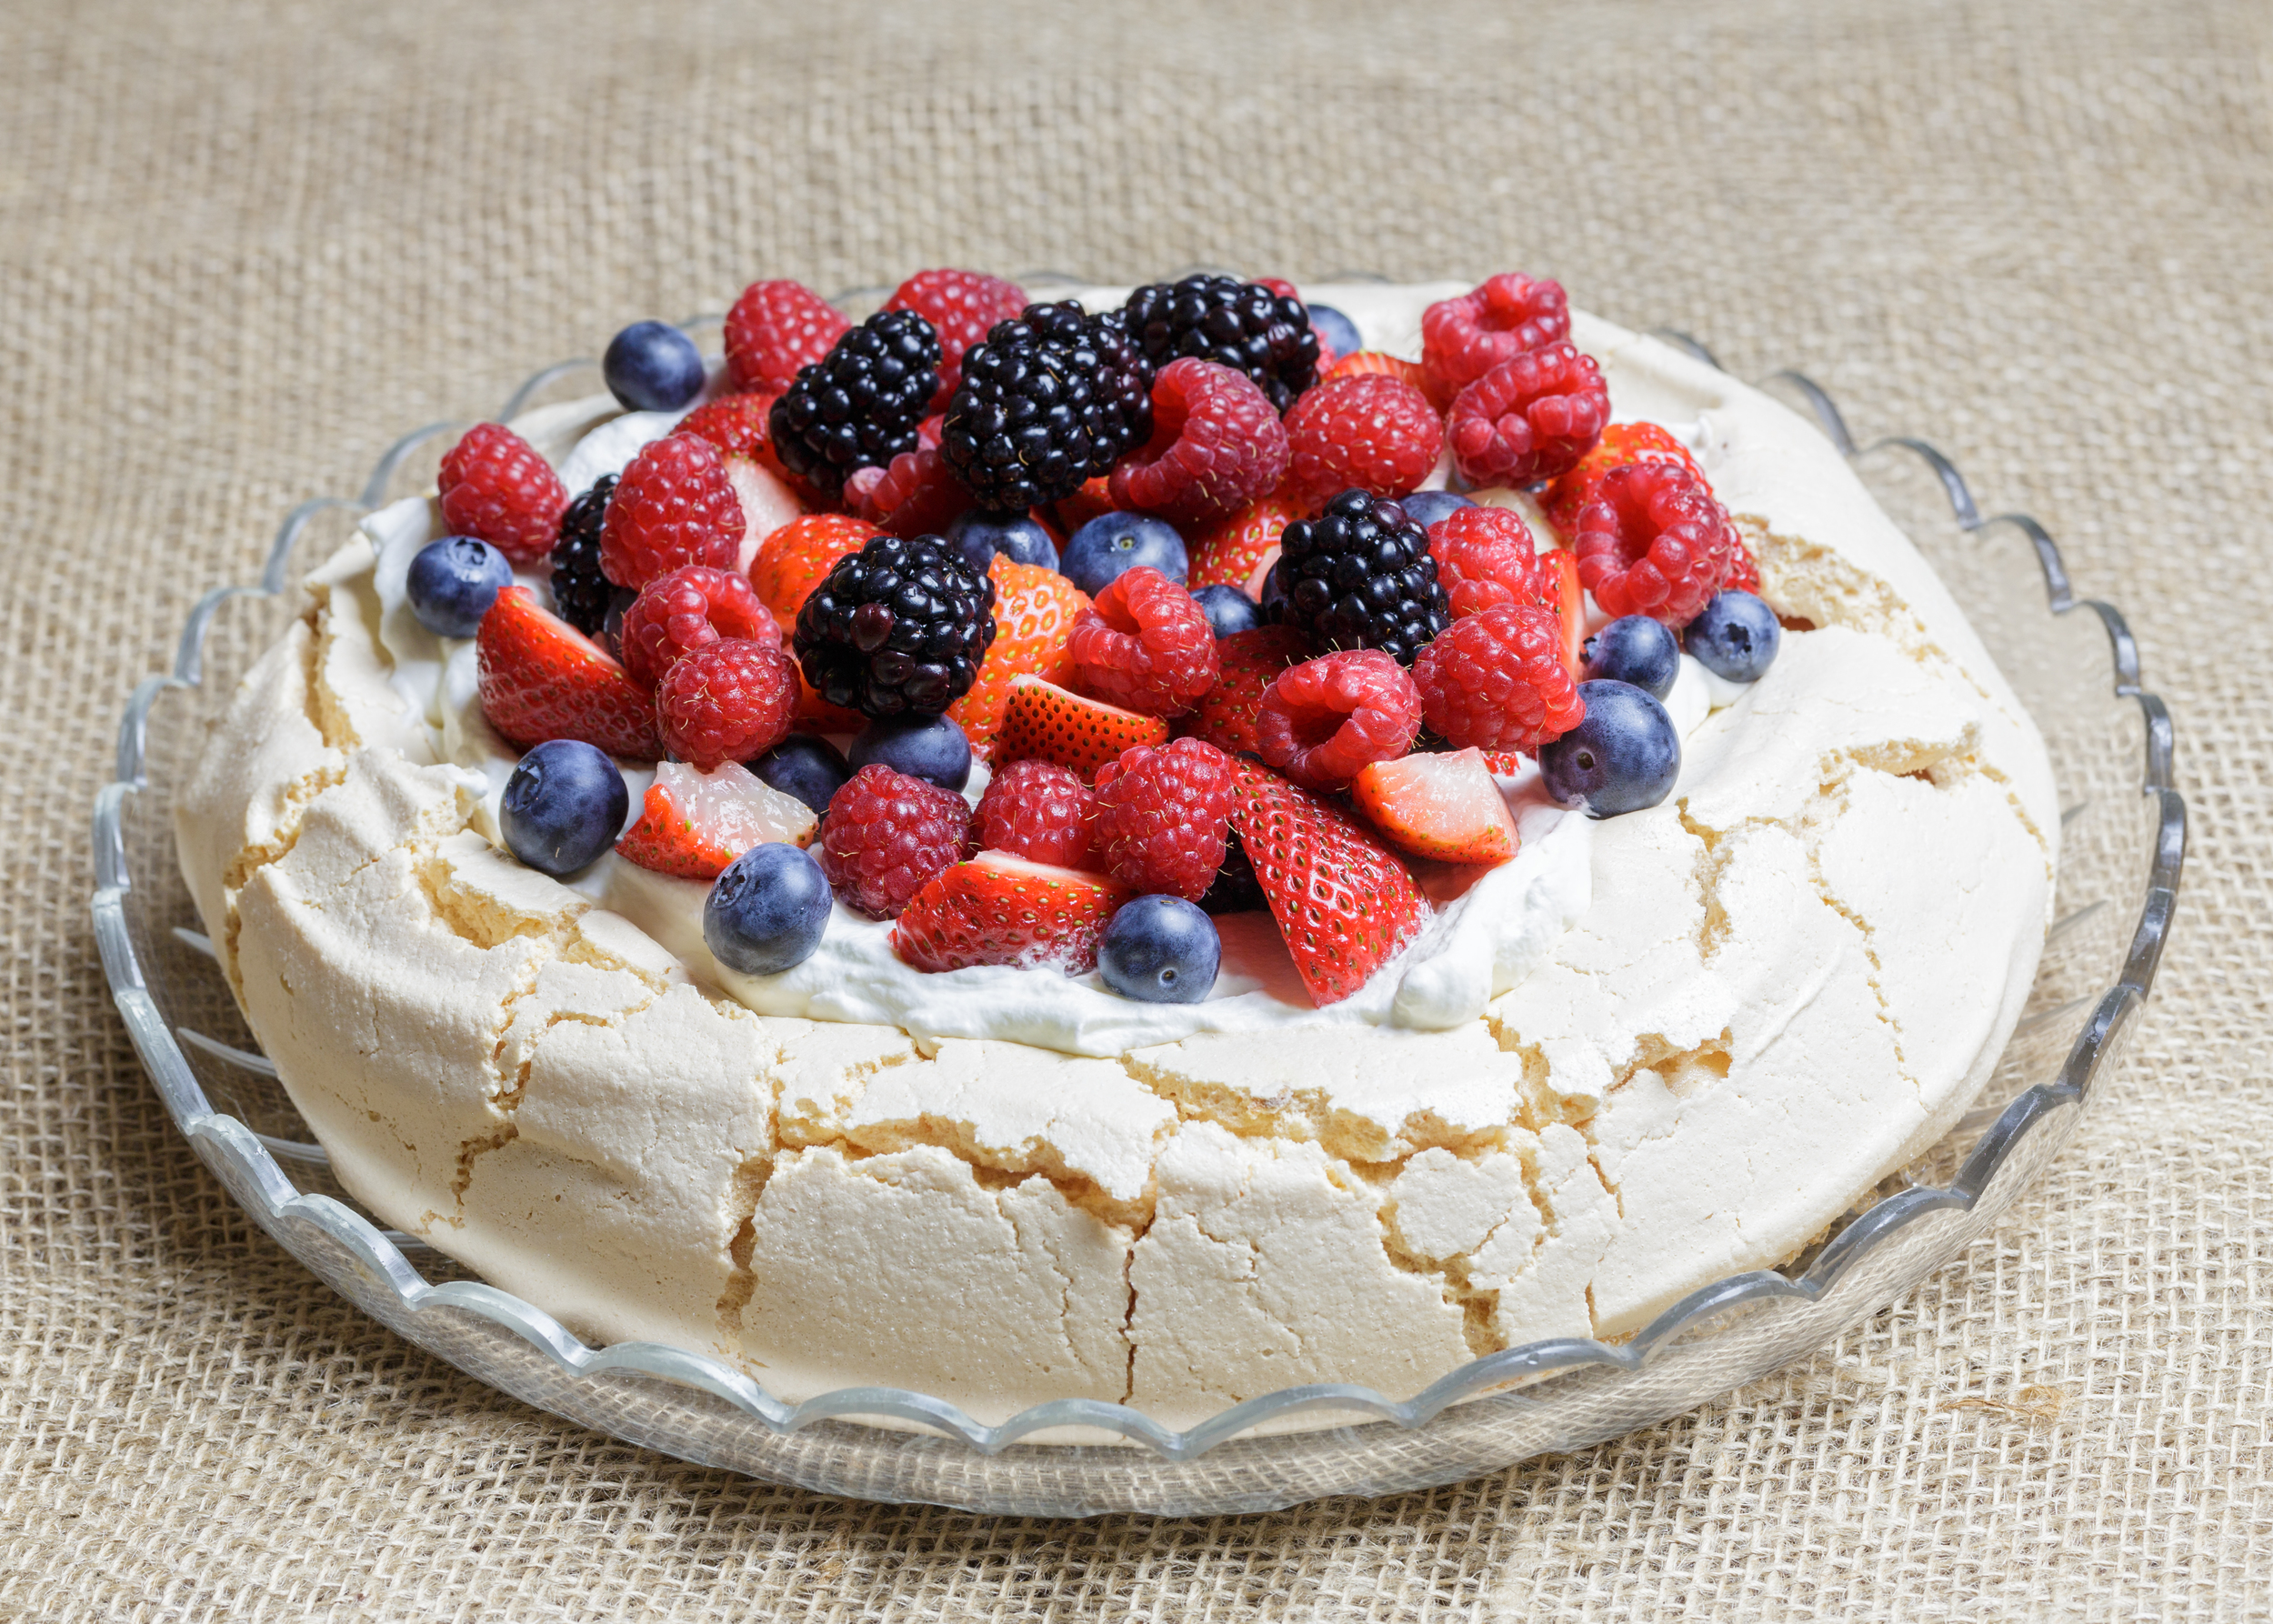
Sweet • Sour • Savory

Food blog on scandinavian style food done right.

Pavlova

DessertsTove Balle-PedersenComment
Pavlova

Pavlova

Super easy dessert, perfect for a summer night on the terrace.

Ingredients:

  • 4 egg whites
  • 265 g sugar
  • 2 teaspoons cornstarch
  • 1 teaspoon vanilla extract
  • 1 teaspoon lemon juice

Topping:

  • Heavy whipping cream, whipped
  • berries (strawberries, raspberries, blueberries and blackberries)

Directions:

Preheat oven to 300℉ (150℃). Line a baking sheet with parchment paper. Draw a 9-inch circle on the parchment paper, and turn the parchment paper upside down, so you don't get any pencil on the pavlova.

In the bowl for the stand mixer, beat egg whites until stiff peaks. Add the sugar gradually, a couple tablespoons at a time, while still beating the egg whites. The egg whites/meringue will become thick and glossy. Gently fold in cornstarch, vanilla extract and lemon juice.

Spoon the meringue inside the drawn circle on the parchment paper. Spread the meringue working from the center towards the edge. You want to make it look like a bowl.

Bake the pavlova for 1½ hour. Cool on a wire rack, before adding whipped cream and berries.

Enjoy!


The Danish version:

Fuglerede

Ingredienser:

  • 4 æggehvider
  • 265 g sukker
  • 2 tsk maizena
  • 1 tsk vanilla ekstract
  • 1 tsk citronsaft

Topping:

  • piskefløde, pisket til skum
  • bær (blåbær, hindbær, jordbær og brombær)

Fremgangsmåde:

Opvarm ovnen til 150℃. Kom bagepapir på en bageplade. Tegn en 22-24cm cirkel på bagepapiret, og vend bagepapiret , så du ikke får blyant på din fuglerede. 

Pisk hviderne stive, og tilsæt sukkeret et par spsk ad gangen, mens der stadig rørers. Du skal ende op med en tyk blank marengs. Forsigtig fold maizena, vanille og citronsaft i marengsen.

Hæld marengsen ud midt i cirklen og spred den ud mod kanten fra midten af. Så du ender op med en lille skål i marengs.

Bag fuglereden i 1½, og lad den køle helt af på en rist. 

Pisk fløden, og fordel den og bær på fuglereden og server den straks.

Velbekomme.


Grilled Espresso Tri-Tip

BBQ, Beef, Dinner, MeatsTove Balle-PedersenComment
Grilled Espresso Tri-Tip

Grilled Espresso Tri-Tip

I had never heard about a tri-tip roast befor moving to California. And even though I have seen the cut in the stores, I didn't know how to cook it. My dear neighbors changed that, when they invited us for a BBQ, and served tri-tip. Now tri-tip is on my cuts to buy. It is so good and flavorful. Now I have to get my neighbor's secret rub, to get the perfect tri-tip for summer.

The tri-tip is a cut from the bottom of the sirloin, and is a close cousin of the culotte roast. 

Since the tri-tip is a lean cut, you have to be careful not to over cook it, particularly when preparing the full roast. You don't want to cook it to more than medium. 

This time the tri-tip became a little more done, than I would have liked, but I still turned out great. The deep flavor of the coffee worked perfect with the spice from the pepper and the beef. 

Ingredients:

  • 1 tri-tip roast
  • 3 tablespoons finely ground espresso coffee beans
  • 1 tablespoons brown sugar
  • 1 teaspoon salt
  • 1 tablespoon fresh ground black pepper
  • 1/2 teaspoon chili powder
  • 1/2 teaspoon garlic powder

Directions:

Combine espresso beans, brown sugar, garlic powder, black pepper, and chili powder. Rub mixture onto the roast and place in a large dish. Let the roast marinade covered, in the refrigerator for at least an hour. 

Preheat grill to medium heat (400℉/200℃).  

Remove roast from fridge and place on grill/BBQ, use indirect heat. Cook for 15-18 minutes turning occasionally. When done, remove from heat allow to sit for a few minutes before carving into  thin slices. 

Enjoy!

Pigs in a Blanket - Pølsehorn

Bread, Brunch, Dinner, Meats, PorkTove Balle-PedersenComment
Pigs in a Blanket - Pølsehorn

Pigs in a Blanket - Pølsehorn

Pigs in a blanket aka pølsehorn is a favorite among kids and adults all over the world.  They are perfect for kids birthday parties or as an easy snack or lunch. You cant eat them cold, warm or hot with your choice of condiments. 

Ingredients:

10 German style Wieners 

Dough:

  • 50 g live yeast (or 4 teaspoons dry yeast)
  • 250 g water
  • 1 teaspoon salt
  • 2 tablespoons sugar
  • 3 tablespoons milk
  • 40 g butter (salted)
  • 1 egg
  • 425 g all-purpose flour
  • 100 g spelt flour
  • 1 egg for egg-wash 

Directions:

In a bowl combine warm water, milk, yeast and sugar. If you use dry yeast let the mixture stand until foamy, about 5 minutes. 

In the stand mixer bowl, whisk flours with salt. Add butter and mix it with a flat beater until the flour looks like crumbs. (Well the dough hook works too.) Stir in yeast mixture and egg until a dough forms. Knead the dough for 5-8 minutes on medium, (8-10 minutes if kneaded by hand), until smooth and elastic. 

Let the dough rise covered for 1 - 2 hours until doubled in bulk.

Cut the wieners in half. Line a baking sheet with parchment paper.

Pour the dough onto a lightly floured workspace, fold the dough over 3-4 times and using dough scraper, divide the dough into 18-20 small balls. Gently roll each ball into a 11-inch/30 cm  rope, and wrap the dough around the half wiener. Squeeze the ends onto the rest of the dough, so it won't unroll when rising.

Cover the pigs loosely with a clean kitchen towel and let to rise in a warm place for one hour.

Preheat oven to 400℉/200℃ with rack in center. Beat an egg and brush some on top of pigs. Bake until tops are golden brown, about 15 minutes.

Transfer to a rack to cool before serving.

Serve the pigs in a blanket with your favorite condiment. 

Enjoy!

This post has been submitted to YeastSpotting

The Danish version:

Ingredienser:

  • 50 g gær (eller 4 tsk tørgær)
  • 250 g vand, lunkent
  • 1 tsk salt
  • 2 spsk sukker 
  • 3 spsk mælk
  • 40 g saltet smør
  • 1 æg
  • 425 g hvedemel
  • 100 g speltmel
  • 1 æg, til pensling

Fremgangsmåde:

Bland det lunkne vand med mælk, gær og sukker. Hvis du bruger tørgær, så lad blandingen stå indtil det begynder at skumme.

I en røremaskine bland melene, salt og smør, indtil smørret er blandet ordentligt med melet, så det ligner krummer. Kom gærblandingen og ægget i. Rør indtil det er blevet til en dej. Ælt dejen i 5-8 minutter. (Ælt 8-10 minutter, hvis du gør det i hånden). Du skal ende op med en jævn og elastisk dej.

Lad dejen hæve tildækket i skålen i 1-2 timer, eller til den er doblet i størrelse.

Halvér pølserne., og kom bagepapir på et par bageplader.

Hæld dejen ud på et bord drysset med mel. Fold dejen 3-4 gange og del dejlen i 18-20 lige store stykker/boller. Rul bollerne ud til ca. 30 cm lange pølser, og sno dejen rundt om pølserne. Pres enderne ind i dejen, så snoningen ikke ruller op, når pølsehornene hæver.

Dæk pølsehornene med et rent viskestykke, og lad dem hæve i omkring 1 time.

Opvarm ovnen til 200℃. Pensel pølsehornene med det sammenpiskede æg, og bag dem i ca 15 minutter indtil de er gyldne og gennembagte.

Køl pølsehornene lidt af inden de serveres.

Server pølsehorn med sennep og ketchup.

Velbekomme!


Hveder - Hvedeknopper

Bread, HolidayTove Balle-Pedersen1 Comment
Hveder - Hvedeknopper

Hveder - Hvedeknopper

Hveder, or hvedeknopper, is a white bread roll spiced with cardamom. It's an old tradition from 1686 to eat heated rolls the night before "Store Bededag" aka "Prayers day." Store Bededag is the fourth friday after Easter, this year it's May 16th.  Actually it's a consolidation of a bunch of prayer and pendance days. Everybody had the day off on Store Bededag even the bakers. You were actually meant to stop all work, play, travels and all games. To make up for not being able to get any fresh bread on Store Bededag, the bakers made an abundance of hvedeknopper (wheat rolls), to tie people over. And the tradition of eating the toasted hvedeknopper the night before Store Bededag was born. Ok people was meant to save the rolls to the next day, but who can resist a fresh-baked roll?

The tradition stayed but nowadays the day is one of days used for the confirmation of the young people in the church - a big day for family parties.

Makes 18-20 hvedeknopper

Ingredients:

  • 50 g confectionary sugar

  • 10 g salt

  • 50 g live yeast (4 teaspoon dry yeast)

  • 1 egg

  • 75 g butter, room temperature

  • 5-10 g cardamom

  • 2½ dl (1 cup +1tablespoon) water, finger-warm

  • 550-600 g all-purpose flour

Directions:

In a large bowl dissolve the yeast in the water. (Add a teaspoon sugar if you are using dry yeast, and wait until it starts to foam.) Mix in the butter, sugar and egg. Add salt and cardamom to a small part of the flour, and add that to the water-mixture. Add the flour a little at a time, until you have a soft dough. You might not need it all. Knead the dough for about 7-10 minutes until the dough is shinny and elastic. Let the dough rise covered for about 20 minutes.  

Hveder - Hvedeknopper

Hveder - Hvedeknopper

Pour the dough onto a lightly floured workspace, fold the dough over 3-4 times and divide the dough into 18-20 small balls. Place the balls only about 1 cm (about ⅓-½ inch) apart on a parchment paper lined baking sheet. Cover the dough balls with a dampen kitchen towel, and let them rise for another 60 minutes. They are meant to grow into each other, you want the soft sides on your rolls, when you pull them apart.

Preheat the oven for 400℉ (200℃).

Bake the hvedeknopper/rolls for 15-20 minutes until they are dark golden brown. Let them cool on a wire rack.

Before serving, cut them in half and toast them. Serve them hot with butter and jam or with a good cheese.

Enjoy!


The Danish version:

Hveder - Hvedeknopper

18-20 stk.

Ingredienser:

  • 50 g flormelis

  • 10 g salt

  • 50 g gær (4 tsk tørgær/11,8 g)

  • 1 æg

  • 75 g smør

  • 5-10 g kardemomme

  • 2 ½ dl lunkent vand

  • 550-600 g mel

Fremgangsmåde:

Opløs gæren i vandet. Hvis du bruger tørgær, kom en smule sukker i vandet og vent et par minutter indtil gæren skummer. Tilsæt smør, flormelis og æg, og rør det sammen til det er blandet godt sammen. Bland kardemomme og salt i lidt af melet og tilsæt det til vandet. Tilsæt resten af melet lidt ad gangen og ælt dejen indtil den er blank og elastisk, ca. 6-10 minutter. Lad dejen hæve tildækket et lunt sted ca i 20 minutter.

Form 20 boller som sættes tæt på en bageplade med ca. 1 cm afstand. Læg et fugtigt viskestykke over og lad dem efterhæve i ca 1 time. Bag hvederne ved 200℃ i omkring 15-20 minutter, indtil de er mørk gyldne. Lad hvederne køle af på bagerist.

Før serveringen flæk hvederne og rist dem i en brødrister eller i ovnen med skærefladen opad ved 230 grader i ca. 5 minutter.

Server hvederne med koldt smør og marmelade eller en god ost.

Velbekomme!

Source: Lagkagehuset

Rhubarb Crumble with Liquorice Marzipan

Cake, Desserts, LiquoriceTove Balle-PedersenComment
Rhubarb Crumble with Liquorice Marzipan

Rhubarb Crumble with Liquorice Marzipan

I was told to make more recipes with rhubarb, and of course I complied. This one is for you Vibs.

Ingredients:

Crumble:

  • 75 g brown sugar
  • 40 g all-purpose flour
  • 40 g rolled oats
  • slivered almonds
  • 60 g butter, salted, and chilled
  • ¼ teaspoon fine liquorice powder

Directions:

Preheat oven to 425℉ (220℃). 

Wash and slice the rhubarb and mix them with sugar, cornstarch and liquorice powder. Set aside while making the crumble. 

Mix brown sugar, flour, oats and liquorice in large bowl. Add chilled butter, using your fingers, blend butter into mixture until coarse crumbs form, then mix in the almonds. 

Divide rhubarb mixture among 3-4 ramekins. Sprinkle the liquorice marzipan on top of the rhubarb. Divide oat mixture among dishes, sprinkling it evenly.

Place ramekins on a parchment paper lined baking sheet. Bake for 10 minutes. Reduce oven temperature to 350℉ (175℃), and continue baking until the crisp topping is golden brown and rhubarb filling is bubbling at edges, about 15-20 minutes longer. Let the crumbles cool for a while before serving.

Serve crumbles with a scoop of vanilla ice cream or some cream fraiche.

Enjoy!

The Danish version:

Rababercrumble med lakridsmarcipan

Ingredienser:

Crumble:

  • 75 g brun farin
  • 40 g hvedemel
  • 40 g havregryn
  • mandelflager
  • 60 g koldt smør, saltet
  • ¼ tsk fine liquorice powder

Fremgangsmåde:

Opvarm ovnen til 220℃. 

Vask og skær rabarber i små stykker, og bland dem med sukker, maizena og lakrid pulver. Sæt til side, mens crumblen laves.

Bland brun farin, hvedemel, havregryn og lakrid i en stor skål. Tilføj smørret,og brug fingrene til at smuldre smøret i blandingen. Bland mandlerne i tilsidst. 

Fordel rabarberne i 3-4 ramekiner, drys lakridsmarzipan ovenpå. Fordel havregrynsblandingen i et jævnt lag over rabarberne.

Placer ramekinerne på en bageplade med bagepapir. Bag kagerne i 10 minutter. Reducer herefter ovntemperaturen til 175℃, og fortsæt bagningen indtil de er gyldent brune og rabarberblandingen bobler i kanten, ca 15-20 længere. Lad crumblen køle et godt stykke tid før servering.

Server crumblen med en kugle vanilleis eller cream fraiche.

Velbekomme!